Module 3: Thinning for Value
 How the public views our forest is different than it was 50 or even 20 years ago. Forest commodities like clean water, carbon storage, and biodiversity were not the focus of conversation at the local sawmill.
We now understand the benefits of a healthy, diverse ecosystem that goes beyond providing a good quality of life. What we do today on our woodlot will provide for a healthy forest and economy.
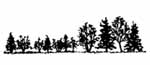
Thinning is the felling or removal of selected trees in a stand to improve the quality of the remaining stand. For the saw miller, it may be higher quality logs. For the hunter, it may result in more trees suitable as browse for ruffed grouse. For many people, larger trees left after thinning creates a better looking forest. This improvement may be more valuable to the landowner than the increased revenues generated by higher value timber.
Thinning a forest offers many benefits:
-
foot access can be greatly improved and more light can penetrate the canopy;
-
future thinning and harvesting costs are reduced;
-
economically, it increases growth of the remaining crop trees. When poor quality trees are removed, the remaining trees get more space, nutrients, sunlight and water.
-
in addition, thinning helps recover wood volume from trees that would normally die from competition for light, nutrients or space. Recovering this wood allows the stand to produce more wood over its rotation.
In some cases, growth may result from more sunlight, whereas in other thinned areas nutrients and water may be limiting. In most cases, it's a combination of the two.
The forest cover types and regenerative abilities of the Acadian forest are well suited for thinning or tending activities.
The ideas presented in the following lessons should make your thinning operation a success. We begin with the process of natural thinning. The lessons learned from nature are transformed into prescriptions for thinning. This is how most modern silvicultural practices were developed.
Lesson One - Nature's Way
 |
|
A forest thins itself as it develops on its own
|
Thinning occurs naturally in all stages of stand development. Trees compete for a fixed amount of light, moisture and nutrients. Every stand or forest is capable of producing a fixed amount of plant or living matter. This is its carrying capacity. For individual trees to reach a large size there must be fewer of them. Every stand is different, but the rule never changes.
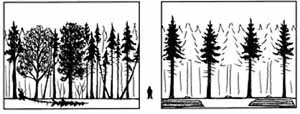
FOREST STAGES
Unmanaged forests or stands go through a series of stages where some trees die, which allows other trees to grow larger and live longer. There are many other changes occurring at the same time but most are not as noticeable as the changes in tree numbers, sizes and quality. Let's look at the stages an Acadian forest can go through.
 |
|
Old growth often precedes earlier stages of stand development.
|
Old Growth
In 1869 the Saxby Gale blew over a large area of red spruce and eastern hemlock forest in southwestern Nova Scotia. The forest was made up of even-aged stands of trees with pockets of uneven-aged stands scattered throughout.
Most trees in this particular stand were felled by the gale, approximately 200 per hectare in all. Weather conditions in the following year were drier than normal and a fire burnt quickly through the debris left from the gale. The result was a barren landscape with 10 to 15 centimetres of humus and organic material and large quantities of scorched stems and boles lying on the ground.
 |
|
Herbs, low shrubs, and tree seedlings usually occupy a site after a disturbance
|
Herb and Low Shrub Stage
Due to the blackened burnt duff layer, the surface temperature rose considerably. The fire burned through quickly, destroying seeds and soil flora and fauna in the upper organic layer. But the lower organic layer and upper soil were not damaged by the fire.
Some shrubs like blueberry and witherod (wild raisin) that can withstand fast fires, re-sprouted. The wind-dispersed seeds of fireweed and aster also found their way to the site. These plants quickly took advantage of the full sun and nutrient rich site conditions. They held valuable nutrients on site in the form of annual leaf and litter fall. During this stage trees, like grey and white birch, balsam fir and cherries, also began to germinate. However, they were slower growing and didn't make up a visible part of the new forest at this stage. Fewer numbers of red spruce and hemlock were established as their seeds were consumed as fast as they were produced prior to the gale and fire by squirrels, mice and birds.
High Shrub and Early Tree Stage
After a few years, the early trees and high shrubs began to dominate the site. The shade produced by these larger plants caused the herbs and low shrubs to disappear. Their energy source, the sun, was taken away. But not before they secured their future in the seed bank and provided food for wildlife. Their stage is over, at least for now.
Then the high shrub and early trees began to thrive. Shaded soil altered nutrient production by soil microorganisms to match the demands of the trees.
 |
|
Tree seedlings and tall shrubs begin to dominate the site
|
Too many trees and shrubs are present on the site and the first natural thinning begins. Large numbers of white birch seed were blown on the old burn from an adjacent stand. At two metres high, there were too many. The balsam fir crowded between the fast growing white birch. Crowns occupied less than one square metre of space. This was fine when the trees were small but at two or three metres in height crowns could no longer produce enough foods to sustain the tree. Stem exclusion or thinning had begun.
Stem Exclusion Or Pole Stage
During this stage, the addition of new trees stops or is reduced to a few shade tolerant species. Individual trees with the slightest advantage of height, crown area and water, or nutrient availability begin to dominate. This can be a slow process, especially if there are 20 to 30 thousand trees per hectare. Hunters and hikers refer to this stage as a thicket. It's extremely difficult to walk through and it provides lots of cover for hares, deer and other wildlife in the understory.
 |
|
During the pole stage, very little light reaches the forest floor.
|
This is also a period of rest for the understory. Leaf litter builds up, along with the stems and branches of trees that lose the race for dominance. Low light levels cause all the herbs to disappear from the understory. Even mosses have difficulty staying alive. This is most common in conifer thickets. However, in a thicket of white birch, light will penetrate in early spring and late fall and some mosses and lichens remain in the understory during the stem exclusion or thicket stage of a forest stand. Fungi are particularly well suited for this stage. They do not require sunlight and shade provides the moisture they need to flourish.
The logs that were not consumed by the fire are waiting to be recycled by fungi into nutrients for the trees that survive the thicket stage.
 |
|
As soon as light begins to reach the forest floor again, trees and plants begin to grow there
|
Understory Re-initiation Stage
Thirty years later, the stem exclusion stage has ended. The white birch occupied the dominant canopy position. A few balsam fir remained as co-dominant trees and more have become established in the understory. Shade tolerant balsam fir will survive in the understory for many years.
The stand now looked different. The 20,000 stems of white birch and balsam fir per hectare have been reduced to 1800. Growth rates have accelerated due to the reduced competition for nutrients, along with availability of sunlight to convert nutrients to food. The boles of the remaining trees grew rapidly and the dense shade of the thicket caused many lower limbs to fall or self prune.
During the stem exclusion stage, the organic layer becomes better suited for the addition of new plants. Fungi begin to break down any large debris. This, coupled with lots of leaves and smaller debris, means that nutrients for herbs, shrubs and trees are in good supply. A much higher canopy with small openings created from crown damage by the swaying of trees in the wind now exists. This condition may persist throughout this stage of development. These small openings allow sunlight to penetrate to the forest floor. Shade tolerant herbs, shrubs and trees begin to establish themselves. Lady's slipper, witch hazel, red spruce and hemlock begin their cycles.
The old stems left from the fire were now only moss-covered lumps lying throughout the stand. The salamander population had increased as the logs created small pools necessary for egg laying. White birch and balsam fir began to die, creating the necessary holes to provide eastern hemlock and red spruce with the light they need to take their place in the canopy. Much of the original debris left from the fire has been recycled by the white birch and balsam fir. As they die, they contributed organic matter that ensured that eastern hemlock and red spruce had sufficient nutrients to reach maturity.
Mature Tree Stage
The stand now began to take on the characteristics of the original forest prior to the disturbances of wind and fire. Only scattered white birch and balsam fir remained. They had been replaced by longer-lived eastern hemlock and red spruce. Because small groups and single trees fell during the transition between the understory re-initiation and old growth stages, an all-aged forest developed. Low light conditions allowed shade tolerant eastern hemlock and red spruce to become established in the understory while they waited for an opening in the crown. Once a tree fell and created an opening, they were poised to grow and fill the space. These shade tolerant species do not grow as fast as white birch and must be established to out-compete such faster growing species.
 |
|
Trees begin to die of old age, allowing even more light to reach the forest floor
|
The ground was covered with mosses, some ferns and a few herbs. The mosses helped maintain high levels of moisture required for micro-organisms to break down leaves, boles and roots of the fallen trees. They also contributed moisture to the air, which helped maintain a high relative humidity in the understory. This is important for some organisms that inhabit a forest in an old growth stage.
The white-footed mouse had been replaced by the red squirrel, which is thriving on the large amounts of seed being produced by the mature trees. No longer was there large amounts of browse for the white-tailed deer. Slow growing lichens appeared which are only found in forests that have not been disturbed for many years. Fungi thrive in the cool, moist understory of the old growth stand. Fungi have very wide spreading root systems that can transport nutrients from one area to another. This is helpful in the decomposition of large woody debris that is common in this forest stage.
Exercise 1. Pick a spot on your woodlot.
Describe the species, age, and density, and determine which stage it is at.
NUTRIENT CYCLING
The most important thing that trees and all green plants do is use the sun's energy to produce food. This is the process of combining hydrogen from water with carbon from carbon dioxide in the air. The result is a simple sugar or food for green plants. All organisms, including people, depend on green plants. Without them we would starve. By-products of this process include oxygen production as well as storage of atmospheric carbon, which are processes essential for life.
 |
|
A typical forest nutrient cycle
|
In addition to simple sugars, trees require other nutrients for growth. Seventeen elements are essential to plant growth. Some, like potassium, are common in the weathered rock component of the soil while others, like nitrogen, make up a large proportion of our atmosphere. The best place to find all the nutrients for tree or plant growth is in the tree or plant itself.
The nutrient cycle of the forest is another process essential to the existence and sustainability of the forest. This cycle occurs in all ecosystems: deserts, grasslands, tundra, including forests throughout the oceans of the world. Everywhere there is plant life, there is a nutrient cycle.
When you walk through the Acadian forest you are walking on a layer of organic debris made up of leaf and branch litter, old tree boles, rotting fungi, herbs, and maybe even the decomposing carcass of an Eastern coyote. This organic layer is rich with nutrients. In fact, all the nutrients necessary for a healthy ecosystem are found in this thin layer.
A healthy organic or debris layer is important for nutrient recycling. It is estimated that 80 percent of the feeder roots of most Acadian forest trees are found in the organic or debris layer.
Thinning can affect the nutrient cycle and the organic layer. Species selection can also affect the availability of certain nutrients along with the rate of decomposition. These factors should be taken into consideration when thinning.
For more information on nutrient cycling and ecological processes, see Home Study Module 7, Woodlot Ecology.
Module 3 - Lesson One Quiz
| Questions: | 10 |
| Attempts allowed: | Unlimited |
| Available: | Always |
| Pass rate: | 75 % |
| Backwards navigation: | Allowed |
Lesson Two - Pre Commercial Thinning (PCT)
Pre-commercial thinning will concentrate future growth on the best trees and the best species. WHY DO PRE-COMMERCIAL THINNING?
Some tree species of the Acadian forest are prolific seed producers. Many naturally regenerated stands in Nova Scotia have too many trees for the site to grow to maturity. Seed bearing balsam fir can produce more than five million seeds per hectare in a single cone crop. Even with high seed losses to animals and diseases, there will be considerable numbers left viable in the soil. Seedling densities in softwood and mixedwood stands range from 4,000 to 36,000 stems per hectare.
Pre-commercial thinning (PCT) is the removal of selected trees from young stands to allow more space for crop trees. There is no immediate economic benefit from a PCT because no saleable wood is removed.
Some stands may have too few trees or seedlings. Thick organic or duff layers may reduce seedling survival. Seedlings must get their roots into mineral soil to ensure a reliable supply of water. This must occur before summer conditions begin to dry out the organic layer.
Exercise 2: Use a 2 m string to measure the number of stems in a young stand on your woodlot. Use a tree or a stick as the plot centre and attach the rope. Swing the rope in an arc around a circle and count every tree that is within the circle. Do this in several locations in the stand and average the numbers together (eg. counts of 10, 16, 19 averages 45/3 = 15). Multiply this number by 800 to give the number of stems per hectare. The example above gives 15 x 800 = 12,000 stems/ha.
|
Counts |
______ |
______ |
______ |
______ |
|
______ |
______ |
______ |
______ |
|
Average |
= total count/number of plots |
|
|
= |
|
|
|
|
Number of stems/ha = average x 800 |
|
|
= |
|
|
|
Long-term benefits of a PCT include:
-
Diameter growth of remaining trees will increase due to reduced competition. This focuses available energy on the site into the growth of fewer trees. The result is larger, faster growing, and healthier crop trees.
Growth lost in the removal of some stems will be redirected into remaining trees. Some growth acceleration may be due to the addition of organic material left from the treatment.
-
Trees are ready for harvest sooner, shortening the rotation of the stand.
-
Harvest costs will be reduced. Fewer stems, similar sizes and uniformly spaced trees will reduce the costs of harvesting. Usable or merchantable volume will be increased at harvest time. Unmanaged stands lose a portion of their volume in stems that are too small to be commercially processed. A PCT puts more growth in merchantable size ranges.
-
Reduction of short-lived, less desirable species will improve stand composition. Leaving too many fast growing species, such as white birch and balsam fir, will reduce choices at commercial thinning and harvest times. At an early age these trees will out-compete more valuable species.
-
Larger crowns and root systems produce more wind firm trees that are better suited for commercial thinning and selection cuts later on. This is important as climatologists now predict that Nova Scotia will see more major weather events like windstorms.
-
Trees will suffer much less from the physical damage caused by wind whipping. This encourages development of stronger stems and branches. Young trees will better adapt to conditions around them increasing their durability to physical damage.
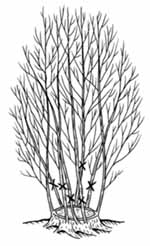
 |
|
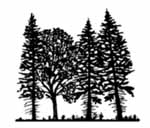
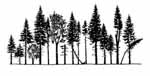
This thicket of crowded trees will benefit from a thinning.
|
WHEN AND WHERE
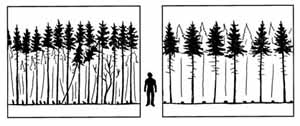
PCTs are done on dense young softwood stands that are less than 20 years old and between 2 and 6 metres in height. In these stands, growth will have slowed due to competition among trees. Stands older than 20 years may have already begun thinning themselves and the dominant trees may be taking over. Although stand quality may be improved from a thinning, growth benefits would be reduced.
A PCT should be done as soon as side branches begin to die. This will help trees respond faster to the thinning. However, PCTs are not commonly done on stands less than 2 metres in height because live branches will likely be found on the stem near the ground, making thinning difficult. Better trees may not yet exhibit dominant characteristics and some species may be subjected to insect damage (eg. white pine weevil damage).
Doing your PCT early will help avoid volume losses of crop trees.
-
Shade foliage adapted to growing just under the canopy in a thicket will now be in full sunlight. Needles with cell arrangements suited for shade conditions are now in full sun. Many leaves fall off reducing the growth capacity of the tree.
-
If the stand is left too long before doing a PCT, winds can sway the stems more than they have grown accustomed, which can damage feeder roots. The pulling action physically tears off the fine feeder roots. Reduction of the nutrient gathering capacity of the tree reduces growth until roots grow back.
-
Snow and ice storms can bend and break tall, small diameter trees with short crowns.
-
The cost of thinning larger trees is greater. Larger trees require more time to cut and fell. Selecting crop trees is also more difficult due to crowded working conditions and higher crowns. It is easier to remove preferred species in this situation.
-
The effects on certain species of wildlife can be minimized. Snowshoe hare may be drastically affected by removing the cover found in the thicket. Early, frequent thinning avoids drastic changes in habitat.
Typical stands that benefit from a PCT are:
DIAMETER GROWTH INCREASES BUT NOT HEIGHT
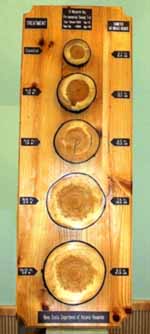
Reduced competition increases diameter growth. Young stands that have just reached crown closure will respond the fastest. Increased growth can be seen by viewing the cross section of a crop tree stem two years after a PCT treatment. Count two years, or rings in, after the PCT and look at the width of the annual ring.
The rings of most softwood species are easy to distinguish because springwood is white and generally the wider portion of a ring. Summerwood is the darker, narrower portion of the annual ring. Both are laid down in one growing season.
Older PCTs will not increase their growth as fast as younger stands. The response is delayed because a longer thicket stage left trees with fewer leaves and roots prepared for the sunlight and space after the PCT. Response will occur but take longer.
 |
|
Studies have shown that more widely spaced trees grow faster in diameter.
|
Despite better growth responses, earlier PCT may result in more branches. These will result in more knots in the finished product.
However, increases in the width of annual growth rings may be delayed. Some trees go into shock for a year before they get the full benefit from a thinning.
When a commercial thinning (CT) is planned after a PCT, space according to what product you want to harvest during the CT.
RULE OF THUMB
Softwoods: Average Diameter in Inches at Full Stocking = Spacing in Feet
Hardwoods: Average Diameter in Inches at Full Stocking = Spacing in Feet – 2
Diameter is at breast height in inches and full stocking represents the time when the crown is fully closed. This is when the trees would be in full competition to the point of suppression.
For example, consider a red spruce stand that is pre-commercially thinned to a spacing of 6 X 6 feet. When the stand eventually becomes overcrowded and competition begins to result in reduced growth, the average diameter would be six inches. For a similar sugar maple stand, the average diameter would be four inches.
Exercise 3.
At what spacing would the average diameter of a white pine stand be 8 inches at full stocking?
This rule of thumb will tell you at what diameter your stand will be too crowded. This would reduce the immediate benefits of the CT if not done at that time. If the trees are healthy and still growing, you will harvest saleable wood from your CT. If the trees are beginning to compete strongly, some may be too small to be merchantable and other trees may be dead already. To avoid competition that results in tree loss or reduced growth, it is best to modify the rule. Therefore, if you want a 6 inch (15 cm) diameter product from a future CT treatment, it would be preferable to space your red spruce at 7 X 7 ft (2.1 m) or your sugar maple at 9 X 9 ft (2.7 m). This will ensure that your desired product size will be reached before you start to lose the benefit of the PCT (eg. lose fast growth). Remember, spacing hardwoods too wide can result in too many epicormic branches.
Exercise 4:
If you want to commercially thin the white pine stand when it is 6 inches (15 cm) in diameter, what spacing should it be spaced to?
THINNING HARDWOOD
Some considerations should be made when planning PCTs in hardwood stands.
Crop trees selected for hardwood saw logs or veneer logs should be a high value species such as red oak, yellow birch, white birch, or sugar maple. At the PCT stage they should show good form - straight stems, no forks, right angle branching and no signs of insect or disease. Choose trees that are fast growing, usually specimens that are dominant or co-dominant.
Trees selected for wildlife should be long-living, mass producers such as red oak or beech.
Thinning for maple sugar production requires healthy, vigorous trees, but not necessarily saw log quality.
 |
|
Spaced hardwood stands can provide high value products in the future.
|
PCT in hardwoods is done later than softwoods, preferably when they reach a height of 6 to 9 metres (20 to 30 ft). This additional time allows the stems to straighten and self-prune lower branches off valuable lower bolts. This will also help prevent the formation of epicormic branches, which develop from dormant buds under the bark. They form on the main stem and reduce the value of the finished product.
Spacing is generally wider than a softwood site since hardwoods grow fewer stems per hectare. However, wider spacing may encourage epicormic branching. A good compromise would be spacing to 8 feet (2.4m), which would discourage branching while producing a 6 inch stem at commercial thinning time.
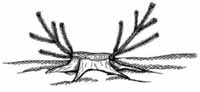
When selecting hardwoods to thin, preference should always be given to individuals that have grown from seed. When this is not possible, trees from sprouts may be utilized.
 |
|
Spacing hardwood clumps to one or two stems will result in valuable stems later.
|
Sprouts, common in maples and birches, are caused by growth of dormant buds near the ground on remaining stumps. This occurs immediately after cutting, but is more noticeable after the felling of mature trees. These sprouts grow very fast as they develop from an established root system.
Release one or two widely spaced stems per stump. Selected stems should be positioned on the stump as close to the ground as possible. This will encourage sprouts to develop their own root system as the stump begins to decompose. Sprouts that leave the stump in a J-shape are preferable to those of a V-shape. The V-shape is more likely to collect debris and introduce rot to the developing clump. J-shaped sprouts are also more likely to grow their own root systems.
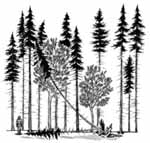
HOW TO DO A PRE-COMMERCIAL THINNING
Decide on Spacing
Strive for uniform spacing of suitable crop trees. Crop trees will be determined by desired product and available species on the site. Where no crop trees are present, any healthy tree should be left. Spacing is determined to some extent by the capability of the soil to grow trees (land capability).
SPACING GUIDELINES
Land
Capability |
Spacing (m)
|
Density
(stems per ha) |
|
hard woods |
soft woods |
|
1.5+ |
2.4 |
N/a |
1700 |
|
4 to 7 |
2.4 |
2.1 to 2.4 |
2300 to 1700 |
|
8 to 9 |
2.4 |
2.1 to 3.0 |
2300 to 1100 |
Uniform or consistent spacing is most desirable, but there will likely be some open areas or holes. Trees around these openings should be left tighter than the desired spacing. The trees will be compensated for the closer spacing by increased light, moisture and nutrients on the open side.
Mark Crop Trees to Leave
Choose straight, well-pruned stems or boles. Give preference to trees with larger diameter boles and well developed crowns in a dominant or co-dominate class. These will most likely be the healthiest trees.
Remove trees with damaged or double tops. This includes damage from porcupines as well as mechanical damage from other trees or machinery. Diseased trees should also be removed. If nearby trees appear infected, have a knowledgeable person determine the nature of the disease. Some diseases can be transported from one tree to another by saws or other cutting devices. Delay treatment until you know you're not spreading a disease. Dead trees can be cut or may be left standing. If they aren't likely to cause mechanical damage to crop trees or create a safety hazard, then nothing is gained by the felling. They may also be useful for wildlife.
If a choice must be made between two double-topped trees, always leave the U over the V. Look at where the tree splits on the main stem. The shape created by this joint will be preferable if it is in the shape of a U. This will allow debris and moisture to fall from the joint more easily. Moisture and debris can create decay that weakens the joint and may eventually lead to structural failure.
If selection is being left up to the contractor, which is quite often the case, make sure it is clear what future crop you want. The contractor should also be informed of any special leave trees, such as boundary or nest trees.
The species to favour will depend on the objectives. Where a choice of species must be made, the following rule may be used.
R U L E O F T H U M B
Softwoods: white pine, red spruce, red pine, hemlock, black spruce, white spruce, tamarack, fir
Hardwoods: sugar maple, yellow birch, white ash, red oak, white birch, poplar
Actual spacing of the treatment should be based on site quality and species. Remember to consider future treatments such as commercial thinning. Wider spacing is generally preferred on better sites; growth is more rapid because of greater nutrient availability. Trees take less time to replace the volume that was removed and crowns close faster.
Mark Strips and Begin Cutting
The most efficient work method is to divide the area into strips 40 to 50 m wide. If possible, strips should be run at right angles from a road and across slope. Using a compass or sighting a landmark on the other side of the treatment area will assist you in keeping lines straight and parallel. Mark strip edges with flagging tape or string to keep you or the workers within the strips. If you don't plan to collect the string or tape, after completing the work, use a biodegradable product.
When working on steep slopes start at the bottom of the strip and proceed up. Your footing will be better and you can cut trees much easier.
Avoid nicks to crop trees that will slow growth and leave a wound that could allow disease or insects to enter. If you damage a crop tree during the treatment, remove it and choose another. Depending on the severity of the damage, it may be better to leave a less desirable species rather than leaving a severely damaged crop tree.
 |
|
It can be difficult to cut trees below low growing branches which can turn up and form new trees.
|
Try to cut trees as close to the ground as possible to prevent branches from turning up. Although dormant buds are not common on softwood species, even the smallest shoot or branch will quickly grow into a new tree if it is not removed.
Always leave trails and roads open. Trails will give you access to the back of the stand when doing the thinning.
Knock the cut trees to the ground to speed decomposition of this material into nutrients for the remaining trees and to minimize damage from falling trees after the treatment is complete. It also makes for a better looking job.
Many people take the time to cut the branches off all cut trees. This reduces the overall bulk of the brush and slash. This is an aesthetics only procedure. If your stand has been properly managed, there should be ample organic material from the harvest operation to produce a suitable nutrient supply for many years to come. If the PCT brush is up off the ground because branches have not been removed, it will only delay the breakdown of this debris. The delay will not be long because the snow and ice will push it to the ground in a year or two. Debris left on the site is slow release fertilizer for your remaining crop trees.
Check Your Spacing
It is a good idea to do an easy check to ensure that your spacing is adequate as you do the thinning operation. This is a good check to perform, especially if you're new at thinning; you're working in unfamiliar surroundings; or it's the first time you've worked with a specific type of tree. Use a 4 metre string fixed to a centre point in a thinned area. Walk away from the centre until the string is taught. Count all crop trees within the circle as you move completely around the centre point. It's like drawing a circle with a protractor. Once you are sure you have all crop trees accurately counted, multiple your answer by 200. This will give you the number of trees per hectare. If the number of crop trees equalled nine, for example, you will be leaving:
9 crop trees in your circle X 200 = 1800 trees per hectare
This would indicate that your spacing would be about 2.4 X 2.4 metres. This is determined by taking the square root of the number of trees divided into the number of square metres in a hectare.
|
_____________ |
 |
10, 000 / 1800 |
Exercise 5.
Go to a mature stand of trees and estimate density in the same way. The results may surprise you.
It is not essential that your spacing always be the same. However, uniform spacing will ensure growth is more predictable.
METHODS OR TOOLS
Non-Motorized Methods
Manual methods are dangerous, slow, and physically demanding. These methods are seldom used.
However, they do provide exercise, cardiovascular, strength and endurance. They do not burn any fossil fuels and are quiet compared to motorized methods. A good alternative to the axe is the lopping shears. An improved blade and lighter handle materials have made this a better tool than it was in the past. Many of them are capable of cutting 5 cm (2 inch) diameter hardwoods with ease. If you have a small area to do or need to touch up, don't overlook this tool.
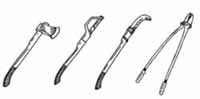 |
|
Axe, brush axe, brush hook, and long handled anvil pruners are very labour intensive but might be make sense for some landowners.
|
Using Chemicals
Chemical thinning is becoming less popular. Biodiversity of plant complexes can be drastically affected. Early thinning or cleaning can be completed by aerial application using herbicides. Extremely large areas are completed quickly, but this method offers very little choice in selection of leave trees. Most hardwoods will be removed, which is not preferred in current thinning practices.
Most conifers tend to be resistant to damage, especially if applied in the fall. This is advantageous if you're growing conifer crop trees. The hardwoods, shrubs and herbs can all be thinned out with very little effect on the conifers.
 |
|
Monsanto easy-ject herbicide injector
|
A more practical method for using herbicides in PCTs is with injection systems or basal treatments. These are useful tools, especially when thinning hardwoods. Remember, hardwoods can re-sprout quickly causing undesirable growth in the understory of your PCT. These sprouts can rob nutrients from crop trees even in an understory position.Injection or basal application of herbicides can control both the top growth of the tree and the complete root system.
Always seek professional advice when using herbicides. You must have a Pesticide Applicators Certificate to use forestry herbicides in Nova Scotia, even on your own woodlot.
Spacing With Machines
Machine spacing is the use of a mowing device attached to a tractor, skidder, or other machine. They are commonly used for controlling woody growth on the shoulders of highways. When used for PCTs, the device is driven across the stand in parallel lines, mowing down approximately one half of the area to be treated. The leave strips can then be lightly thinned or left to slowly encroach into the cut strips. This method does not lend itself to uniform spacing and crop tree selection is limited. Other problems include damage to the edge trees in the leave strip and high stumps that encourage re-establishment of the cut trees. This method was designed as an economical method for extremely large areas most often managed by large forest companies.
Chain Saw
The chain saw has been used for PCTs, but is not preferred. It is physically tiring and can lead to lower back problems if improperly used. The chain saw was not designed to cut small trees close to the ground. High cuts can often miss lower conifer branches that will quickly grow a new tree. Low cuts will often result in a damaged chain, which makes safe use more difficult. Chain saws require skill and safety when used for their intended purpose and more caution must be used for PCTs. The chain saw may be more productive than manual methods, but it falls far short of the clearing saw. Its use is based primarily on its availability over the clearing saw; many woodlot owners already have one.
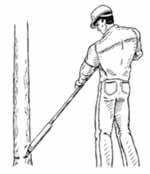
Clearing or Spacing Saw
This is by far the most common and preferred method for PCT. The danger zone of the blade is out of the operators way, so even if it strikes a tree improperly the chances of injury are very low. The biggest risk is when two people are working too close together. This is easily rectified by keeping workers a safe distance apart.
Properly balanced spacing saws are easy to use and cause far less fatigue than the chain saw or manual methods. It is designed to cut trees low to the ground and provides good visibility to avoid injury to crop trees. Although most clearing saws can cut trees up to 10 cm (3 inches), smaller diameters are more easily cut. In smaller diameter PCTs this method is very fast.
The clearing saw has become a standard in both hardwood and softwood PCT. The disadvantage for small woodlot owners is its specialized nature and cost. Fortunately, spacing saws can be rented when you're working on your PCT. Proper use of the clearing saw can be learned easily from an experienced operator.
Safe use of both the chain saw and clearing saw is described in the Professional Forest Worker Safety Manual. This manual can be obtained from the N.S. Dept. of Environment and Labour. See Appendix 1 for contact information.
Module 3 - Lesson Two Quiz
| Questions: | 10 |
| Attempts allowed: | Unlimited |
| Available: | Always |
| Pass rate: | 75 % |
| Backwards navigation: | Allowed |
Lesson Three - Commercial Thinning (CT) - Removing Saleable Products
Trees that would normally die are salvaged in a commercial thinning.
A commercial thinning (CT) results in direct immediate economic benefit, increased future value, and improved health and vigour of the forest stand.
It is beneficial when the forest has reached a point where too many trees are competing for nutrients and light. Growth rates are slow as individual trees are out-competed. When nature is left to thin the stand, it results in volume losses, produces poorer quality wood products and slows tree growth. The main difference between a CT and a pre-commercial thinning (PCT) is the size of the trees. When doing a commercial thinning the final harvest will not have increased volumes, but trees that would die if untended will be harvested and sold.
CTs involve cutting trees that have reached diameters that can be processed and sold. This brings immediate revenue, in addition to improving future economic value of the stand.
There are many other reasons for CTs:
-
It is aesthetically appealing.
-
CTs, along with PCTs, receive positive reviews from other nations. This may be an important factor when Sustainable Forest Certification becomes a standard in global marketing of wood products.
-
As with a PCT, diameter growth will be directed on fewer trees. This will decrease final harvest costs by reducing the total number of trees for a given volume of wood.
-
Removal of defected and damaged trees will increase the quality of the remaining trees at harvest. Clear, straight boles can be selected to leave, which will increase product value and reduce harvest costs.
-
Unlike PCTs, trees left after a CT are less likely to produce a change in specific gravity. Fibre length and the amount of compression wood may change, but not significantly.
-
Stand composition can be improved. Undesirable harvest species can be removed during the CT. This leaves higher value crop trees for the final harvest.
-
Stand diversity can be improved. A CT is an excellent opportunity to improve general aesthetics, wildlife habitat or diversity of tree species.
-
A CT can improve trees and stands to resist insect and disease damage and mechanical damage from snow and ice. Vigorous growth is encouraged by development of stronger crowns and root systems.
 |
|
Crowded stands with a mix good and poor trees will benefit from a commercial thinning.
|
WHERE AND WHEN
A CT is generally done as trees are moving from a juvenile to a mature stage of growth. Both hardwoods and softwoods will benefit from a CT. It will have a positive effect on the growth rates of most commercial species and is well suited for Nova Scotian forests.
Guidelines for thinning:
-
Softwood CTs should have a land capability (LC) of at least LC4. Hardwood CTs should have a LC of at least 2. Site classes lower than this will not respond to thinning quick enough to make it worthwhile. In some cases, the response on poor sites can be so slow that better adapted, non-commercial species can invade or spread over the site and defeat the purpose of the CT.
-
At the time of thinning the average merchantable diameter should generally be 14 cm (6 inches). This is the average, so smaller merchantable diameters will be included in the overall harvest.
-
Crop, or leave trees, should have a live crown that covers at least one third of the total height of the tree. Trees with less crown are susceptible to damage after thinning. These trees will frequently break if snow or ice builds up on the crown.
-
When you thin a softwood stand that has been accustomed to growing close together, they must be wind firm. Before thinning, trees hold each other up due to their tighter spacing. When the wind blows, one tree is supported by the next, and so on and so on. Once thinned, trees must stand more independently from the next tree. Ability to resist wind throw is dependent on tree species, soil characteristics and exposure. Pines and hardwood species are more wind firm than spruces or balsam fir. Trees growing on sandy or gravel soil types are generally more wind firm than those on thin or clay soils. If you don't know, seek the assistance of a forest professional. It is possible to thin less stable stands, but it involves very light thinning and multiple re-entries.
-
Diameter growth of the stand to be thinned should be just beginning to show signs of slowing down. This indicates the trees are crowding each other and require more space. If wide growth rings are still obvious, then it may be too early to thin.
-
Trees should be healthy and vigorous. Stands that have suffered attack from insects or diseases should be avoided. Good, general health of the stand for the next 20 years should be anticipated.
-
Suitable softwood species include red spruce, red pine, white pine, hemlock, black spruce, Norway spruce, balsam fir and white spruce. Black spruce should be less than 50 years of age. Balsam fir and white spruce should be less than 40. The only softwood species not suitable is eastern larch.
Hardwoods suitable for a CT include yellow birch, red oak, sugar maple, and white ash. Red maple, white birch, beech and all poplars are not recommended for this type of thinning.
RE-ENTRIES
There are advantages to removing fewer trees at each harvest if it is economical to do so. Many contractors cannot afford to return to the same stand to remove a small volume of wood several times. This results in increasing the cords per acre (or m3/ha) removed during an individual CT. However, this option may be okay for a landowner operating his own woodlot.
Re-entries may also be affected by the type of product harvested. Low value products, such as pulpwood, are less likely to justify multiple re-entries than veneer logs or high value hardwoods. In these cases, harvest value of the end-product can compensate for multiple re-entries.
For small woodlot owners, the cost of multiple re-entries may be outweighed by aesthetic benefits and reduced risk of blowdown. Removing small quantities of wood during each thinning may go unnoticed. This can be important if the woodlot is used for recreational purposes. Although multiple re-entry is more expensive overall, it can produce a larger total harvest because it avoids the losses associated with wind throw and remove trees that succumb to disease and insect damage. Increased costs may be less important to the small private owner of a multiple-use forest.
Multiple re-entries can reduce the effect of wind in sensitive areas. Properly conducted, low-intensity CTs will increase wind firmness of leave trees. Root growth will be stimulated in leave trees because of more space, sunlight and nutrients. Greater movement of trees in the wind will encourage development of more roots which increases stability.
Wildlife is often less affected with multiple re-entries. Although disturbance is more frequent, intensity is less.
Re-entries can also be used to gradually create a better age structure in a stand. Regeneration can be encouraged in the small holes created by the thinning.
HARDWOOD VS SOFTWOOD
Although hardwoods are more wind firm than most conifers, the canopy should not be opened too much. Increased light conditions in the understory can encourage epicormic branching. These branches take energy from the tree and can reduce diameter growth. They also reduce the value of clear saw log boles. Another disadvantage of high light conditions is an increase in sprouting. Sprouts can easily out-compete more valuable trees grown from seed. It can also be less aesthetically pleasing to crowd the understory with too much re-growth.
Hardwoods have a deeper rooting depth, which improves stability on exposed sites. They also drop their leaves during the fall, reducing their resistance to the wind and making them wind firm.
Choosing proper crop trees is also more critical with hardwoods. They are slower growing and care must be taken to ensure that healthy, vigorous trees are selected to leave. Identification of hardwood species is sometimes more difficult, especially in winter.
UNDERSTANDING BASAL AREA
Basal area is the area in square metres (or square feet) of the cross section of the tree trunk at breast height. It is most commonly used as an indicator of stand density and is expressed as square metres per hectare (square feet per acre).
In a PCT, tree spacing was used to determine which trees to remove and which trees to leave. Because of the number of stems and the small diameters, it is the most practical way to plan and conduct a PCT.
In a CT, proper spacing is more difficult to determine than proper basal area (BA). The trees are larger, therefore the spacing is too wide to easily estimate when doing the thinning. The variation in diameters must also be taken into account. Large diameter trees have larger root systems and crowns. They must be given more space than a small diameter tree. Larger trees also have more harvestable wood. One 35 cm (14 inch) diameter tree has more merchantable wood than three 20 cm (8 inch) diameter trees. The BA method will account for the space required for both large and small diameter trees in the same stand.
Basal area is measured by adding the area of the stems of all trees in the stand. Because of the time required to measure every tree, only a sample of the stand is measured. The sample is used to predict the total amount of wood in the stand. Once this has been determined, the thinning can be planned using basal area removal. This is the method used most by contractors and large forest industrial landholders.
The most common methods of sampling a stand to determine the basal area is by using a prism or relascope. These methods quickly provide an estimate of basal area, but neither one is exact. They can only serve as a guide.
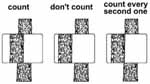
Prisms
Prisms can be purchased from most forestry supply stores. They can be used as follows:
 |
|
Trees are counted if the displaced stem overlaps with the main stem.
|
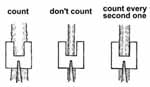
Go to a spot in a stand and do a complete circle, counting only those trees that are not totally displaced (see illustration below). With a prism you need to use the prism as the centre of the plot and rotate around it. For a 2 factor prism, multiply the number of trees by 2 to get the basal area for the stand in square metres per hectare (eg. If you count 20 trees, your basal area is 40 square metres per hectare).
Relascopes
The main advantage of a relascope is that it can be made inexpensively with some string or chain, and a stiff piece of cardboard or plastic.
A 2 factor relascope can be made in 5 steps:
-
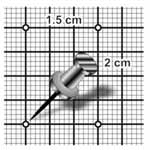
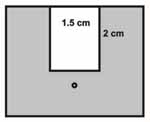
Use a pin to prick corners on a stiff piece of cardboard or plastic as marked on the graph paper. The opening must be exactly 1.5 cm wide. A 1 mm error in notch width will affect accuracy by approximately 10 per cent.
-
Connect the dots with a ruler and pencil.
-
Cut out the opening with scissors or a knife.
-
Cut the outer edges as drawn (dimensions are not critical).
-
Attach a string below the opening as shown. Knot the string exactly at 53 cm from the relascope. A 1 cm error in string length will result in a 10 per cent error in accuracy.
 With a 2 factor relascope (eg. BAF = 2) each tree that completely fills the opening will represent 2 square metres of basal area per hectare (The way it works is this: BAF = a2/y2 x 2500 where a = notch width and y = length of string).
To use the relascope, go to a spot in a stand and do a complete circle using your eye as the centre of the circle. As you make the circle, hold the knot of the string to your face and pull the other end tight horizontally away from you. Count only those trees that completely fill the opening in the relescope. Multiply this number by 2 to get the basal area for the stand in square metres per hectare (eg. If you count 20 trees, your basal area is 40 square metres per hectare).
 |
|
When using a relascope, remember to use your eye as the center of the circle.
|
You can also predict when your stand should be thinned again using the catch-up rule of thumb. On an average site, divide the percentage basal area removed by 2. This will tell you how many years will pass before another thinning is required.
Exercise 6: Make your own relascope with 2 feet of string and a stiff piece of cardboard or plastic. Cut a notch 1.5 cm wide and tie a string or chain 53 cm. This will give you a 2 factor relascope.
If you decide to remove 40 per cent of the basal area during a commercial thinning then (40 / 2 = 20) it will be 20 years before the stand will require harvesting or another thinning.
HOW TO DO A COMMERCIAL THINNING
Choose the best season
CTs may be done any time of year, but certain times have advantages. Spring is generally a poor time. Trees are active moving sap to new leaves and shoots. Crop or leave trees will be susceptible to damage by both machinery and falling trees. Avoid CTs on exposed sites in the fall. In fall wind can cause most of the blow downs. The roots of remaining crop trees, even if slightly injured by CT machinery, will be more susceptible to disconnection from the ground. Winter and summer are the best times for CTs. The only exception to this is on sites susceptible to wind damage. These sites can be wind firm through the winter months once the ground is frozen. If winter snow arrives before the ground freezes the root mat, trees can be susceptible to wind damage. Winds during winter storms are some of the strongest of the year. Wet snow and ice can make wind resistance greater, creating problems that are more serious in high winds.
Care must be taken when using heavy equipment during a thinning. If the roots of the leave trees, especially those close to the stem, are damaged by heavy tires they will be more susceptible to wind throw.
Leave behind trees valuable for wildlife and biodiversity. These include trees with cavities or twig nests, and species not commonly found. Trees that were selected during previous treatments should be included again. It is recommended to leave behind a minimum of five wildlife trees per hectare. Long-lived, wind firm species are preferable.
Select the equipment and extraction method
Most types of extraction equipment can be used for a CT. When selecting a method and equipment, consider the type of product, trail patterns, equipment size, time of year, topography, soil type and equipment availability. Available equipment, such as your own tractor, often determines what type of equipment will be used. This is OK as long as the job is properly planned. See the table on page 29 for more specific information on selecting equipment for thinning.
Avoid using heavy equipment on wet or fine textured soils such as clay, unless the soil is dry or frozen. Uneven terrain can cause some problems with unstable types of equipment, such as small tractors and ATVs.
These and other factors will determine what method and piece of equipment is best suited to your CT. If in doubt, ask a fellow woodlot owner or a forest professional.
Find a market
Determine what types of products you will be cutting and find a buyer. Wood buyers will have specifications on type of tree, diameter sizes and log lengths. The wood being removed will be smaller diameter than an average harvest operation. Total volumes removed will be less than a final harvest. Estimate the number of cords to be cut. You may have to cut your wood over a long period, one truck load this year and one the next. Contact a trucker and make sure your wood can be delivered on time. Don't wait until the wood is piled roadside.
Leave coarse woody debris on the ground to improve wildlife habitat and biodiversity. It will eventually break down and provide nutrients for the remaining trees. Old agriculture fields that have been planted or naturally regenerated may need more left than a similar forest stand. These stands, unlike natural forests, start with an organic matter or debris deficiency.
Decide what species to favour
If the area to be thinned has more than one crop species, prioritize based on markets and objectives. If you plan a final harvest of poles, red pine should be favoured over white. The white pine can be removed now or maybe in the next thinning. Remember that markets change, so seek the help of local buyers for suggestions about the best product to grow for future markets. What you can sell now may also influence your decision on what to thin in mixed stands. In the absence of any market information, the following is a basic priority list beginning with the most preferred crop species: red spruce, white pine, sugar maple, yellow birch, white ash, red oak, eastern hemlock, red pine, white birch, red maple, balsam fir.
This list is based on the value of the species, as well as its ability to respond to a CT.
To ensure the stand can regenerate, do not remove too many trees. You must cut or thin enough to make the treatment economically worthwhile but not too much. This is especially important on sites that may be susceptible to wind throw. Sites susceptible to wind damage are not just located on hilltops and bluffs. Sites where anchor roots are unable to penetrate the soil can be extremely susceptible to this type of damage. Shallow soils over bedrock and fine textured soils that remain wet most of the year can cause problems with wind throw. Most sites like this are easy to recognize. If you notice blow downs in your stand have a good look around and thin lightly. Pines and most hardwood trees are more wind firm. When thinning, spacing distances can be increased for pines. Even though hardwoods are more wind firm, greater spacing distances will create unwanted lower branching. CTs on plantations or previous PCT sites will be much less likely to have problems with wind-throw.
Determine spacing or basal area removal
As discussed earlier, the most complicated step in planning a CT is determining how many trees to remove and spacing of the crop trees.
There is a lot of information to help you make a good decision.
Average spacing for a softwood CT varies between 2 metres (7 ft) and 4 metres (13 ft). Exact spacing depends on species, size and basal area removal. An average spacing for hardwoods is 3.3 metres (11 ft). This will leave approximately 1,100 crop trees per hectare in soft wood stands, 900 crop trees per hectare in hard wood stands and 1,000 trees per hectare in mixedwood stands.
The crown of trees in CTs must have space to grow. When thinning there should be a minimum of 1 metre (3-4 feet) between the crowns when viewed looking up. The space between crowns should be measured from branch tip to branch tip of adjacent trees. The branches used to determine this should be the widest on the tree. These will almost always be the lowest branches on the tree.
Distances between crowns should be determined by tree species and site characteristics. A LC6 pine site might have 2 metres between crowns, while an LC6 hardwood site might only be 1 metre.
Lay out thinning
The final step before starting the saw and beginning your CT is laying out the extraction trails and marking crop trees. Trails should be laid out in a herring bone fashion (see illustration). Mark the trails with flagging tape, making sure they are wide enough to account for the width of the extraction equipment. Try to connect the trails at the end, especially if you're using a trailer to extract wood. Keep trails as straight as possible, although broad sweeps can be made while avoiding crop trees. Where terrain is rough, trails should be slightly wider to account for leaning of extraction equipment. Curves will require some additional width as well. This is important when hauling tree length. Keep stumps in trails low to avoid damage to equipment.
Distance between trails will be determined by the extraction system. Trails should be closer for short wood systems; 12 to 14 metres (40 – 45 ft) is average. For tree length products using winches, 24 to 36 metres (80 to 120 ft) is better. When harvesting tree length material, let trees fall toward the trails.
Remove trees safely and efficiently without causing any damage to remaining crop trees. Be aware that damage to buttress roots can seriously affect the growth and health of crop trees. Leaving "brush mats" on the extraction trails will help reduce damage to these roots. A brush mat is a bunch of branches and tops left from cut trees. This material can be piled over large roots of leave trees. This will protect the roots from damage caused by extraction equipment. Brush mats can also be used to build short roadways over wet or boggy areas.
 |
|
Herring bone trails make wood extraction easier.
|
Another method of protecting crop trees is using bumper trees. Trees that are marked for cutting can be selected to protect the stems of crop trees from damage caused by dragging of other trees to trails. Where trees to be removed will scrape valuable crop trees, leave a remove-tree to protect them until all the trees have been skidded out. After the trees have been moved to the trail, then cut the bumper tree. These trees can also be used to anchor cable pulleys.
Mark the trail centerline. Make sure the cutting crew is clear on what has been marked.
Pick the best trees
Mark crop trees to be left. It is important to make sure that anyone working on the CT understands what trees to leave. It is quite common to mark trails with one colour of flagging tape while marking leave trees with another.
When selecting trees to remove, always choose damaged, poor quality or diseased trees first. It is better to select a healthy, second choice crop tree than to leave a damaged first choice tree. Even injuries like porcupine damage should justify tree removal if another good tree is nearby. Although this injury may heal over, it can still reduce the value of the bole significantly.
Trees with excessive limbs should be removed before well-pruned trees. Dead branches that remain on the tree while the stem or bole is growing will leave knots in the wood. The longer these branches remain on the tree, the more knotty the finished product will be. If your buyer prefers clear lumber, you'll want to select these trees for early removal. Remove these trees in the first CT so you don't waste time adding volume to low grade trees.
Always favour dominant and co-dominant trees over intermediate and suppressed trees. These trees are still growing rapidly and will respond better to release. The only time you would favour an intermediate or suppressed tree is in the case of injury, disease or poor quality individuals.
Regardless of crown class, crop trees must have a good live crown ratio. The crown should make up at least one third the height of the tree.
Avoid creating large openings, which reduce volume growth and can encourage excessive limbs on surrounding trees.
Spacing should be tighter around the edges of the CT if the adjoining stands are less forested. If the site is bordered by roads, young plantations or agricultural fields reduce thinning intensity for 10 to 20 metres (30 to 60 ft). The forest edges not only take the brunt of the wind load during storms, they also maintain cooler temperatures and higher relative humidity during warm summer days. This effect can extend far into the forest. The edge is where wildlife diversity is greatest and is aesthetically important to many landowners. If the stand borders another forest type of equal or greater height, then thinning to the edge is not a problem. Maintaining the integrity of forest edges should be a priority.
Make sure that the stand you want to CT has species that are recommended for this treatment. If there are trees not recommended for a CT, they can be removed.
 |
|
The taller trees are dominant or co-dominant,
while the shortest trees are suppressed.
In-between trees are intermediate.
|
Recognize the difference between crown classes. Crown classes show the dominance of the trees in the stand.
Dominant trees are taller than average trees in the stand. Their crowns extend above the level of the canopy. They receive light on top and part of the side. They are in the most desirable position for crop trees.
Co-dominant trees are those that make up the general level of the canopy. There are generally more co-dominant than dominant trees in a stand. They are also preferred crop trees, although dominant trees should be left first.
Intermediate trees have crowns below the general level of the canopy. They receive little direct sunlight from the top and none from the sides. These trees can be released but they have already slowed down and will take longer to respond. They should be removed before dominant and co-dominant whenever possible.
Suppressed trees have crowns that are entirely below the general level of the canopy. They receive little or no direct sunlight. These trees will most likely die before the final harvest. They are preferred for removal during CT.
General guidelines for choosing equipment for thinning. Actual results depend on how and when (season) equipment is used. Good results requires good planning. Straight trails are best when possible.
|
EQUIPMENT |
SUITABILITY
FOR THINNING |
SPACING BETWEEN TRAILS |
RISK OF SOIL DISTURBANCE |
RISK OF TREE DAMAGE |
MISCELLANEOUS |
|
portable winch (eg. Yankee yarder)
|
good
|
up to 100 m (300')* with snatch blocks, another machine required for trails
|
low, but can get organic layer disturbance
|
moderate because of tree length
|
slow and labour intensive, requires skid pan or skid cone
|
|
horse or oxen equipped for skidding
|
good
|
up to 150 m (500')*, often used with another machine for forwarding
|
low, but can get root and organic layer disturbance
|
moderate due to tree length
|
devices are available to make skidding easier
|
|
horse or oxen with trailer
|
good
|
+or - 20 m (60')
|
low
|
low
|
loading devices are available
|
|
ATV equipped for skidding
|
good
|
up to 150 m (500')*
|
low
|
moderate due to tree length
|
devices are available to aid with skidding
|
|
ATV equipped with trailer
|
good
|
+or - 20 m (60'), but trails can very narrow over short distances
|
very low
|
low
|
loading devices available, can move wood fast on good terrain
|
|
snowmobile
|
good
|
up to 150 m (500')*
|
extremely low
|
low
|
small loads; but can be fast; not good at hauling uphill
|
|
truck tractor
|
ok
|
20 m (60'), much wider with winch
|
moderate
|
low
|
best if used with winch to bring wood to trail
|
|
walking skidder**
|
good
|
up to 100 m (300')*
|
low
|
low
|
slow
|
|
tractor with winch
|
good
|
up to 100 m (300') with snatch blocks
|
low, but lots of surface disturbance
|
moderate
|
greatly increases capability of tractor
|
|
tractor with trailer
|
OK
|
20 m (60')
|
moderate
|
low
|
versatile if used with winch
|
|
skidder
|
good
|
up to 100 m (300')*
|
moderate
|
moderate to high
|
very productive
|
|
forwarder
|
OK
|
20 m (60')
|
moderate
|
low
|
most
|
* these machines can operate with very small trails over short distances
** these machines are controlled as you walk with them, like a garden tiller
THINNING PHILOSOPHIES
Three thinning philosophies can affect selection of crop trees and future harvesting goals. It is useful to have an understanding of these when selecting crop trees in a CT.
Low thinning or thinning from below is one of the oldest methods. In low thinning, trees are removed from the lower crown classes, while most of the crop trees are dominant and co-dominant. This type of thinning is most suited to the natural evolution of a stand where the lower crown class trees die. It will make the best use of product that would be lost to mortality or reduce the growth of better trees.
Thinning from below is the safest method of thinning where blow downs might be a problem. Removal of lower crown classes does not make openings that leave a stand more susceptible to wind throw. Make use of this thinning method when crop species or site exposure may create a wind throw hazard.
When crown thinning, trees are removed from the middle and upper crown and diameter classes. With this method, some of the larger trees in the stand will be selected for cutting. Dominant and co-dominant individuals are still favoured for crop trees, but are left in a more open canopy position.
In crown thinning the majority of the cutting is done in the upper crown classes, leaving more of the intermediate class. Crown thinning increases the economic value of the treatment because more wood volume is generated. Larger trees are being cut.
Crown thinning should be applied only in wind-firm stands and where undesirable crop trees are present in the dominant and co-dominant crown classes.
Combination thinning is another practice used in Nova Scotia. Because of variable site and stocking characteristics of many Nova Scotia woodlots, combination thinning is commonly used. It can include a combination of crown, low, or high thinning.
Module 3 - Lesson Three Quiz
| Questions: | 7 |
| Attempts allowed: | Unlimited |
| Available: | Always |
| Pass rate: | 75 % |
| Backwards navigation: | Allowed |
Lesson Four - Other Types of Thinning and Considerations
SEMI-COMMERCIAL THINNING
Semi-commercial thinning is a combination of a PCT and a CT. Much of the wood will remain on site to complement the organic layer as in a PCT, but some will be removed as salable product like a CT.
This type of thinning can produce specialty hardwood pole products, fence posts, rails, and small amounts of pulpwood or fuel. It is not formally conducted in Nova Scotia, but many woodlot owners take a few sticks of product when conducting PCTs. This meets the definition of a semi-commercial thinning.
SHELTER WOOD
A treatment similar to commercial thinning is a shelter wood. However, the goal of a shelter wood is to encourage natural regeneration. The best trees are left to produce seed and give shelter to regeneration. Shelter wood harvesting is a single or series of cuts designed to encourage the establishment or development of natural regeneration. This system has been used for more than 500 years in Europe and has been successfully conducted in Canada, including Nova Scotia.
Like a CT, shelter wood is restricted to the most wind firm species and sites. It involves significant removal of upper crown classes, leaving the stand very susceptible to wind damage. Openings in the canopy are necessary to allow sunlight to penetrate to the forest floor. There, seedlings are encouraged to develop. Once the number of seedlings and their height are appropriate, the remaining trees are harvested.
A shelter wood is considered a harvest treatment; more information can be obtained in Module 2.
SELECTION HARVESTING
Selection harvesting involves the removal of a small number of merchantable stems per hectare on a continuous basis. This is the harvesting method of choice for all-aged stands. All-aged stands have healthy crop trees in all age classes. Most people think that this harvesting method most closely mimics tolerant old growth stands of the Acadian Forest.
Stands suitable for this harvest method must be wind firm, have at least three age classes present, and have a high proportion of long-lived shade tolerant species such as hemlock. Because the forest canopy usually remains in tact, many people prefer the look of it.
This is also considered a harvest system and is covered in Module 2.
SPECIES DIVERSITY AND WILDLIFE HABITAT
The meaning of wildlife has changed. The historical meaning brought to mind mammals, birds, fish, amphibians and reptiles. Soil and aquatic invertebrates, plants, algae, lichens, bacteria and fungi were not considered a part of this wildlife group. The new definition includes all non-domesticated species of living organisms. No matter how big or how small, it is a wildlife species.
Even slight changes that we see in the forest will have an effect on some organisms. When one organism is altered, others are affected. For the red squirrel, there will be less food and therefore fewer squirrels if its habitat is thinned. The same thing will affect many ground insect and soil micro-organism populations, but it will be much less obvious to us.
Recognize that changes to less obvious wildlife species will occur.
Always consider wildlife habitat and species diversity when planning a thinning operation. Wildlife Habitat and Watercourses Protection Regulations were proclaimed law in Nova Scotia in 2002. These regulations are the minimum habitat requirements to be met during harvest. Get the brochure listed on page 40 or check www.gov.na.ca/natr/forestry/strategy for more information.
 |
|
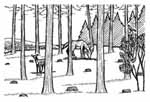
Wildlife such as deer continue to use a stand after it is thinned because it oftens offers food closer to the ground.
|
There are other things to consider as well. Uncommon tree and shrub species should be left where possible, unless they are not native to your area. Valuable browse or food species might be selected to encourage wildlife population levels. In addition to stand level consideration for wildlife, you should also consider woodlot and forest level decisions.
The pileated woodpecker requires a large cavity tree in which to nest and care for its young. In addition to a good nesting cavity, it needs a lot of food when rearing its young. When planning to thin a stand near a cavity tree, try to avoid felling the tree unless it is unsafe to leave it. You also should leave a healthy dominant tree nearby to afford it some protection from the wind.
After thinning, conditions will benefit soil organisms that break down organic matter into nutrients. They are at a low population level in a thick, dense forest. Lack of soil warmth due to the shaded understory conditions keep levels naturally low. After the canopy is partially removed, activity in the organic layer will increase. Conditions are now more favourable for wildlife species found in soil, while they are less favourable for canopy feeders like squirrels.
Most of the living organisms found in our forest are well adapted to natural changes in their habitat. The natural process of thinning will benefit some wildlife species, but be detrimental to others.
Try to keep brush off wildlife trails. A thinning will be enough change for wildlife that inhabits your woodlot. They will adapt quickly, but will appreciate trails being left open.
Many songbirds nest in thickets of both hardwood and softwood. If you can avoid doing your PCT until after nesting season, injury to the fledglings will be minimized. Try to avoid the months of May and June.
Leave any residual snag or cavity trees from your earlier harvest. Many standing dead or dying trees will likely remain that way for many more years. These trees generally do not rob nutrients from younger crop trees. Eventually they will contribute their branches and stems to the organic layer, which will quickly recycle it into your crop trees. In the meantime they are a valuable attraction to the wildlife on your site and add structural diversity.
Keep variety in each stand. Conifer stands should have some component of hardwood and vice versa. This is usually not a problem as holes are quite often filled by alternate crop species. Variation should also be encouraged with other plant species. Shrubs and herbs provide food for many wildlife species. Non-commercial tree species can also be valuable for certain wildlife species.
Ensuring that obvious needs of wildlife on your woodlot are met is essential. In addition, you must understand some less obvious needs. Any changes you make will affect some wildlife species that inhabit other parts of your woodlot and even other parts of the forest. The treatments may affect wildlife on your neighbours woodlot and vice versa.
Make sure buffers are maintained along watercourses. These riparian zones are sensitive and support an increased amount of wildlife.
Remember, plants, lichens, fungi, reptiles, amphibians and invertebrates require the same considerations as a hawk.
For more information on improving or maintaining wildlife habitat, see Modules 4 and Module 7.
EFFECTS OF THINNING ON QUALITY
As already discussed, thinning affects the properties of wood that will be harvested later. Increased growth rates will produce larger, more uniform stems. Thinning leaves behind trees with fewer and more stable knots; larger sapwood area; lower resin content; longer fibres and dimensional stability. This results in superior products.
If you want quality log products, log species should be favoured. It's important to consider what local buyers require. In many cases, your harvest will be many years away and buyers can provide valuable insight. Quality white pine lumber may be in demand 30 years from now while white spruce dimension lumber may not.
 |
|
Good quality trees left after thinning can be harvested for high value products later.
|
Most harvests produce multiple products, sometimes as many as six different products from a single site. Harvesting efficiency can be increased when fewer products are generated. Start with as much information about the future product demands as you can and then select your primary species to favour.
Reducing the number of trees with stem or bole defects will improve the stand quality the most. Whatever end product you may be growing, clear stems will be preferable. Increased growth rates will produce larger boles, which will be much faster and easier to harvest. Larger boles are also suitable for a wider range of products.
However, thinning may have some negative impacts. The branch pruning properties of a thicket are very good. The absence of sunlight when the canopy is fully closed will cause lower branches to die and fall more quickly. This produces a stem with fewer knots, which is preferred for lumber. This is especially important for high value hardwood species. You may want to delay your thinning to take advantage of this self-pruning process, but you will lose growth.
Fast growth isn't always desirable. Much of the wood used for musical instruments comes from slow growing trees. The density of the fibres and the appearance of the narrow growth rings are sought after by instrument makers. Clear stems, free from defects are still essential, but opening the canopy too much when growing this product would be detrimental.
Substantial increases in diameter growth may have negative effects on the finished product quality. PCTs can cause an increase in the production of juvenile wood, which has a lower specific gravity. High specific gravities are desired in both finished hardwood and pulp. Keeping spacing to less than 8 X 8 feet slows diameter growth, producing higher gravity wood. This is at the expense of overall or gross volume.
There are trade offs, but wider spacing up to 8 feet (2.4 m) is most common for typical pulp and log species.
For more information on adding value to your wood products, see Module 8, Wood Utilization and Technology.
HIRING A CONTRACTOR
If you are not planning to do the work yourself, you should be comfortable with the person or crew you hire. If you're uncomfortable with saws or don't have the experience, it's a good idea to get some help.
There are many good contractors. For more information see Module 2.
Module 3 - Lesson Four Quiz
| Questions: | 3 |
| Attempts allowed: | Unlimited |
| Available: | Always |
| Pass rate: | 75 % |
| Backwards navigation: | Allowed |
Glossary of Key Terms - Module 3
Acadian forest - the most common forest type in the Maritimes
bolts - a short section of wood, as cut for shingles, shakes, rough dimension stock, stakes, pallet and crating material, and rotary cut veneer
breast height - height commonly used to measure tree diameter and age, 1.45m or 4.5 ft
biodiversity - the variety of plants and animals in an ecosystem
bole - stem of a tree once it is large enough to yield pulpwood or sawtimber
canopy - upper layer of a forest where most branches occur
carbon storage - the storage of carbon in organic material; affects the greenhouse effect
codominant - those trees whose crowns form the top of the tree canopy and receive full light from above, but very little from the sides
crop trees - best trees in the stand that are left to put on more growth
decomposition - the break down of complex organic material into simpler materials by other organisms
dominant - trees with crown extending above the general level of the canopy and receiving full light from above and from the side
ecosystem - an interrelated and interdependent community of plants and animals in their habitats
epicormic shoots - shoots that develop from buds located near the bottom of a tree often in response to disease, insects, or opening up of a stand
even-aged - a forest stand in which relatively small age differences (10 to 20 yr) exist between individual trees
flora and fauna - plant and animal species found in one or more regions
habitat - place where an animal lives
intermediate - trees growing in the shade of others, receiving light only from above
juvenile wood - inner layer of wood surrounding the pith formed when the tree was young; usually has smaller cells
land capability - see site capability
organic layer - layer of needles and leaves on top of the soil
rotation - the age at which a stand is ready for harvest; can be based on maturity, growth, value, or nutrient capital
seed bank - seeds stored in the soil that can germinate at a later date
shade tolerance - the capacity of a tree or plant species to develop and grow in the shade of, and in competition with, other trees, or plants
site capability - ability of site or soil to grow trees
specific gravity - the ratio of the weight of wood over the weight of water of the same volume
spring wood - the portion of the annual layer that is formed during the early part of the growing season; it is usually less dense and weaker mechanically than summer wood (also called early wood)
sprouts - hardwood saplings that originate from dormant buds on tree stumps
stand - a community of trees sufficiently uniform in species, age, arrangement, or condition to be distinguishable as a group from the forest or other growth on the area
stocking - a measure of area occupied by tree cover
structural diversity - variety of heights in a stand or ecosystem
summerwood - the portion of the annual layer that is formed during the latter part of the growing season after the early wood formation has ceased (also called latewood)
suppressed - trees growing completely in the shade of other trees, receiving only a little wood from above; the same age as the taller trees
understory - trees or other plants growing close to the ground under taller trees; usually younger than the taller trees
uneven-aged - stands with at least 3 age classes of trees ( ie 20 , 40 and 60 years)
Suggested Readings
AVAILABLE FROM NATURAL RESOURCES
Robertson, Ronald G. and Young, Robert W., Shelterwood Harvesting Manual, NS Dept of Lands & Forests, 1989, Amherst, NS
Robertson, Ronald G. and Young, Robert W., Hardwood Thinning Manual, NS Dept of Natural Resources, 1991, Amherst, NS
Robertson, Ronald G. and Young, Robert W., Merchantable Thinning Manual, NS Dept of Lands & Forests, 1990, Amherst, NS
Nova Scotia's Wildlife Habitat and Watercourses Protection Regulations. 2001. A brochure describing what's required when harvesting trees in Nova Scotia. Information Circular WDL-7.
Selling Standing Timber: Here are Some Tips. 1999. A 4 page brochure describing how to hire a forestry contractor. Information Leaflet DNR-3
AVAILABLE ELSEWHERE
Anderson, H.W. and Rice, J.A. 1993. A Tree Marking Guide for the Tolerant Hardwoods Working Group in Ontario. Ontario Ministry of Natural Resources.
Rodiek, Jon E. and Bolen, Eric G., Wildlife and Habitats in Managed Landscapes, Island Press, 1991, Washington, DC.
Davis, Mary B. and Davis, John., Eastern Old Growth Forests, Island Press, 1994, Washington DC.
Harrison, Girvan, 2000. Out Roddie's Way. Lessons on Matters Pertaining to the Forest. Earthwood Editions. Gagetown, New Brunswick.
Gershuny, Grace and Smillie, Joseph, Soul of the Soil, agAccess, 1995, Davis California.
Maser, Chris, Sustainable Forestry, St. Lucie Press, 1994, Delray Beach, Florida.
Perkey, A. W., Wilkins, B.L.. and H. Clay Smith. 1993. Crop Tree Management in Eastern Hardwoods. USDA Forest Service. Morgantown. WV, NA-TP-19-93
The Forest Professional: Guidelines for the Stewards of tomorrow's forests (Third Edition): Describing practical techniques and procedures for good forest operations. Province of Nova Scotia, 2001. ISBN 0-88871-691-5
Downloads
As the Home Study modules become available copies will be made available for download. At this time only the Introduction - Getting More from your Woodlot, Module 2 and 9 are available in French.
|
All modules are currently available in English and some in French |
Adobe Acrobat
Acrobate D'Adobe |
|
Principles of Forest Stewardship |
Download |
|
Introduction: Getting More From Your Woodlot |
English
Francais |
|
Module 1: Introduction to Silviculture |
Download |
|
Module 2: Harvesting Systems |
English
Francais |
|
Module 3: Thinning for Value |
Download |
|
Module 4: Woodlots and Wildlife |
Download |
|
Module 5: Stand Establishment |
Download |
|
Module 6: Chainsaw Use and Safety |
Download |
|
Module 7: Woodlot Ecology |
Download |
|
Module 8: Wood Utilization and Technology |
Download |
|
Module 9: Woodlot Recreation |
English
Francais |
|
Module 10A: Managing Woodlot Finances:Planning and Investment Guide |
Download |
|
Module 10B: Introduction to Woodlot: Income Tax and Estate Planning |
Download |
|
Module 11: Roads & Trails: Planning it Right from the Start |
Download |
|
Module 12: Small Scale Harvesting Equipment |
Download |
|
Module 13: Non Timber Forest Products: Growing Opportunities |
Download |