Module 9: Woodlot Recreation
![]() Many woodlot owners enjoy outdoor recreation activities like hiking or snowmobiling on their property but are not purposefully managing for those activities. Others may tend to separate recreation and timber management even though they do recreational activities in areas managed for their timber values. Outdoor recreation can be improved by planning for it and can also be managed for along with the other uses of your land.
Many woodlot owners enjoy outdoor recreation activities like hiking or snowmobiling on their property but are not purposefully managing for those activities. Others may tend to separate recreation and timber management even though they do recreational activities in areas managed for their timber values. Outdoor recreation can be improved by planning for it and can also be managed for along with the other uses of your land.
This module will help you develop an outdoor recreation plan in keeping with your interests and woodlot potential. It contains basic, practical information if you use your woodlot for family recreation or if you allow occasional public use.
If you expect a lot of use by groups or plan on starting an outdoor recreation business on your woodlot, you should refer to a companion study called the Woodlot Recreation Manual (1995). This manual by Glyn Bissex, a professor at Acadia University in the School of Recreation and Physical Education, provides more in-depth information on planning and marketing.
As with the other courses in this series, the Department of Natural Resources may hold a field day to present examples of the info on the course.
Lesson One - Introduction to Outdoor Recreation
This lesson gives you an understanding of outdoor recreation and its benefits. It also explores integrating recreation with other uses or values on your woodlot.
WHAT IS OUTDOOR RECREATION?
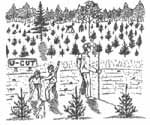
According to a 1993-94 Nova Scotia Woodlot Owner Survey conducted for the Nova Scotia Department of Natural Resources, 27 per cent of respondents said outdoor recreation was one of the reasons they own their woodlot. Outdoor recreation refers to leisure activities that take place in a natural setting and benefit the body, mind and/or spirit. Examples are hiking, fishing, skiing, snowmobiling and wildlife viewing.
Outdoor recreation can overlap with competitive outdoor activities such as orienteering or ski races. It can also be done with other activities such as environmental education for example hiking to study an old growth forest. Outdoor recreation can also simply be enjoying the peace and quiet in a non-physical way.
Table 1 illustrates the wide variety of outdoor recreation activities and may give you a few new ideas too. Some of the more common ones are listed below. Check off those you do now on your woodlot and put a question mark beside those you are considering.
|
|
Hiking |
|
Cross country skiing |
|
|
Running |
|
Skating |
|
|
Mountain biking |
|
Snowshoeing |
|
|
Horse riding |
|
Snowmobiling |
|
|
Canoeing |
|
ATV/ dirt bike riding |
|
|
Camping |
|
Wildlife viewing |
|
|
Rock climbing |
|
Nature study |
|
|
Swimming |
|
Photography |
|
|
Fishing |
|
Hunting |
|
|
Other: | ||
WHAT ARE THE BENEFITS?
Outdoor recreational activities benefit people in a variety of ways. Some are listed below. Many activities provide a combination of physical, mental and spiritual benefits.
Physical fitness
Some of these activities will help keep you physically fit if you do them regularly.
Relaxation
The woodlot provides a quiet setting to escape from everyday pressures and relax your mind while enjoying an outdoor activity.
Adventure
Some of these activities such as mountain biking can be stimulating, challenge your limits, and provide fun and adventure.
Personal enjoyment
You may appreciate the outdoors for such pleasures as enjoying the beautiful scenery, or the sense of discovery in finding interesting historical or natural features such as wild flowers.
Nature Appreciation
Spending time on the woodlot can encourage an appreciation of what we see and a desire to better understand and care for nature.
Other
If outdoor recreation benefits you in another way, describe it here in a sentence or two.
Give each benefit listed a rating of 1, 2 or 3 depending on how important it is to you. One is Very Important, Two is Somewhat Important and Three is Not Very Important. Write the number beside the benefit.
Table 1. List of outdoor recreation activities
| Type | Land Based Activities | Water Based Activities | Air/ Underground |
| Non - Consumptive |
Camping - Family Camping - Group Camping - Backcountry Trails - Nature Trails - Hiking Trails - Cross Country Adventure Rope Courses Rock Climbing Nature Study-Bird Watching Nature Study-Mushrooms Nature Study-General Nature Photography Landscape & Nature Painting Archery Paintball Games Wide Games Adopt-a-Forest Biodiversity Plots Cross Country Skiing Running Orienteering |
Ice Skating - Lakes Ice Skating - Ponds Ice Skating - Wetlands Wind Surfing Adopt-a-Stream River Rafting Swimming Holes Catch & Release Fishing Canoeing Kayaking |
Caving (Spelunking) Kite Flying Astronomy Hang Gliding |
| Consumptive |
Butterfly Collecting Berry Picking Blackpowder Hunting Lapidary Guiding - Hunting Shooting Range Clay Pigeon Shooting U-Pick Christmas Trees Maple Sugar Production Edible Wilds Forest Pharmacy |
T-Trout Fish Clam Digging Fly Fishing Workshops Gold Panning Guiding - Fishing Ice Fishing |
|
| Motor/ Animal Propelled |
Horseback Trail Riding Sleigh Rides Hay Rides Motor Cycling Snowmobiling Four Wheel Drive Club Motor Cross Dog Trials Fox Scent Hunts ATV Trails |
Water-Skiing Motor Boating |
|
| Indoor/ Outdoor |
Cabin Rentals Campfire Programs Woodlot Management Workshops Barbecues |
Bed & Breakfast Outdoor Cooking Day Camping Hunter Safety |
Fly Tying Workshops Environmental Education Hunter Safety |
INTEGRATION WITH OTHER VALUES
Outdoor recreation is one of many reasons we value our woodlots. If you have a management plan, you've already spent some time considering what values are most important to you. Woodlot values can include:
|
|
Recreation |
|
|
Wildlife habitat |
|
|
Wood production (pulp, sawlogs, Christmas trees) |
|
|
Aesthetics (how your woodlot looks) |
|
|
Biodiversity (a healthy, functioning mix of species) |
|
|
Soil and water conservation |
|
|
Improving for future generations |
|
|
Other: |
Give each value listed a rating of 1, 2 or 3 depending on how important it is to you. One is Very Important, Two is Somewhat Important and Three is Not Very Important. Write the number beside the value. Note to yourself if your values have changed from when you first did your management plan and why?
 |
|
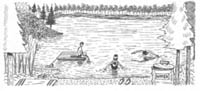
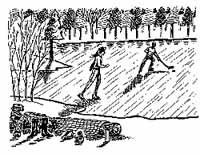
Illustration #1: Outdoor recreation comes in many forms |
Integrated resource management
It is possible to manage your woodlot for several values at the same time. This is known as integrated resource management (IRM). The goal of IRM is sustainable use for a variety of values which means meeting the needs of today without reducing the land's ability to meet the needs of future generations. To ensure sustainable use of our woodland, it must have the potential to be managed for all the values listed above.
 |
|
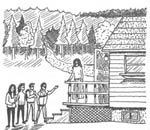
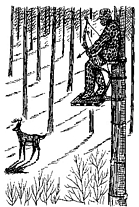
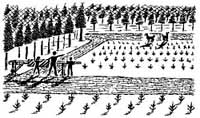
Illustration #2: Hiking in a Christmas tree plantation. |
The following examples look at specific integration problems.
Example One
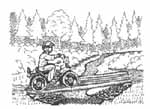
Riding your All Terrain Vehicle (recreation value) and preserving fish habitat (wildlife value) are both important to you. Some time ago, you read the Woodlots and Wildlife module, and recall that riding vehicles through streams is very destructive to fish habitat. But one of your favourite ATV routes goes through a stream. Are both possible? You look at alternate routes and also research bridge designs and cost. After some thought, you decide it's worth your time and effort to build a bridge to sustain both values.
 |
|
Illustration #3: Bridges protect fish habitat from ATV's. |
Example Two
You enjoy bird watching as a recreational activity and you also want to encourage breeding pairs. One of your favourite walks is close to an eagle's nest where you watch the eaglets in spring and early summer. However, the Wildlife and Forestry module says that between March and July "unusual activity can cause nest failure". Can you accommodate both values? After a visit to the area, you decide to cut out a new trail in the fall. You know that cutting is not recommended within I00 metres (328 feet) of a nest. The trail will not be close to the nest but you plan it so you will have a good view using binoculars when the birds are nesting.
Integrating woodlot values involves these three questions:
- What do you want on your woodlot?
- What is possible?
- How can you make it happen?
This and other module explores each of the above questions to help you develop an overall recreation plan for your property. Lesson Two looks at the first question as it deals with assessing your recreation goals. Lesson Three looks at what sort of recreation is possible on different parts of your woodlot. Lesson Four provides practical information on how to build or improve trails and various structures. After a brief look at legal issues in Lesson Five, all this information will be pulled together to help you design your action plan in Lesson Six
Still, there is no single formula for every situation for integrating recreation with other values. Each woodlot and woodlot owner are different. You may first need to learn more about some of these values by reading or talking to people knowledgeable in these areas. Woodlots and Wildlife module has much relevant information as well as the module on Woodlot Ecology. Other useful references are listed at the end of this module. Some tradeoffs may look at how the forest community uses these components of the forest site.
Module 9 - Lesson One Quiz
| Questions: | 10 |
| Attempts allowed: | Unlimited |
| Available: | Always |
| Pass rate: | 75 % |
| Backwards navigation: | Allowed |
Lesson Two - Getting Started
This lesson will help you develop a first draft of your recreational plan after first doing a woodlot inventory, assessing community recreation opportunities and goals, and looking at personal versus public use.
YOUR WOODLOT INVENTORY
The first step in deciding what outdoor activities you want to manage for is to do an inventory of your property. This means making a list of all the relevant features and current activities. This information should then be put on a map of your woodlot. Knowing what you are starting with will help in determining which activities are possible.
Referring to your management plan should be useful if you have one. As well, topographic maps and aerial photographs scaled to 1: 10, 000 may help you with your woodlot features. These are available from the Land Information Centre, 1660 Hollis Street, Suite 600, Halifax, N.S. B3J I V7 and four regional offices, phone 1-800-798-0706. Digital maps of some counties are available from Forest Inventory, Department of Natural Resources, Box 68, Truro, N. S. B2N 5B8, phone 893-5650.
Some relevant features are listed below.
Check the ones that are present on your land.
|
|
Forest growth stages (open, shrub, pole, mature and old growth) |
|
|
Forest treatments (plantation, shelterwood, Christmas trees, thinning,etc.) |
|
|
Waterways (streams, ponds, lakes, rivers, wetlands) |
|
|
Roads, trails |
|
|
Bridges |
|
|
Wildlife sites/trails (nests, deer yards, dens) |
|
|
Fields |
|
|
Houses, cabins, barns, other out buildings |
|
|
Prime attractors (destinations like old growth forest, look-offs, picnic sites, waterfalls) |
|
|
Existing recreation activity sites/routes (ski trails, swimming holes, fish pools, hunting blinds, etc.) |
|
|
Areas not suited to recreation (too steep, ecologically sensitive, poor drainage, etc.) |
|
|
Other (gravel pit, orchard, etc.) |
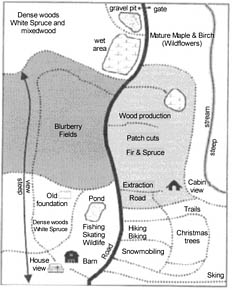
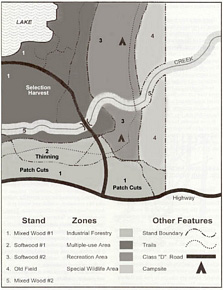
A SAMPLE WOODLOT MAP
The following sample map shows how some of these features could be represented.
 |
|
Illustration #4: A Sample Woodlot Map |
DRAWING YOUR WOODLOT MAP
The next step is to draw an outline of your property. If you have a management plan, you can trace the map that comes with it. It will already show some of the features listed above.
Include these on your map along with any additional features from the list. After drawing all your woodlot features on your map, make a few photocopies so you have extras if needed. In Lesson Six, you will be adding your final recreational goals to this map.
ASSESSING COMMUNITY RECREATION OPPORTUNITIES AND GOALS
Recreation in the community
Before you put time, effort and money into improving or creating a recreational opportunity on your land, it is wise to first find out what opportunities already exist in the community. This includes checking out the area around your community and talking with your immediate neighbors. What you discover may change your plans or help resolve a problem.
For example, you may enjoy snow- mobiling and would like to have more trails on your land. But your woodlot is small and you do not have time to create a new trail. You contact the Snowmobile Association of Nova Scotia (SANS) and discover that they have trails close to your woodlot. You decide that for now you will use their trails and get to know the area.
Future community goals
It is also important to ask about the future recreation goals of the community. What are the long range recreation plans? For instance, are there plans to develop ski trails or bridle paths?
 |
|
Illustration #5: Cooperation can benefit the woodlot owner and local recreational groups. |
Options
You will need to ask yourself if you want or need to duplicate existing or planned opportunities. You may have reasons for developing a similar activity on your own property (option one). Or you may decide to support the community effort in some way (option two).
A third option is to partner with the community. Going back to the snowmobile example, it may be a future goal of SANS to increase the number of trails in your area. After discussion with the local club, you agree to cut a connecting trail through your property with their help. This gives you ready access to their network and gives snowmobilers a new trail.
Partnering with your neighbors is another option that can benefit everyone (option four). Perhaps your neighbors enjoy the same recreational activity as you and that activity would be enhanced by managing adjacent properties for a common purpose. For instance, you enjoy hiking along the river to your property line where the trail ends. You would like to continue the trail up the river and loop back to your property. After some discussion with your neighbors who also like to hike, you agree to work together to extend this trail and create a loop you can both use.
Recreation management on a landscape basis
Looking beyond your own boundaries to management of a larger area is known as landscape design. It makes sense because opportunities and requirements usually extend beyond our property lines to natural boundaries such as watersheds or forest stands. It can be enlightening in terms of silviculture, wildlife, recreation and other values if we look at the bigger picture around us.
Putting this into practice is not easy in a province where 47 per cent of the forested land is in small woodlots. For recreation on a landscape basis, you will need to consider the properties around you, what your neighbors preferences are and what you could do together. You may want to have a written agreement. If you don't know who owns an adjacent woodlot, the local Natural Resources office may be a useful starting point.
PUBLIC OR PRIVATE USE
An important question to answer in determining your recreational goals is whether to plan for personal or public use. Some people want to keep woodlot use as private as possible, especially if they value solitude.
For others, companionship is an essential aspect of outdoor recreation whether the companions are personal friends, family or community members. Certain individuals have a strong community spirit and provide recreational opportunities on their land for public use such as swimming holes or educational trails.
 |
|
Illustration #6: Maintaining a swimming hole for public use. |
Some considerations
Only you can decide whether recreational opportunities on your woodlot will be for personal or public use. However, there are a few factors to keep in mind.
First, more people are using Nova Scotia's private woodlands for recreation. This is due to better roads and access, more leisure time, and a growing appreciation of nature among other reasons.
Second, there is increased use of remaining natural areas. You may have noticed this on your own woodlot. More land is being used for intensive silviculture. While intensively managed land can be used for recreational activities and new logging roads have improved access, people generally prefer more natural settings for outdoor leisure activities.
Third, it can be difficult to keep people off your land. As a landowner, you may have to go to civil court to press charges for trespassing in a non-commercial area. More information on legal issues is provided in Lesson Five.
 |
|
Illustration #7: Placing the trail head close to your house may allow more control of access. |
You may want to read this lesson before deciding to promote public or personal use.
Finally, as mentioned before, about half of the province's forested land belongs to small woodlot owners. Small woodlots are defined as having less than 400 hectares (about 1,000 acres). All these factors mean the small woodlot owner is an indispensable and inevitable provider of outdoor recreation.
Once recreational use of a site has become established, it can be hard to stop. It may be fine with you if the public uses your land but you would like some degree of control. Some of your concerns may be keeping people out of managed areas, away from safety hazards or from damaging or littering your property. This can be handled to some extent through the use of gates, bridges, signs, litter cans and strategic placement of roads and trails where you can see who is entering or leaving your property. Some of these are discussed in Lesson Four.
In summary, you need to answer:
- What outdoor recreational opportunities already exist in the community?
- What are the future goals of the community in this respect?
- Do I need to duplicate these activities?
- Do I want to partner with the community
- Do I want to partner with my neighbors?
- Do I want to develop my property for personal or public use?
ASSESSING YOUR RECREATIONAL GOALS AND OBJECTIVES
Answering the above questions may take some effort but it will be time well spent. The answers will put you in a better position to determine your recreational goals and objectives. A goal is your final purpose and an objective is the means to reaching that goal. For example, a goal may be to improve skiing on your woodlot and your objective is to upgrade a particular trail.
Maintain, protect, improve or create
Your intention may be to maintain or protect an opportunity. It may also be to improve existing opportunities or create new ones.
Some sample goals and objectives might be:
- To improve existing ski trails
- To develop a new loop trail to a look-off
- To protect sites for bird watching and create new ones
- To dig a pond for swimming and fishing
- To make the swimming hole safe and convenient for public use
- To build a cabin for relaxing
Prepare a list of your outdoor recreation goals and objectives to create a recreational plan for your woodlot. It may help to refer to your list of recreational activities, benefits and values from Lesson One. You may also want to refer to your woodlot map for some idea of existing limitations and opportunities.
You will be reassessing this list after studying the information provided in later lessons. Your goals should become more realistic and your objectives more specific as you complete the course and gain more knowledge.
Module 9 - Lesson Two Quiz
| Questions: | 10 |
| Attempts allowed: | Unlimited |
| Available: | Always |
| Pass rate: | 75 % |
| Backwards navigation: | Allowed |
Lesson Three - Outdoor Recreation Potential
This lesson looks at various woodlot features and their importance to outdoor recreation. It also deals with recreation in wood production areas.
As you apply this information to your own woodlot, you may have a better idea of what activities are possible in your situation. The concept of zoning areas is introduced at the end of the lesson.
WOODLOT FEATURES
A variety of features affect your woodlot recreation potential. They include woodlot size, forest stages, tree species, natural areas, trails, terrain, waterways and attractiveness. Some features can be changed or modified to enhance recreation. Some of these changes are long term and will benefit the next generation but some may improve your present recreation potential.
1) Woodlot Size (from Woodlot Recreation Manual)
0.5-5 ha (1.23 - 12.3 acres)
Backwoods cabin, picnic area, camping, short trail network, nature study, photography, skating, swimming - more site specific activities. With heavy use, undergrowth may get trampled and wildlife disturbed. It may be necessary to stay on trails to prevent excessive damage to vegetation.
5-20 ha (12.3 - 49.2 acres)
Longer trail networks are possible to link sites of special interest. Above uses and more. Having separate areas for recreation, forestry operations, or wildlife may be difficult due to limited size. More overlapping use may be necessary. Use can sometimes be separated by season (for example hiking in summer, thinning in winter).
20-40 ha (49.2 - 98.4 acres)
More extensive trail network possible such as a cloverleaf design. The woodlot can be zoned for various uses but some overlapping may still be required. For more on zoning, see page 19 at the end of this lesson.
40-75 ha (98.4 - 185.25 acres)
Longer routes can be developed for horse riding, ATV'S, snowmobiling, skiing, and other activities that cover more distance. This size can provide privacy for different groups using the woodlot at the same time. Primary use of some areas for recreation, silviculture or wildlife is possible.
75-400 ha (185.25 - 988 acres)
Back country camping, wilderness recreation, longer overnight trips. Possible to manage for intensive outdoor recreation, forestry, wilderness areas and other woodlot values.
 |
|
Illustration #8: Back country camping on a large woodlot. |
Woodlot size can influence your options although size is not the only factor. Trade-offs are more likely on smaller lots. If the woodlot is too small for your goals, you may be able to buy adjacent property. Or you may try partnering with your neighbors as discussed in Chapter Two.
2) Forest Stages
See illustration 10.
Forest openings and more mature forest generally allow easier access and so provide more area for recreation. Many activities may be difficult in pole timber and dense growth areas. It may be necessary to cut small forest openings and trails if few exist. Thinning may also be helpful but is more labour intensive.
More specific silviculture techniques for improving recreation in dense and mature forest are provided later in the lesson.
Forest fires, blowdown and insect infestation are three other natural forest stages that affect outdoor recreation.
-
A charred forest does not make for very pleasant walking or wildlife viewing. This will change after a couple of years as new growth comes in. Winter activities may be more appealing when the burnt duff and trees are covered with snow.
-
Extensive blowdown can greatly limit recreational potential in an area. It may be necessary to cut trails through it or go around it.
- Insect infestation can kill or weaken trees making them a hazard for people passing by. You may want to cut trees along trails or cut the infested area creating a forest opening.
3) Plant Species
A diversity of plant species improves conditions making wildlife viewing and nature study more interesting. Planting single species provides limited wildlife habitat but other species will usually invade a site to improve the mix. Planting a variety of species or doing a selection cut can increase diversity. Make sure the species selected for planting match the site.
 |
|
Illustration #9: Blowdown from windstorms may block trails. |
4) Natural area
The amount of natural looking area on your woodlot may affect your recreational options. Wilderness camping for many is not appealing in a 50 ha (123.5 acre) woodlot that has been clearcut. Wildlife viewing may be limited by lack of natural habitat. While many recreational activities are still possible in wood producing areas, most people prefer a certain amount of natural area or at least natural-looking area for recreational activities. Stands can be left to develop naturally to provide a better mix of natural and treated areas.
5) Trails
Outdoor recreation activities can be safer and easier using trails especially if the forest is dense and full of obstacles. Places seem closer with trails. Trails can include extraction trails, old roads, foot paths, abandoned railway lines, boundary lines and animal trails. Creating new trails may be necessary if none exist. Lesson Four has information on trail construction.
6) Terrain
Most woodlots have some variety of terrain which makes outdoor recreation more interesting. If your woodlot is very flat, it may limit the adventurous aspect of certain activities such as skiing and mountain biking. Jumps and obstacle courses may provide a challenge. On a lot that is very steep, hiking and other activities may be difficult. Switchback trails may help. If a site is nearly vertical, consider rock climbing.
7) Waterways
Waterways increase your potential for fishing, swimming, skating, canoeing, wildlife viewing and increases visual interest. If natural waterways are not present, consider building a pond. It can also be used as a water source in case of fire. See Lesson Four for more details on ponds.
8) Attractiveness
The beauty of a woodlot affects our recreational experience. People can be greatly attached to certain sites on their land. This can be very subjective. Many people find a mature forest with large trees attractive. Others have a favourite tree species or like a variety of species.
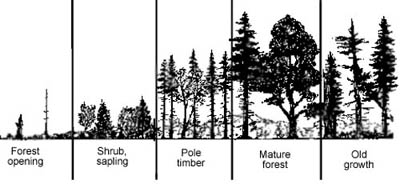 |
|
Illustration 10: Forest Stages
|
Diversity on your woodlot
Consider the diversity your woodlot has in each of the eight features described above. Give each feature a value of one for high diversity, two for moderate diversity and three for low diversity. Mark the number next to each feature in the list below. Remember that these features can be modified to benefit recreation.
|
|
Woodlot size |
|
|
Forest stages |
|
|
Plant species |
|
|
Natural areas |
|
|
Trails |
|
|
Terrain |
|
|
Waterways |
|
|
Attractiveness |
RECREATION IN WOOD PRODUCTION AREAS
Recreational activities often take place in wood production areas because of an existing network of roads, trails and openings. Each forest treatment has its own limits and opportunities for outdoor recreation. Shelterwoods, selection cuts, clearcuts, plantations, Christmas tree plantations, maple bushes, weedings, thinnings, and extraction roads and trails are explored below.
With all of these treatments, safety is a concern when crews are cutting and heavy equipment is in use. You may want to limit recreational use and post signs when operations are active.
Shelterwood
A shelterwood treatment involves thinning an even-aged mature stand two or three times over 5-20 years. The overstory opens up with each cut promoting seedling growth underneath. Visibility is improved, a plus for recreationalists.
This is an attractive forest with a high canopy. Movement may be easy at first but dense new growth increasingly makes movement more difficult than it was before the treatment. Care should be taken not to damage new seedlings once they have started.
 |
|
Illustration #11: Horse riding in a shelterwood |
For these reasons, recreation, especially motorized activities, may need to be limited to trails in a shelterwood. Slash on trails (branches left from cutting) and new growth should be removed from trails. The final cut of a shelterwood removes the canopy leaving a new forest with well-established, dense new growth. Recreational opportunities change because the new forest is younger and provides less shelter.
Selection cutting
This treatment also results in a visually attractive forest but this one has constant cover and several layers or canopies. Cutting is done every 5-20 years to create or maintain an uneven-aged forest. It is possible but not necessarily easy to move about in a selection cut depending on the species and stand diversity. Young regeneration is not as dense as in a shelterwood and is thinned frequently. A selection cut requires an extensive road and trail network that benefits most types of recreation.
Clear cut
Large clear cuts are often considered unattractive for recreation although they can benefit specific wildlife species and provide a view. Keeping cuts smaller will provide more diversity and interest for the recreationalist.
A study in New Hampshire found that people preferred the looks of medium sized cuts as opposed to very large or very small.
Clear cuts create more slash at one time than other forest treatments. Slash and stumps result in hazards for most forms of recreation.
When planning a clear cut, consider the effect it will have on existing trails and other recreational opportunities. Avoid putting slash on existing trails. A ski trip along a favourite trail can come to a sudden end when you run into a big slash pile. On the other hand, slash can also be used to shut down a trail no longer needed.
Eventually smaller branches will break down but larger ones will remain for many years. If the pile is small enough, you may want to clear a new route through it. An alternative is to redesign your route to make use of the extraction road.
Plantations
It is important in a plantation not to damage the young trees. Recreational activities that could result in damage may need to be restricted to existing trails. When crews are planting, have them leave trails for recreation. Slash may still be a hazard in young plantations until it decomposes. As trees mature, activities off-trail may be difficult due to the density of the vegetation.
Christmas trees
Although a Christmas tree plantation may not offer a lot of visual diversity, there is something delightful about the shape of the sheared trees. Christmas tree stands vary greatly in their density.
Some may allow easy passage for a variety of recreational activities while others may be too closely spaced. Care is needed not to break branches or damage seedlings. Broken branches can ruin the saleability of a tree.
Most christmas tree lots are very suitable for recreation as they have good trail systems. Tractor trails are usually 60 - 90 meters (196-295 feet) apart. Those lots are also good for viewing wildlife such as deer hawks, hare and grouse.
It is important to ask permission if you want to hunt on or near a Christmas tree lot to ensure that workers are not working in the area at that time.
Weeding
Weeding may be done in a clear cut control plants that interfere with the growth of desired tree species. Weeding is done with chemical sprays using back pack tanks or by air, or by air, or by manual cutting. Signs are usually posted when an area is going to be chemically sprayed.
After spraying, it is recommended not to use the area for seven days. recreationalists are also restricted from the area when it is being manually weeded. Otherwise, the considerations for clearcuts and plantations may be applied.
Thinning
A precommercial thinning or PCT is thinning immature trees from a stand generally less than 6 m (20 feet) to promote growth remaining trees. Although the forest becomes less dense, the cut trees are left on site creating difficulty underfoot.
A commercial thinning removes at least 30 per cent of trees in a stand over 15 cm (5.8 inch) diameter (dbh). Slash may be a deterrent to reaction. Extraction roads may be used and possibly connected to other trails. The most important consideration is to keep existing trails clear of slash.
Maple Bush
A maple bush or sugar bush may seem well suited to recreation. Here you have an attractive, mature maple forest with large, crowned trees that is cleared below. Unfortunately for the recreationalist, this forest is a maze of waist height plastic lines!
 |
|
Illustration #12: Skiing in a maple bush may damage lines and skiers. |
Activities like hiking and snowshoeing can be done without damage to the lines. In fact, maple bush operators use snowshoes when they are tapping out the trees in March. Skiing can be very challenging unless you are highly skilled.
Again you may want to restrict certain activities to existing trails. Sugar woods usually have a good trail network as well to allow for intense management.
Extraction roads and trails
Some extraction roads and trails are better suited to recreation than others. The layout of your roads depends on the treatments being done and on the extraction equipment and method (tractor, forwarder, tree length, etc.)
Generally loop roads and trails that are not too straight are more interesting for recreation. It may be possible to incorporate sections of your extraction trails into ones more suited for recreation or you may need to cut new ones.
Avoid making ruts with harvesting equipment since they can interfere with certain recreational activities and wash out trails. They can also lead to sediment in waterway and affect the wildlife that live there.
If your woodlot has preexisting ruts, these may need to be repaired. You may need to make new routes through less sensitive areas or use some type of bridge if drainage is a problem (See Lesson Four).
ASSESSING RECREATION POTENTIAL ON YOUR WOODLOT
This lesson has examined what outdoor activities are possible in term of woodlot features and wood production areas. Now you can apply this information to your woodlot. Have your woodlot map and list of recreational goals and objectives at hand.
Consider how the following woodlot features affect your outdoor recreational plan: woodlot size, forest stages, tree species, natural areas, trails, terrain, waterways, and attractiveness.
For example: How does you woodlot size affect your plan? Do this for each remaining feature. Using your woodlot map should be helpful. Make changes to your list that are necessary. You may not be able to accommodate all of your goals and objectives.
What can you do on your woodlot to improve these features for recreation?
Look at the wood production areas on your woodlot map. Can these commercial treatments co-exist with your recreational plan? How will each area be changing in the next 20 years?
What changes will you make? For example, will your mature spruce stand be cut in ten years? Will this change your recreation plan for this area? Again make a note of any changes.
You now have a list of recreational goals and objective based on what is possible on your woodlot and future changes. The next lesson contains "how to" information. The last part of this lesson on zoning may be useful to you if you are managing you woodlot for many different uses.
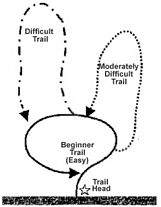
 |
|
Illustration #13: Woodlot zoning map. |
ZONING YOUR WOODLOT
Zoning your woodlot is a more recent practice though some woodlot owners may have been doing it formally for years. It involves dividing your woodlot into zones based on what uses are most important to you in those areas. It also depends on your woodlot features. Zoning areas for single use is generally only possible on a larger woodlot as mentioned before.
A zone is managed for one use or for multiple uses like recreation, wildlife and wood production based on order of importance. There are many options. In terms of outdoor recreation, you may decide that a certain zone is to be used only for recreation. A second option is for recreation to be a primary use with wood production as a by-product. A third possibility is for recreation and wood production to be of equal value. Finally recreation may be a by-product of wood production.
Zoning may help you zero in on specific sites and possible conflicts. Where conflicting uses occur, you will need to list values in order of importance or choose between them. You may decide to change treatment plans if recreation is a priority.
Also remember that the forest is not static and zones will change over time.
If you have a management plan, your woodlot may be divided into zones already. You may want to try drawing various zoning options on your woodlot map photocopies.
If you want to know more about zoning, refer to Seeing the Forest Among the Trees,by forester Herb Hammond, Chapter Five, pages 220-230. In it, he discusses the concept of holistic forest use zones, how to make decisions on zoning and zoning maps.
Module 9 - Lesson Three Quiz
| Questions: | 10 |
| Attempts allowed: | Unlimited |
| Available: | Always |
| Pass rate: | 75 % |
| Backwards navigation: | Allowed |
Lesson Four - Developing Recreation Opportunities
This lesson provides some basic information on trails, bridges and various structures to improve recreation on your woodlot and make it safer and more enjoyable. This information may also affect your recreational goals and objectives by giving you some new ideas. Or you may change an objective when you realize what is involved in upgrading a trail for example. Sources of additional information are suggested throughout the lesson and are listed in the reference section (Appendix B).
The information for Lesson Four was taken in part from two manuals on trail development and modified for small private woodlots. The first manual is Notes from the Trail Development Workshop, Gaelic College, October 1994. It covers trail planning, trail construction and guidelines for specific activities.
The second manual is Introduction to Basic Trail Development, prepared by the Parks and Recreation Division of Natural Resources, June 1995. It has more detailed information and diagrams on trails, steps, bridges, crossing wet areas, view points and signs. Both are available from the Parks and Recreation Division, Nova Scotia Department of Natural Resources, RR #1, Belmont, NS BOM 1C0. Phone (902) 662-3030.
USING SILVICULTURE TO ENHANCE RECREATION.
In mature forests
In general, mature forests are attractive and suited to recreation although they are not always the best places for wildlife viewing. Trees may be large and well spaced and the canopy reduces undergrowth making walking easier. An exception to this is mature white or pasture spruce that often develop on old fields in Nova Scotia. The branchy, closely spaced trees can make travel almost impossible.
In over mature forests, decay may be a safety concern as trees die and fall over.
To create or maintain a mature forest, do not open up the canopy. Opening the canopy will permit new growth. Some people prefer to remove the undergrowth and regeneration for a manicured park look. This is not recommended since regeneration must be left to replace the mature trees as they die. Debris nourishes the soil and provides animal habitat.
In dense and less open stands
You may need to cut new trails for hiking, skiing and other forms of outdoor travel in dense woods or go around them. This can be done by cutting edge trees for wider trails or limbing (cutting branches) for narrower trails. Cut close to the stem to prevent rot when limbing. More information on limbing is provided under Trails.
Creating openings
You may want to do small patch cuts to create camping areas. You will need to clear the slash and limit new growth to maintain the clearing. Openings also provide food for wildlife and good viewing opportunities.
Silvicultural techniques such as cutting, thinning or planting can be used for recreational purpose to create views, privacy, shelter, or redirect paths. If recreation is your silvicultural priority in these areas, be careful to consider the effect on other values like wildlife and biodiversity.
TRAIL
Trails are a key element in your woodlot's outdoor recreation potential. This section looks briefly at planning, construction techniques, and trail requirements for specific activities.
Trail planning
 |
|
Illustration #14:
Stacked loop |
|
|
 |
|
Illustration #15: Compound loop |
|
|
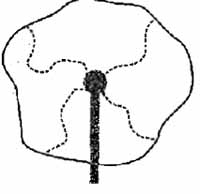 |
|
Illustration #16: Radial loop |
|
|
When planning trails for recreation, certain general factors should be considered.
Try to:
- Include diverse and attractive features such as viewpoints or wildflowers
- Link sites of special interest
- Make loops where possible
- Consider the skill level and stamina of the primary users.
Try to avoid:
- Areas that are sensitive ecologically (easily damaged or have rare species)
- Areas with poor drainage (see crossing seasonal wet areas later in this lesson)
- Hazardous areas such as old mine shafts where dangers might be unseen
- Excessive slopes
Use existing trails or make new ones
Woodlot owners will likely find it easier to use existing trails with some upgrading for their recreational purposes. It may be necessary in some situations to make new ones or develop a combination of both. Your decision depends on what the trail will be used for and the condition of existing trails.
Trail designs
Linear trails can be used to reach more distant points on your woodlot. The traveler returns by the same route unless connecting with another trail. They may be entered at multiple access points or from other trails. A long ridge or shoreline may be suited to a linear trail.
Loops are preferred when users must return to the same starting point. It reduces impact on the trail and provides more interest. Loops are more suited to short day use trips. Short spurs may be cut to points of interest. In addition to a simple loop, there is a stacked loop and a compound loop.
A radial layout is similar to a wheel with spokes going to a central hub. This layout is suitable where a central facility exists in a small site.
A maze allows a variety of potential routes. It is easy to create in a woodlot with lots of logging roads.
TRAIL CONTRUCTION
Cruising for new trails
Potential new routes should be cruised in the spring when it is easier to detect any wet areas, Flag a corridor that your trail will lie within or the trail itself if it is clear to you. Do this by tying flagging tape to the branches or trunks.
Trail height and width
A rule of thumb for hiking trail clearance is the height of your arms extended above your head (about 2.75m or 9.02 feet) and the width of your arms outstretched (about 2m or 6.56 feet). This rule is useful when upgrading old trails as well as when creating new ones. The width will need to be doubled if you require two-way travel. For limited use, it may be more practical to move to the side to allow passing. Special requirements for other activities are discussed later.
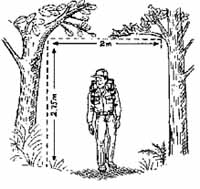 |
|
Illustration #17:
Trail height and width |
Cutting the trail
Cutting can be done with hand tools such as axes, brush hooks and chain saws.
 |
|
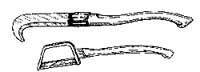
Illustration #18 :
Brush hook and brush axe. |
Cut branches and trees within the clearance area. Cut branches as close to the trunk as possible but avoid scarring the trunk. This allows the wound to heal over faster. Limbing spruce and fir may promote rot so avoid limbing these species if possible. Cut stumps as low as possible. Pile slash to the trail edge to provide shelter for small animals or scatter it in the woods allowing it to decompose faster. You can also limb up cut logs and place them along the trail for sitting.
The trail surface
The type of trail surface depends on what activities will take place. Some activities require a smoother surface than others like mountain biking. Many woodlot owners may not have the time or resources to gravel or fill in trails extensively as in a park or community trail network. However, if you have access to a chipper or a gravel pit this may be an affordable option for you.
In dense woods, it may be necessary to cut small trees to create a trail. Remove stumps when constructing the trail or later when they have rotted. Also remove small boulders and other obstacles if possible and fill in the holes. Drainage is important. Dig out channels if necessary to direct surface runoff away from trails to prevent erosion. Brooks and streams across your trail require culverts.
Crossing seasonal wet areas
Try to avoid seasonal wet areas when planning your trail. Unblock drainage channels if that's the problem. It may be necessary to build a simple crossing to avoid trampling vegetation along the edge. Stepping stones may be sufficient. Softwood branches laid in a crisscross pattern may be suitable where the soil is not too mucky.
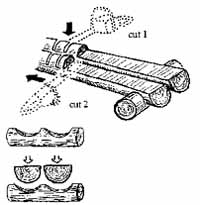
Another option is a puncheon walk or logs on sills. Two logs 10 cm (3.9 inch) diameter or bigger are secured underneath by short cross pieces. The top of the logs are flattened as shown in the illustration below and then laid over the wet area.
For short distances, a corduroy trail may be useful. Logs (10 cm or 3.9 inch minimum diameter) are laid across the width of the trail with breaks for water flow.
In areas that are wet year round, more elaborate structures using logs and lumber may be necessary such as logs on stringers, decked stringers or walkways on posts. These are costly and time consuming. They are described in the two manuals mentioned at the start of this lesson.
 |
|
Illustration #19:
A puncheon bridge. |
Maintenance
Cruise trails once a year with your chain saw, brush hook or buck saw (and preferably some strong friends) to remove blowdown and trim back branches. Use stumps or make benches from logs to sit on. Some areas may require more frequent clearing such as alder patches. Check the trail surface for erosion and redirect the water flow if necessary. If the trail is becoming too worn, it may need to be closed for a while or sections of the trail rerouted. Repair structures to keep them safe.
Other structures
Some trail construction, while initially involving a great deal of work, may prove useful in the long run. The following structures are helpful in areas of excessive slope. Switchbacks make travel on steep slopes easier. Stairs help in short, steep climbs. Trails built across steep slopes can be supported using retaining walls or side-filled using various techniques. These structures are described in the two manuals mentioned earlier.
TRAIL REQUIREMENTS
Most trails on your woodlot can be used for a variety of recreational activities. Some activities however have special requirements so you may need to study your woodlot to determine the best trail to use for these activities and what changes may be required.
Winter activities
Winter trail activities require extra height clearance. Not only is the user higher up but branches droop under the weight of the snow.
Faster activities
Certain activities involving speed (skiing, biking, snowmobiling, ATV's, etc.) also have special requirements. Turns anywhere on a hill should not be too sharp. A wider bend gives people more room for turning and allows them to see others sooner and move aside if necessary. Switchbacks used for hiking may be too tight for activities with more speed.
Incompatible activities
Some activities cannot be done comfortably on the same trail as others if there is high use. For example, hiking and motor biking, or skiing and snowmobiling. The reasons include noise level, danger to users, and damage to the trail. On a woodlot however, it may be more difficult to limit a trail to specific uses. Signs prohibiting motorized activities or advising caution may help.
Trail requirements for five common activities - hiking, skiing, snowmobiling, mountain biking and horse riding - are outlined below.
Hiking
Most trails can be used for hiking. Some people may enjoy low, narrow animal trails with less than the recommended clearance. In general, day hiking trails should be 2 metres (6.56 feet) wide for single track and 3 metres (9.84 feet) wide for double track. Longer hiking trails may be narrower. Height clearance should be about 2.75 metres (9.02 feet). The Nova Scotia Trails Federation has more information on trail development for hiking. Contact Sport Nova Scotia, PO Box 3010 South, Halifax, NS B3J 3G6 (902) 425-5450, Extension 325. If you are planning on using the same trails for skiing, follow the requirements below.
Skiing
Trails designed for skiing should be two metres (6.56 feet) wide for single track and 3 metres (9.84 feet) wide for double track. Four metres (13.12 feet) height will allow for snow. A minimum of 4 metres width will be needed if you want to ski skate. Avoid trails with sudden turns on hills. Bends on steep hills should be wider (3 metres or more) for downhill turning and for uphill herringbone or side ways step. A widened turn out at the hill base is recommended.
 |
|
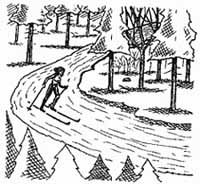
Illustration #20:
Bends on hills should be 3 metres (9.84 feet) or more for skiing. |
Cruise potential routes to assess where snow accumulates and where it melts fast; also check for wetness, obstacles, and sudden dips. Dips can be filled in with brush before the snow falls. Be careful of brush-filled dips when using trails for non-winter activities.
Avoid routes that will get skis wet as this can cause snow to stick to skis and ruin a trip. On shallow streams, ski over ice if possible. Placing stepping stones in the off-season in the stream may be useful. If the stream is too deep, consider building a bridge or rerouting.
Grooming can be done if you have a powerful enough snowmobile and a groomer to compact and smooth the trails but most woodlot owners likely will break their own track. Once a track is established, it can be used by other skiers until the next big snowfall. You may want to post signs asking snowmobilers and snowshoers to avoid ski tracks if possible.
While skiing and snowmobiling are listed as incompatible in some guides, in reality they often take place on the same trails. Snowmobile tracks can benefit the skier in deep snow. If the tracks ice up however, skiing on them can be hazardous and it is better to break new trail.
Snowmobiling
Trails should be about 3 metres (9.84 feet) wide for single track and four for double with four metres height. Care should be taken when skiers and snowmobilers are using the same trails. You may consider putting up a sign indicating skiers on trail.
Since snowmobile touring requires lengthy trails, you may want to consider connecting your woodlot with the SANS network of trails. SANS has 2,500 km (1562.5 miles) of trails in the province mostly on private land and 23 local clubs. The woodlot owner can sign a permission form that gives SANS a right-of way. SANS operates and maintains the trail and assumes liability. They also provide a variety of signs including stop ahead, yield, sharp corner, bridge, tree plantations, speed limits and trail numbers. Marking gates properly is especially important for snowmobilers (see Gates).
A manual on trail development for snowmobiles is available from the SANS administrator, Sport Nova Scotia, PO Box 3010 South, Halifax, NS B3J 3G6 (902)425-5450, Extension 324. SANS is also developing etiquette guidelines for snowmobilers and other trail users.
Mountain biking
Trails should be 2-3 metres (6.56-9.84 feet) wide and 2.75 metres (9.02 feet) high. Generally, mountain bikers like hard packed trails with no rocks or roots. For this reason, old worn trails may be better. New trails may be too soft with exposed roots and rocks. -Good drainage is important.
An example of good mountain biking trails is located at the youth hostel near Wentworth, Colchester County. More information on mountain bike trails can be obtained from Bicycle Nova Scotia, at the Sport Nova Scotia address above, Extension 316.
Horse riding
Bridle paths (for horses) should be at least 2 metres (6.56 feet) wide so horses can pass one another. Recommended height is 3 metres (9.84 feet). Extra care should be taken to cut stumps close to the ground as horses trip easily.
When planning routes, avoid slippery banks and streams as horses may lose their footing. Deer trails should also be avoided as some horses will be startled if deer leap onto the trail. Snowmobiles, ATV and dirt bikes may also startle horses. Mark trails accordingly. Hikers are usually not a problem. Hiking and horse riding may be incompatible in high use areas due to horse manure and ruts but likely not a problem in low use trails on a private woodlot.
Planning your woodlot trails
When planning your trails, ask yourself: what is the purpose of my trail? It may be for a specific activity, it may be a route to a special attraction like a look-off, or both. Are there special requirements for width, height or length?
Once you have decided on use, ask yourself.. do my existing trails meet these requirements? To answer this, you may need to examine your woodlot map and walk your woodlot. Can you upgrade existing trails for your purposes? Do you need to build new trails or connect old trails? What time and effort might be required and do you have it? Use copies of your woodlot map to draw potential routes using new and existing trails.
BRIDGES
Plan routes to limit the number of stream crossings. Where possible use existing bridges on your woodlot. Nova Scotia Department of Environment permits are required for new bridge and culvert construction.
Where streams must be crossed, stepping stones or a puncheon may be suitable for some types of activities like hiking. A puncheon is best on streams less than 3 metres (9.84 feet) wide and is not suited to streams that flood since it will float away.
 |
|
Illustration #21: Bridge areas may become popular spots for recreation. |
More substantial bridges may be needed for activities like snowmobiling and for wider channels. These can be built with logs, rocks and other materials on hand or it may be necessary to use timbers and lumber. Research various designs to determine the one best suited to your situation. More details on bridge designs are given in the Introduction to Trail Development Manual. Also the Nova Scotia Department of Natural Resources has a booklet available called Woodlot Road Stream Crossings, 1992, with much useful information on stream beds, culverts, disturbance, and permits.
When deciding where to place a bridge, look for high stable banks to reduce the need for cribbing. Choose the narrowest point but do not build bridges at bends in the stream because they are prone to erosion. Also, the bridge should go straight across the stream, not at an angle.
A bridge area may become an attraction for fishing, swimming, picnicking and other activities. You may want to develop it with benches and litter cans for example, or design the area to discourage recreational use with appropriate signs and gates.
PONDS AND FISHING
Ponds support a variety of activities like swimming, boating, skating, and fishing. Ponds attract wildlife and so are good areas for wildlife viewing. Ducks Unlimited has helped a few small woodlot owners develop large ponds that attract waterfowl and a variety of small mammals. Ponds may need to be excavated and cleared of weeds and silt every few years if swimming is a primary activity.
 |
|
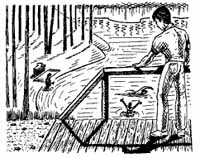
Illustration #22:
Ponds can be used for a variety of recreational activities. |
Fishing is another popular activity. Oxygen and food supply are vital ingredients for fish to thrive. Natural ponds usually provide better fish habitat than artificial ponds. Ponds can be stocked to improve fishing. Dug ponds may not be adequate for spawning, oxygenation of the water or food production and may need to be restocked every few years. Fish may also need to be fed. For more information on stocking ponds, contact the Information Officer, Nova Scotia Department of Fisheries, PO Box 700, Pictou, NS B0K 1H0 (902) 485-5056.
Many woodlots have ponds built for fire control. Others may have natural ponds or ponds created by beavers. If you want to create a pond, look for wet areas or surface run-off. It is also possible to widen or dam a stream or create a stream bypass to a dug pond though these are not preferred methods. Heavy equipment will likely be needed. Any in-stream alteration will require a permit form the Nova Scotia Department of Environment.
The slope and width of banks are important. Also the depth must be at least 2.5 metres (8.2 feet) to prevent fish from freezing. More details on building ponds can be found in Building Woodland Ponds by Steven Talbot, 1974 and in Farm Ponds in Nova Scotia by J.K. Higgins, available from the NS Department of Agriculture and Marketing. For on-site help, contact your local Natural Resources office.
Improving fish habitat can mean better stream fishing. Fish prefer silt free streams with logs for cover and insect habitat. Don't cut trees along the stream banks because they keep the edge from eroding and branches provide cover from birds of prey. Trees also provide shade to keep the water from getting too warm. Use existing game trails further from the stream if possible.
Fact sheets on stream habitat produced by the St. Mary's River Project are available, at Natural Resources offices. As well, the Department of Fisheries and Oceans has a new brochure called Stream Restoration for Woodlot Owners.
WILDLIFE VIEWING AND HUNTING
The first step in promoting wildlife viewing on your woodlot is to improve habitat. This involves developing both shelter and food sources. This is explained with easy-to-follow directions in Module Four, Wildlife and Forestry. Feeder and nest boxes are good for attracting birds and salt or mineral licks may draw various mammals to your lot.
Other steps will also enhance your wildlife viewing. It is important for serious viewers to have a comfortable place to sit where it is easy for you to watch without being seen. You can use a bench or build a blind or tree stand as used in hunting.
Quiet and patience are also necessary. If you are walking, it is helpful to stop every so often and sit or pause. Walking can limit your ability to hear wildlife and may also scare them off. Rest areas along your trail may make good spots for wildlife viewing.
Being able to identify animal signs such as tracks, browse and scat can greatly add to your enjoyment. It can help you find where animals commonly feed and travel. You may not always see the popular species like deer or eagles but there are many other animals present to enjoy. Care should be taken not to disturb an animal or bird when tracking, particularly if young are involved. Young herons for example can die if disturbed in the nest.
The suggestions above for wildlife viewing will also help you with hunting. It is important to consider possible conflicts between hunters and other recreational users. For example, other users may interfere with hunting and some users feel unsafe where there are lots of hunters around.
 |
|
Illustration #23:
Tracking is a challenging outdoor activity. |
During hunting season, you may have to choose between allowing hunting or allowing other activities on your woodlot. Even if you post "No Hunting" signs, it is still wise to wear orange clothing. To be extra safe, you may want to restrict use to Sundays when hunting is not permitted. If you choose to hunt or allow hunting on your land, you can post warning signs.
For wildlife viewing or hunting you may want to buy or build tree stands. They can often be left on the woodlot for year round viewing. Wildlife often do not expect danger from above and your scent may travel over their heads.
You can buy portable stands that you can pack to a suitable location. These come with steps that either screw into the tree or are attached by straps. Prices range from $75 and up.
Ladder stands are also available at hunting supply stores. They are more difficult to transport to the desired location and take more time to put up but they are easier and more comfortable to use. Prices start at $100. Both types of stands should be used with safety straps.
Another option is to build your own. These can range from a simple ladder made with poles leading to a wooden platform to a more complex tree house with sides and roof. Tree houses offer the ultimate in comfort, safety and concealment but are expensive and time consuming to build. Since stands are spiked or screwed to the tree, some damage is unavoidable.
 |
|
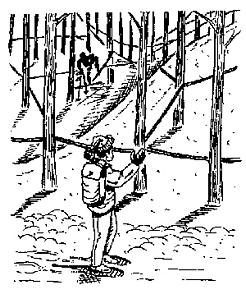
Illustration #24:
Hunting in a tree stand. |
Be sure to remove all screws and spikes from the tree if you stop using the tree stand or if harvesting is planned in the area. Metal objects left in trees are very dangerous to chain saw operators and saw millers.
Ground blinds also offer concealment for wildlife viewing. They can be as simple as a few branches around a natural opening or as elaborate as a wooden structure. Use materials that will blend in with the surroundings. Fresh lumber or peeled logs will blend in better as they age. Camouflaged ground blinds can also be purchased from hunting supply stores.
Both tree stands and blinds offer more viewing opportunities as wildlife get used to them after a few months. They should not be out in an opening but near or in the edge of cover.
Location and timing
Seeing wildlife also depends on being in the right location at the right time. What is "right" depends on the species you are looking for but in general edges and waterways provide good opportunities. The further you can see, the more interesting and productive your viewing will be. In thick areas, your view can be improved by cutting view lanes or narrow openings in one or more directions.
As you become more familiar with your woodlot, you will learn where to look for wildlife.
Timing is also a factor as seasons and time of day play a role in wildlife movement. For example, you are more likely to see certain species in summer or at dawn or dusk.
Excellent books are available to help you identify wildlife and learn about their habits:
- Summer Nature Notes and Winter Nature Notes, by Merritt Gibson,
- Animal Signatures, by Edward Claridge and Betty Ann Milligan,
- Notes on Nova Scotia Wildlife, by Julie Towers
- Tom Brown's Field Guide to Nature Observation and Tracking
CAMPING AND PICNIC SITES
Shelter, drainage and a level area for a tent are important if creating a new camp site. Have your site open to the east if possible to get the morning sun. Water and wood supply need to be considered. Is the water safe to drink? Will continued use of wood around this site ruin its appearance? Increasingly, campers need to consider packing in their water and fuel for cooking. Build a fireplace to prevent the development of many pits.
Waste disposal is also important. Burning garbage can be unsightly and litter can cause hazards to wildlife and people. Encourage the policy of "pack it in, pack it out". For human waste, bring along a trowel or stick and dig a shallow hole. Cover waste with a light layer of duff for best composting.
For higher use sites, you may need to build a pit privy. For more information on the health hazards of human waste and proper disposal, read How to Shit in the Woods by Kathleen Meyer.
Building camp furniture like tables and chairs out of branches, fallen logs or rocks can be fun and make the site more comfortable to use. If you are competent with a chain saw, you can get quite fancy.
High use camping and picnic spots may already exist on your property. Post signs about not littering or cutting wood. If litter is still a problem, you may want to provide litter cans and empty them regularly as a service to the community. You might also want to provide a few picnic tables and an outhouse if vandalism is not much of a threat.
CABINS
 |
|
Illustration #25: A wilderness cabin. |
Shelter and level ground are less important in site selection for a cabin but are still a consideration. You may want to have cover on three sides and with a view on the fourth, for example. A somewhat level area around the cabin is useful for activities like preparing wood and eating outdoors.
A water source is important. Site the cabin near a stream or spring if possible but leave a buffer. Cabins should be at least 50 m (164 feet) from lakes and major water ways. It may also be possible to dig a shallow well or collect rain water or run-off. Water may have to be boiled before drinking.
Cut fuelwood away from the cabin to maintain shelter and appearance. In most cases, it is better to get fuelwood from thinnings near the cabin or in the immediate area. Build the outhouse away from your water source and cabin. Pack out garbage or bum it thoroughly and bury the remains. This will help minimize damage to your cabin by animals.
Building with logs cut on site will be less expensive and involve less transportation of materials but will take more time. Leave enough good trees to regenerate the site. Many simple designs are possible using both vertical and horizontal logs. Backwoods Cabins by Bud Inglis is a delightful book with descriptions of 19 cabins in different parts of Nova Scotia to give you some ideas. Some are log and he provides some basic details on construction. Building with Logs by B. Allan Mackie may also be helpful.
Gates, signs and access point location can all be used to control and direct public use of your woodlot. They may be used to restrict entry for example to forest plantations, hazardous areas, and areas where heavy equipment is being used or people are working. Even with gates, users may continue to trespass (see Legal Issues in Lesson Five.)
It is important that gates be built to ensure they are visible to road users. The gate should not be hidden by a turn or bend in the road. It should be visible at all times of year. Cables and pipes should be painted a bright orange and have attached a board with diagonal orange stripes. More details are provided in the brochure Woodlot Gates in Nova Scotia: Are your gates safe? available from your local Natural Resources office.
 |
|
Illustration #26: Signs may help control access and damage as well as improve safety. |
Signs should be posted warning of gates ahead. Other signs may be helpful but do not guarantee cooperation. A sign that explains the reason behind the request may produce better results. For example: No hunting-People at work, or Slow down-Sharp turn ahead.
Tie signs to trees rather than using nails for the safety reasons mentioned earlier. Signs can be nailed to posts or fences where possible. Posts or cairns can be used in areas without trees.
If you plan a route for skiing or hiking, for example, that will be used by people unfamiliar with it, you may want to number the trails and provide people with a map or have a large sign at the access point. Signs should be placed so people can see them from both directions. If the trail is long, you may need more signs along the route. You may also want to colour code the trails for degree of difficulty.
Access to your woodlot can be controlled by having one access road to your lot that goes by your house or with a gate you can close when necessary. Also create loop trails that return to one starting point.
SCENIC ROUTES AND SITES
Plan routes to take advantage of special attractions and scenic viewpoints. Climbing trees and taking short detours may help determine where the best views are and some thinning or cutting along the trail often help to make a view visible. Scenic qualities can also be improved by keeping edges irregular rather than straight which looks more natural. Leaving buffers between recreational areas and cuttings also improves appearance.
Scenic sites can become trampled with overuse so you may want to limit use to the trail. If the site is on a cliff or water edge, a guard rail may be required.
Module 9 - Lesson Four Quiz
| Questions: | 10 |
| Attempts allowed: | Unlimited |
| Available: | Always |
| Pass rate: | 75 % |
| Backwards navigation: | Allowed |
Lesson Five - Legal Issues
This lesson looks briefly at the issues of access, safety and liability for small woodlot owners. More complete details are available by reading the various acts mentioned below.
ACCESS
What are your rights as a woodlot owner to limit access to your land? Generally, the landowner has a right to control any use made of his or her land, including prohibiting entry on the land. Enforcing that right involves either the application of the Protection of Property Act or a private legal action.
Under the Protection of property Act, it an offense to enter certain lands such as a lawn, garden, orchard, vineyard, golf course, agricultural area, tree plantation or Christmas tree management area without permission.
Landowners may also post signs prohibiting entry or certain activities on lands without permission. If a member of the public violates this Act, you may ask for assistance from the local police in enforcing the Act.
The Act does not apply to forested or noncommercial areas where recreational activities are taking place. As a landowner, you still have the right to control activities on your forested or non-commercial areas but you must enforce that right in a civil court.
Recent changes to the Wildlife Act will also allow landowners to post their forested or noncommercial lands to control trapping on their lands. You can obtain the assistance of conservation officers of the Department of Natural Resources in enforcing these provisions on your lands.
SAFETY
Woodlot owners can be held responsible accidents in some cases. You can reduce the possibility of accidents by following certain guidelines. "An ounce prevention is worth pound of cure." So before examining liability let's first look at improving safety.
Some safety guidelines have already been discussed in previous lessons. They include:
- Restrict use during harvesting operations
- Make trails safe for specific activities
- Plan trails away from hazardous areas
- Use gates or barriers to protect users or the land
- Clear trails on a regular basis
- Sign gates and dangerous areas
- Build guard rails near drop offs
- Keep structures in good repair
You may have a sense of some of the potential recreational safety hazards on your woodlot. If not, contact outdoor organizations for advice.
LIABILITY
Liability means the responsibility you have as a landowner for loss or injury to users of your property. Under the law, the occupier has different liabilities toward different users as outlined below. The occupier is not necessarily only the landowner but can include whoever is responsible for the condition of the woodlot.
Table 2: Occupiers responsibilities to visitors
| Visitor | Occupier's responsibility |
|
Trespasser On the property without permission |
Occupier Must not act to intentionally cause harm to visitor or act with reckless disregard for the safety of the visitor. |
|
Licensee On the property with permission but no benefit to occupier |
Occupier Must take reasonable measures to protect visitor from hidden or unusual dangers that occupier knows of. |
|
Invitee On the property with permission and of benefit to land owner |
Occupier Same as above plus dangers occupier ought to know of. |
Example One:
A group has asked to hike on your land. You know of a large hole in the trail that may be unstable around the edges. Before the group comes, you set up a barricade around this hole that still allows passage along the trail. You discuss the problem with the group when they arrive. In this way, you have fulfilled your responsibility toward licensees.
If a licensee or invitee is breaking the law, such as deer jacking, then your liability is reduced to that given a trespasser.
These obligations will change when a trespasser or licensee is on your land while on a motorized vehicle. Under the Occupiers of Land Liability Act, the occupier must not create a danger with the deliberate intent of doing harm or damage to the trespasser or licensee.
You may be held liable if you fail in your responsibility as an occupier. Asking users to sign a voluntary assumption of risk or to absolve you of any responsibility may limit your liability to some extent although these do not always stand up in court.
Another option is to have a trail on your property designated under the Trail Act. The trail is then managed by government or municipal groups and users assume all risk. Additional details on this Act are provided in Notes from the Trail Development Workshop manual.
Module 9 - Lesson Five Quiz
| Questions: | 4 |
| Attempts allowed: | Unlimited |
| Available: | Always |
| Pass rate: | 75 % |
| Backwards navigation: | Allowed |
Lesson Six - Your Recreational Plan
A BRIEF REVIEW
If you have worked through the previous lessons, most of the your work - the mental work anyway - is done. You have learned how to manage your woodlot for recreation and have a realistic recreational plan based on a wide range of factors.
Each lesson presented a set of factors that affect your recreational plan.
In Lesson Two, you developed your first list of recreational goals and objectives after considering: what exists now on your woodlot, what exists in the community, partnering possibilities, and public or personal use.
In Lesson Three, you considered the effects of woodlot features, and commercial forestry on your recreation potential and modified your plan as needed.
And in Lesson Four, you learned how to use silviculture, and create trails and various structures to improve recreational activities.
Other factors specific to your situation also need to be considered. Looking at your plan once again, you need to ask yourself if you have the time, ability and resources to accomplish your goals and objectives.
Has your final list changed much from your first list?
PUTTING YOUR PLAN INTO ACTION
Your plan will continue to evolve as factors continue to change on your woodlot and in your life but it is a good starting point. Which goal and objectives do you want to work on first? How long do you estimate they will take to accomplish? Will it take more than one year? If so divide the actions into Year One, Year two etc. Write out a plan of action for each goal and objective.
UPDATING YOUR WOODLOT MAP
Now comes the fun part after all that work. Get out your woodlot map. Using your recreational plan, update your map to include new recreational opportunities you want to create. Draw longer trail systems, irregular edge, ponds, cabins, scenic view points, everything you would like to do. If it is too crowded, you may need to use different copies for different opportunities or enlarge your map.
CONCLUSIONS
This module has set out to show how outdoor recreation can be managed along with other woodlot values and that managing can improve recreation on your woodlot. Each woodlot and woodlot owner is different so you will need to adapt this information to your situation. May your efforts be rewarded with days of enjoyment.
List of References - Appendix A
Bissex, Glyn. (1995), Woodlot Recreation Manual, Nova Scotia Department of Natural Resources.
Brathwaite, Glen C (1992), Woodlot Road Stream Crossings, Nova Scotia Department of Natural Resources.
Brown, Tom. (1983), Tom Brown's Field Guide to Nature Observation and Tracking, Berkeley Publishing Corp.
Claridge, Edward and Milligan, Betty Ann. (1992), Animal Signatures, Nimbus Publishing and the Nova Scotia Museum
Gibson, Merritt. (1980), Winter Nature Notes for Nova Scotians, (1982), Summer Nature Notes for Nova Scotians, Lancelot Press, Hantsport, Nova Scotia
Hammond, Herb. (1991), Seeing the Forest Among the Trees: The case for holistic forest use. Vancouver: Polestar Press Ltd.
Higgins, J.K. Farm Ponds in Nova Scotia, NS Department of Agriculture and Marketing
Inglis, Bud. (1990), Backwoods Cabins of Nova Scotia, Lancelot Press, Hantsport, Nova Scotia
Introduction to Basic Trail Development, (1995), Parks and Recreation Division, Nova Scotia Department of Natural Resources
Mackie, Allan, B. (1971), Building with Logs, Log House Publishing Company, RR 1 Pender Island, British Columbia, V0N 2M0
Meyer, Kathleen. (1989), How to Shit in the Woods, Ten Speed Press, Box 7123, Berkeley, California, USA 94707
Scrutton, Ted and MacDonald, Margaret. (1994), Notes from the Trail Development Workshop Outdoor Recreation, Nova Scotia Sport and Recreation Commission, Nova Scotia Department of Natural Resources
Talbot, Steven. (1974), Building Woodland Ponds. Nova Scotia Department of Lands and Forests
Towers, Julie. (1995), Wildlife of Nova Scotia, Nova Scotia Department of Natural Resources, Nimbus Publishing Ltd.
List of Outdoor Organizations - Appendix B
Bicycle Nova Scotia
P.O. Box 3010 South
Halifax, Nova Scotia
B3J3G6
Phone (902) 425-5450 Ext.316
E-mail: canoens@sportns.ns.caCamping Association of Nova Scotia
P.O. Box 3243 South
Halifax, Nova Scotia
B3J3H5
Phone (902) 865-3523
Fax: (902) 865-3542Canoe Nova Scotia
P.O. Box 3010 South ,
Halifax, Nova Scotia
B3J3G6
Phone (902) 425-5450 Ext.316Federation of Nova Scotia Naturalists
c/o the Nova Scotia Museum
1747 Summer St.
Halifax, Nova Scotia
B3H 3A6Nordic Ski Nova Scotia
P. 0. Box 3010 South
Halifax, Nova Scotia
B3J 3G6
Phone (902) 425-5450 Ext.316Nova Scotia Centre for Outdoor Recreation Services
5516 Spring Garden Road
P.O. Box 3010 South
Halifax, Nova Scotia
B3J 3G6
Phone (902) 425-5450Nova Scotia Federation of Anglers and Hunters
P.O. Box 654
Halifax, Nova Scotia
B3J 2T3
Phone (902) 423-6793
Fax: (902) 423-6793
E-mail: tr.NSWS@chebucto.ns.caOrienteering Association of Nova Scotia
P.O. Box 3010 South
Halifax, Nova Scotia
B3J 3G6
Phone (902) 425-5450 Ext. 325Recreation Association of Nova Scotia
P. 0. Box 3010 South
Halifax, Nova Scotia
B3J 3G6
Phone (902) 425-1128
Fax (902) 425-5606Snowmobilers Association of Nova Scotia
P.O. Box 3010 South
Halifax, Nova Scotia
B3J3G6
Phone (902) 425-5450 Ext.324GOVERNMENT AGENCIES
Heritage Canada, Atlantic Region
P.O. Box 1358 Station B
Ottawa, Ontario
K1P 5R4
Phone (613) 237-1066Nova Scotia Department of Natural Resources
Founder's Square, 2nd Floor
P.O. Box 698
Halifax, Nova Scotia
B3J 2T9
Phone (902) 424-5933
Fax. (902) 424-0520Nova Scotia Sport and Recreation Commission
5516 Spring Garden Road
Suite 200 P.O. Box 864
Halifax, Nova Scotia
B3J 2V2
Phone (902) 424-7512
Glossary of Key Terms - Appendix C
Aesthetics: How something looks, a value judgement based on appearance.
ATV: All terrain vehicles- generally 4 or 6 wheeled vehicles built for traveling in rough terrain.
Biodiversity: Variety and amount of each and all species in a forest or other environment.
Blowdown: A tree or pile up of trees blown down by the wind.
Cruise: Walking through a woodlot for the purpose of determining a specific factor like volume of wood or trail conditions.
dbh: diameter at breast height (1.32 metres).
Edge: The line between forest and open areas or between stands.
Erosion: The washing away of top soil caused by rain, or other water action.
Flag: To mark trees or other objects with tape by tying onto a branch or the trunk.
Flagging tape: Coloured plastic or biodegradable tape for tying to trees.
IRM: Managing or planning for several objectives or uses at the same time
Maple Bush: A thinned, mature maple stand that is used for sap collection to make maple syrup and other maple products.
Orienteering:A competitive, outdoor sport involving completing a course using map and compass.
Overstory: The top layer or oldest of trees in a stand.
Puncheon: A simple bridge less than 3 metres wide made of logs.
Stand: A group of trees similar in species, size and age.
Switchbacks: A trail design used on steep slopes shaped like an "S" to reduce the slope of the trail
Downloads
As the Home Study modules become available copies will be made available for download. At this time only the Introduction - Getting More from your Woodlot, Module 2 and 9 are available in French.
| All modules are currently available in English and some in French |
Adobe Acrobat
Acrobate D'Adobe |
| Principles of Forest Stewardship | Download |
| Introduction: Getting More From Your Woodlot |
English Francais |
| Module 1: Introduction to Silviculture | Download |
| Module 2: Harvesting Systems |
English Francais |
| Module 3: Thinning for Value | Download |
| Module 4: Woodlots and Wildlife | Download |
| Module 5: Stand Establishment | Download |
| Module 6: Chainsaw Use and Safety | Download |
| Module 7: Woodlot Ecology | Download |
| Module 8: Wood Utilization and Technology | Download |
| Module 9: Woodlot Recreation |
English Francais |
| Module 10A: Managing Woodlot Finances:Planning and Investment Guide | Download |
| Module 10B: Introduction to Woodlot: Income Tax and Estate Planning | Download |
| Module 11: Roads & Trails: Planning it Right from the Start | Download |
| Module 12: Small Scale Harvesting Equipment | Download |
| Module 13: Non Timber Forest Products: Growing Opportunities | Download |