Module 11: Roads and Trails: Planning it Right from the Start
![]() This Home Study Module is for small woodlot owners who want to build roads and/or trails on their land. You may want a road for transporting wood, recreation or access. The six lessons in this module will guide you through the basics of planning and building a road suitable for small woodlots.
This Home Study Module is for small woodlot owners who want to build roads and/or trails on their land. You may want a road for transporting wood, recreation or access. The six lessons in this module will guide you through the basics of planning and building a road suitable for small woodlots.
After completing the exercises in this module, you will have a good start on a road plan based on your woodlot needs. The actual construction will likely be done by someone else. For this reason, this module focuses more on planning and less on building. The lesson on building will help you when discussing on-going work with the road builder.
The information in this book may also be a useful starting point for large woodlot owners. However, if you have a large volume of wood to be transported over long distances, you will need a better quality road network. The services of a forester, technician, a surveyor and/or a contractor may be needed.
Building Woodlot Roads and Trails is part of the Woodlot Management Home Study series produced by the Department of Natural Resources. This series is meant to help woodlot owners make informed decisions about the various uses of their land.
Lesson One - Introduction
 |
|
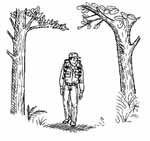
Hiker on a recreational trail
|
Nova Scotia is one of the most roaded provinces in Canada. In fact, you can't travel more than 16 kms (10 miles) in any direction (except maybe in the Tobeatic Protected Wilderness Area or the Cape Breton Highlands) without crossing a road of some kind. This is partly because of the long history of settlement here compared to other parts of the country.
It's hard to think of a woodlot in Nova Scotia that doesn't have a road or trail of some kind on it. The road could be part of a long-abandoned route across the province or between communities. It could be an old woods road used by early settlers. Or it may be a more recent road built to take out a load of logs by tractor trailer. Even if the lot was never harvested, it probably has a few trails across it.
Your land probably already had a road or trails of some sort on it when you bought or inherited it. Depending on your management objectives, it may be time to upgrade those roads and/or build new ones. These lessons will guide you through the many factors to consider when planning your road.
Trails
A trail can range from a foot path to what some might call a rough road. For this module, we look at trails cut out by hand or machines for a specific purpose. The most basic trail of this sort is a recreational trail brushed out to the sides and above so that people can pass through. The surface may be left the way it is or large rocks and stumps may be removed.
A trail for harvesting may be wider than a recreational trail. Trees on the trail are cut by chainsaw or machine and removed. It may be difficult or impossible to drive your truck on such a trail.
Harvesting trails sometimes lead to a rough road called a grub road. On a grub road, the stumps and rocks are pushed aside. The surface is somewhat smooth and packed. It may have a landing. Small trucks and harvesting equipment can travel on this road in dry or frozen conditions.
Grub roads can result in long term savings where hauls to main roads are long; they reduce wear and tear on machinery and the operator and reduce skidding or forwarding time.
Roads
The grub road or harvesting trails lead to a forest access road. A maintained road of this sort is wider than a trail. The surface is smoother and it may be graded and surfaced with gravel. It is usually brushed out on either side and ditched. Heavy equipment like bulldozers and excavators are used to build up the road from available material. It may have landings where the wood is piled for pickup, turnouts for passing and a vehicle turnaround at the end. Generally, roads are more permanent than trails.
 |
|
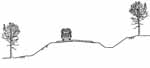
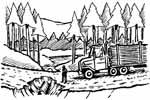
Loaded tractor trailer
on a "D" class road |
Both roads and trails on a woodlot may have culverts and temporary or permanent bridges. It may be hard to tell an old road that is overgrown from a trail unless you inspect it closely. Most types of heavy equipment can travel on a forest access road that has been maintained.
The Nova Scotia Department of Natural Resources (NSDNR) uses a class system to rate forest access roads ranging from high-quality, two-lane "A" class roads to low volume "D" class roads. Most small woodlot roads used for transporting wood are "D" class roads. A "D" class road is a permanent, single lane road designed to carry a loaded tractor trailer at low speeds (15 km/hr) up to five times a day. It is meant for use in dry conditions (summer and fall) or when frozen. The recommended maximum length is 2.4 km (1.5 miles). If your destination is further than that, you may want to consider building a "C" class road that leads to the "D" class roads.
WHY HAVE ROADS AND TRAILS?
Roads and trails may be built for harvesting and transporting wood products, for recreation and/or to access certain sites on the woodlot for other reasons.
Harvesting and transporting wood products
Woodlot roads and trails are often built so woodlot owners can harvest and transport wood products such as saw logs, pulpwood, firewood, and Christmas trees.
 |
|
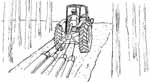
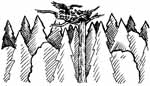
Tractor on an extraction trail pulling logs
|
Trails allow skidders, forwarders, tractors or horses into the stand being harvested to skid (drag) or transport trees out to roadside landings. They are known as extraction trails or skid trails. They may lead to a grub road or feed directly onto the forest access road. Some trails are used many times a year, some every few years and others may be used only once depending on the type of harvesting activity being done.
A "D" class road allows harvesting equipment and cutting crews to drive to the work area which saves time and money. It reduces extraction distance and allows tractor trailers or other trucks onto your woodlot to pick up the wood and transport it to market.
Recreation
Although woodlot roads and trails are often built for harvesting, they may be used more often for recreation. People like to use trails for a variety of outdoor activities like hiking, skiing, snowmobiling and bird watching. Some of your roads and trails may be more suitable for recreation than others.
 |
|
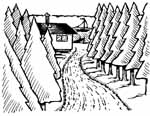
Road leading to cottage on a lake
|
You may want to build a trail, alter an existing trail or create a trail network specifically for a recreational activity you enjoy. Building trails for recreation is discussed briefly in Lesson Six. If recreation is your main objective, then Module Nine on Woodlot Recreation will help you plan your trails.
You are less likely to build a road solely for recreation due to the high cost. Roads built for other purposes, however, are often part of a recreational network.
Access
Trails and roads may be built to access a certain site on the woodlot. For example, you may cut out a trail so you can walk to a favourite look-off or fishing hole. You may build a road to a gravel source so you can extract the gravel for your own use or to sell. Or you may want to build a cottage on a special site on your woodlot and need a road to deliver the building materials and for future access.
Other uses and benefits
Roads and trails have other not-so-obvious uses and benefits to the woodlot though it is unlikely they would be built only for these reasons.
Roads allow large fire trucks to get onto your woodlot in case of a fire. The fire trucks can fill up at fire ponds located along the road. Smaller trucks (one ton) loaded with water backpacks may also be able to get closer to the fire using roads and trails. The firefighters can then use trails to carry the packs to the fire edge. Roads also act as fire breaks.
Insects and diseases can cause extensive damage to your woodlot. A system of trails allows you to monitor areas of your woodlot to catch problems early and cut or treat the stand.
Roads and trails can be expensive to build but increase the value of your woodlot if you decide to sell. Also, a good road and trail system can mean a higher stumpage rate to the landowner which can help offset the road cost. It should be noted, however, that road construction does take land out of production.
YOUR OBJECTIVES
List your woodlot objectives if you have not done so already. Your objectives are determined by what is on your land and your woodlot priorities. Your immediate objectives may also be determined by possible land uses next to your existing road system. For example, if your road ends next to a stand that has potential as a shelterwood, developing that shelterwood may become your next objective.
Exercise One
Check off your immediate objectives for upgrading or building your new road or trail. "Other" objectives might include preserving an old historic trail or coach road that crosses your property.
__ Harvesting sawlogs
__ Harvesting pulpwood
__ Harvesting fire wood
__ Christmas tree production
__ Maple syrup production
__ Maintaining boundary lines
__ Recreation
( Describe_______ )
__ Access to specific sites
( Describe_______)
__ Other________
MULTIPLE USE
You may only have one objective at present. For example, you may want to harvest a mature stand that extends one km (0.6 miles) past the end of an existing road. A new road into this area with extraction trails will do the job. However, you may have a few different objectives as listed above for needing a new road or roads. In that case, you will need to consider a few questions such as: Which objective is most important? Do I need more than one road? Which road will I build first?
 |
| The Young's woodlot shows how important it is to know your woodlot and to plan ahead. This is discussed more in the next lesson. |
Example
The Young brothers have a maintained road on their woodlot that leads to a Christmas tree lot. Their main objective is to expand the Christmas tree operation and they would like to extend the existing road another half kilometre. Another objective they have is to build a cottage on the river which would require a one kilometre road. This route would branch off from the existing road close to the end. A short distance along this proposed route is a gravel source. Further along is an area with small patches of mature timber.
After reviewing the options, they decide to build the longer road first (road option 2). The gravel will provide a useful road surface. Cutting the mature timber will provide immediate funds to help offset the cost of the road. They plan to build the Christmas tree extension road next year and use the available gravel to surface it.
Lesson Two - Planning Ahead
Many problems in road building can be avoided by planning before construction begins. This means more than just deciding where it is going to go. There are many factors to consider including your objectives, cost, security, terrain and environmental guidelines and standards. This module will help by providing a step-by-step review of these factors.
Planning is essential to the success of your new road or trail. What can happen if you fail to plan? Plan to fail as one road expert says. For example, a road could get washed out if not properly built. You could fail to discover the best route for your road. Fish habitat could be ruined by erosion from your road. It is important to balance cost with a road that meets your needs and will hold up for the long run.
Knowing your woodlot
It is important to be aware of the existing roads and trails, forest stands, contours, waterways, wetlands, and soil composition on your woodlot.
 |
|
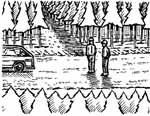
Explore your woodlot at various times of year to determine the best road location.
|
A map indicates many of these features but not all. Aerial photos can also be helpful in identifying forest stands, hidden roads and other features. Also refer to your management plan and map if you have one. Property maps, topographic maps (1:10,000 and 1;50,000), and aerial photos are available from the Land Information Centres. See Appendix B for more contact information. You will also need to spend time exploring your woodlot to be aware of features that may not be on a map/photo or new since the map/photo was made.
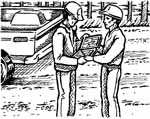
Explore your woodlot and proposed road location at various times of the year. Some areas that are passable in summer may be impassable in winter and spring due to wet conditions. Observing water flow during the wet season and after a heavy rain is important to proper placement of culverts. Visit after leaves have fallen and before buds have opened for better visibility. Take note of trees and other vegetation growing in different areas of the woodlot. They can indicate the type of soils and drainage.
Example
Mr. Green decides to upgrade an old road. He wants to use it for harvesting and for year-round access to a future cabin. There are no signs on his map of wet areas. Previous visits have always been in summer and fall. He snowshoes in over the winter and discover a two metre drift across an 100 m open area. In the spring, he walks the same route and finds a muddy section created by spring thaw that would sink a truck to the axles. The road is always dry in summer and fall.
He does some research and decides that a snow fence will reduce the drift enough to allow a plow to pass. He thinks about building a new road around the muddy area but it will be quite expensive. In the end, he decides that he will not drive the road during the spring when the road is impassable.
A TIME LINE
The time line below lists the steps involved in planning and constructing your road and the time required. It is dictated by seasonal conditions. The best time for building a road is from mid-summer to mid-fall when the ground is likely to be firmer and drier, and nesting season is over.
An important fact to note at this point is that you may need to allow a full year or more from when you begin constructing your road to when you can use it.
Winter/Spring
Get woodlot maps, scout woodlot looking for wet areas, use this manual to plan and locate your road, read Environmental Standards and Stream Crossings (see Appendix A), check into financing and funding sources, (see Cost below), arrange for a contractor to build your road, and get necessary approvals.
(Approvals are required for any alteration to a watercourse or wetland from the Nova Scotia Department of Environment and Labour. After planning your road, you and/or your contractor will know what approvals you need to apply for. This is discussed more in Lesson Four.)
Summer/Fall
Flag road centre line and side lines; cut out and grub roads; deliver culverts and bridge materials; install culverts and bridges; build roads, landings, turnouts and turnaround; use road
or
Winter
Let road settle and harden especially if build with wet, uncompacted materials
Spring
Begin harvest or other use after spring break-up when ground conditions have dried
Road building is expensive and may affect how much road you can build and when. The cost of building a "D" class road depends on the terrain and soil in your part of this province and the length of road you need. Road building conditions vary greatly in Nova Scotia. Sometimes slight changes in location can mean large changes in cost.
In ideal conditions, the average cost could be as low as $3,000 per kilometre. This could easily double if you have to import gravel for your road surface. It can be much higher if your planned route is rocky or swampy.
The value of timber removed from the road area could reduce the cost of the road. An excavator costs from $80 to $120 per hour. To get some idea of the cost per kilometre for your woodlot terrain, contact a local contractor, or your local Department of Natural Resources office. Once you know how much road you need, you will be able to calculate the approximate cost of your road.
Financial Assistance
Many woodlot roads in Nova Scotia have been built with some financial help from the Road Access and Gas Tax program run by the Forest Products Association of Nova Scotia. This program, funded by the provincial government, has been helping woodlot owners build and upgrade "D" class roads since 1967. Some conditions apply such as past woodlot use and the proposed use of the new road.
To apply for road assistance, you need be a member of the Association. For approved applications, the assistance rates are determined annually by a Gas Tax/Access Road Committee and will be based on available funds and the number of applications received. In 2000, the program funded 135 kms of new roads and 292 kms of road upgrades. Applications are usually approved in the same year they are submitted. The woodlot owner pays the contractor and is reimbursed by the Association.
For more information on this program, contact the Association at (902) 895-1179 or visit their web site at http://www.fpans.ca/index.aspx.
Financial help may increase the length of road you can afford and allow you to build a longer road than initially planned that will better service your long-term objectives.
GETTING HELP
 |
|
Most woodlot owners will need help building their road.
|
Some woodlot owners may be able to build the road themselves. This depends on the time you have available, your level of knowledge, your equipment and the difficulty of your road.
Most woodlot owners will be more involved in the planning process than in actual construction. You will likely need outside help for building your road. You may use the services of a forester, technician, road contractor and/or a forestry contractor. Contact your local Group Venture if you are a member or your local Department of Natural Resources office for help with planning and road layout. Find a contractor in your area who has a good reputation for woodlot road building. You may want to tender the work and get several quotes based on the road length. A basic contract should include a diagram of the road, right-of-way width, grubbing, ditch slopes, turnouts, landings, culverts, bridges and other relevant specifications.
Here is a possible arrangement:
| 1. General road location | > | You |
| 2. Road layout | > | You and a technician or a road contractor |
| 3. Road construction | > | A road contractor |
| 4. Trail construction | > | A forestry contractor or yourself |
Module 11 - Lesson One Quiz
| Questions: | 5 |
| Attempts allowed: | Unlimited |
| Available: | Always |
| Pass rate: | 75 % |
| Backwards navigation: | Allowed |
Module 11 - Lesson Two Quiz
| Questions: | 5 |
| Attempts allowed: | Unlimited |
| Available: | Always |
| Pass rate: | 75 % |
| Backwards navigation: | Allowed |
Lesson Three - Choosing a General Location
Lesson One covered what roads are and why we need them. Lesson Two discussed when to build your road and who will do the work. In this Lesson, we begin to plan where to build your road and choose a general location. The exact layout of the road is determined by the terrain and environmental factors which are covered in the next Lesson.
You may already have a good idea of where your road needs to be. It may be a case of extending or branching off from an existing road to reach a new work area. For other woodlot owners, there may be other considerations that are not so obvious. The shortest route may not always be the best. Five factors to consider at the start are reviewed below.
Exercise Two
First, make a few copies of your woodlot map including the immediate area around it. Using your collection of maps and aerial photos, draw in pencil all existing roads and trails on your woodlot. Draw in all stream and wetlands that you know of if not already on the map. Include usable routes as well as old ones. Then draw all public roads that cross or border your lot. Finally draw any roads on neighbouring woodlots that come near or up to your boundary. Some research on the ground and on the phone is recommended to make sure that you have up-to-date information.
Going back to your objectives in Lesson One, circle the area(s) that you want to reach.
One : Extension or upgrade of existing roads on your woodlot
Look at the existing road system on your map. Does it meet your immediate objective? If so, what is the condition of the road? Does it need to be upgraded? Is it practical to extend it or branch off to the planned work area? Can all or part of it be used or should it be retired? Sometimes, going from an old, low standard trail to a good quality, long-term forest access road can cost as much or more than a completely new road in a better location.
Two: Using nearby roads
Building a long road is expensive and may not always be necessary if the area being harvested is close to an existing public road. It may be cheaper to build a short road in from the public road rather than a long one extending from another part of your land. Is this an option for you? An approval from the Nova Scotia Department of Transportation and Public Works (DOTPW) is required to connect a private road to a public road. Adequate sighting distances and night visibility are necessary. Contact your local DOTPC office.
 |
|
One option for accessing your woodlot may be to use a neighbouring road.
|
If the area you want to reach is close to a neighbour's woodlot road, you may want to consider asking your neighbour for a legal right-of-way. It may come with a price. Make sure your neighbour's road is adequate for your proposed use and will continue to be. Another option for two or more neighbours that need a road is to cooperate in building one that extends across each property. This is called a common road and is generally a class "C" or better.
If you don't know who owns the land, information on land ownership can be obtained from the Land Information Centres (Appendix B). Information on getting a legal right-of-way across Crown Land can be obtained from the Land Administration Branch of NSDNR at 424-4267.
Three: Security
Building and upgrading roads and trails means easier access to the woods and this may attract more people to your woodlot for recreational use. This brings up three issues: privacy, liability and vandalism.
If privacy is important to you, you may want to install gates and No Trespassing signs. Be aware, however, that the public do have the right to use unmanaged, private, forested land for recreational purposes in Nova Scotia under Protection of Property Act, Section 15. The landowner can sue, however, under Common Law for unlawful entry.
More visitors also means more potential liability to the landowner. Liability refers to your responsibility if anyone gets hurt. As a landowner, you have various responsibilities to the visitor depending on the nature of their visit as listed in the chart below. For more information on trespassing and liability, see Module Nine, Woodlot Recreation, Lesson Five.
| Visitor | Occupier's responsibility |
|
Trespasser On the property without permission |
Occupier Must not act intentionally to cause harm to visitor or act with reckless disregard for the safety of the visitor. |
|
Licensee On the property with permission but no benefit to occupier |
Occupier Must take reasonable measures to protect visitor from hidden or unusual dangers that occupier knows of. |
|
Invitee On the property with permission and of benefit to landowner |
Occupier Same as above plus dangers occupier ought to know of |
Garbage dumping and destruction to buildings and equipment may also become an issue if access to your property is improved. A growing problem is the cutting and theft of valuable trees. Again installing gates and No Trespassing signs may be helpful. Gates should be well marked with luminous reflectors and there should also be signs ahead sometimes from both directions warning of the gate.
 |
|
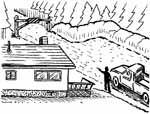
Locating your woodlot road close to your house can provide more security.
|
These issues may affect where you decide to locate your road. If security is a major concern for you, you may want to design your road system so there is only one entrance for vehicles. If you live on your woodlot, you may want to locate that access next to your home.
Four: Long-term objectives
Review your long-term objectives that may require more road and trail networks in the future. Some of these may be five, ten or even twenty years ahead. Make a note of these future needs. Locate them on your map in a different colour. Considering long-term as well as immediate objectives may change your road location.
Five: Terrain
Terrain is a big factor in the layout of your road (next Lesson) but it may also be a factor in choosing a general location. Try to avoid areas that have steep hills and gulches, large rock outcrops, wetlands, and poor soil drainage.
Example
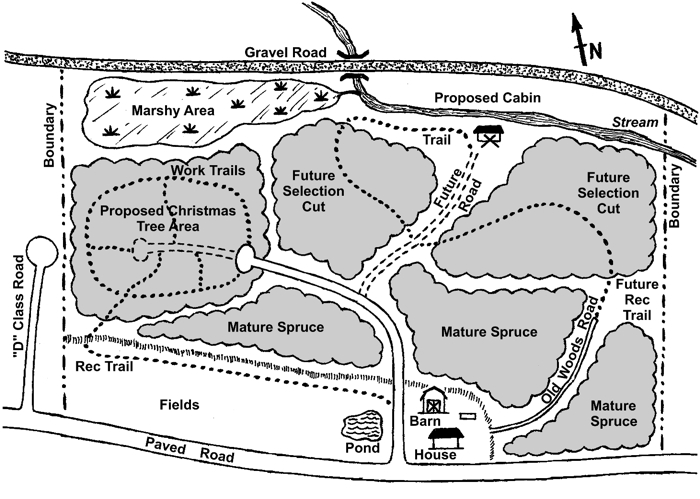
The MacDonald family recently bought a 150 ha (370 acre) woodlot where they now live (see map). The lot is an old farmstead with 10 ha of cleared fields, a .5 km old woods road and a network of old trails. Some of the land is mature spruce that grew up in the fields. The lot has some stands of mixed woods that would be good for selection cutting of sawlogs and firewood. There is a large area suitable for Christmas trees.
 |
|
The MacDonald woodlot
|
Their immediate objective is to develop a Christmas tree lot. In the future, they would also like to build a camp on the back of their land. Another long-term objective is to have a network of trails suitable for cross country skiing and horseback riding.
To meet their objectives, they get familiar with the entire lot at various seasons and locate all existing roads and trails and wetlands on a map. The short, unused road is not close to the proposed Christmas tree area. A public road to the north provides closer access, but there is a large marsh in the area. A neighbour's Class "D" road comes even closer, but they realise that a Christmas tree operation requires frequent visits and decide not to rely on a right-of-way road.
They consider building a road directly in from the paved road to the south but have some concerns about security. They do not mind people using their woodlot for recreation but they are very concerned about vandalism and tree theft. They decide to build a new road that begins next to their house to have some control over who is entering their woodlot. This requires a long 1.5 km road back to the Christmas tree area, but the road will service branch roads in the future for skiing and riding.
Exercise Three
Looking at your map, consider each of these five factors as it relates to your woodlot. It may be necessary to get more information. Do these factors affect where your road will be located?
Module 11 - Lesson Three Quiz
| Questions: | 1 |
| Attempts allowed: | Unlimited |
| Available: | Always |
| Pass rate: | 75 % |
| Backwards navigation: | Allowed |
Lesson Four - Planning Your Layout
Woodlot terrain is the major factor in determining the layout of your road. Environmental concerns and protecting wildlife also need to be considered. Wildlife refers to all forms of organisms and their habitat including wild plants, invertebrates, microorganisms, fish, amphibians, and reptiles as well as birds and mammals.
ENVIRONMENTAL CONCERNS
1 Erosion
Poorly constructed roads are the major cause of erosion in the forest. When top soil is removed, the natural filtering action of the soil is lost and rain water is not absorbed. Water flow builds up on roads, trails and in ditches picking up soil particles and causing erosion. The soil particles may then flow into wooded areas and natural water courses causing siltation damage. This siltation can take months or even years to clear up.
Erosion can also happen after road and trail construction from the use of harvesting equipment and motorized recreational vehicles. These machines can compact the soil so water is not absorbed by the soil. If used in wet conditions, they can create ruts. These ruts become channels that collect and concentrate runoff that may find its way into watercourses.
 |
|
Impassable road washed out by erosion
|
Most of us have, unfortunately, seen examples of erosion in the woods such as washed out roads, trails and ditches, deep ruts, silty streams and wetlands filled with mud. Silty water running along ditches and into streams and ponds can ruin water quality and destroy wildlife habitat. A muddy wetland may no longer support the ducks, frogs and the many other plants and animals who lived there. Siltation may reduce the oxygen available to wetland plants and fish.
Control of surface runoff is by far the most important aspect of road construction both for the road itself and the environment. If the erosion is serious enough, the road may become impassable. Like a chain, a road is only as good as its weakest link.
During layout, observe water flow along the route to plan for the right size of culverts in the right places. (Also note water flow during spring run off and after a heavy rain). Proper building techniques to control runoff are discussed further in the next lesson. They may increase your road cost at the start but will save you money in the long run by reducing repair costs and lost access time.
 |
|
Avoid nesting sites when locating your road.
|
Protecing the environment protects your investment.
2 Loss and fragmentation of habitat
Habitat refers to the environment a plant or animal needs to survive. This can be a forested area, clearing or a wetland. The habitat that certain plants and animals need may be reduced by road construction. Loss of habitat may mean the loss of certain creatures on your woodlot. On land, nesting sites, dens, deer yards, rare plants or other critical sites could be destroyed. Certain small amphibians or reptiles may not cross over rocky or muddy road surfaces so their habitat will be limited or broken up. Larger mammals will have less habitat and less cover for traveling from area to area.
 |
|
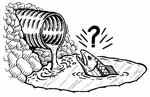
This culvert is installed too high above water level for fish to travel.
|
Many species are dependant on watercourses for habitat and travel. Some animals won't travel through culverts that are too long or dark. Fish as well as reptiles, amphibians and smaller mammals will use culverts if they are big enough and properly installed. Arches or bridges that maintain a natural stream bed may sometimes be more effective for fish travel.
Wetlands
Wetlands serve to filter and clean water as well as providing vital habitat for certain forms of wildlife. Road construction can be especially destructive to wetlands. It may divert water from a wetland or flood it or both if the road divides the wetland. Siltation resulting from road erosion can destroy a wetland. Some fragile plant habitats like bogs may be altered or lost forever.
In most cases, it is best to avoid wetlands since it is not practical or environmentally sound to build there. If crossing a wetland is unavoidable, you will first need to get approval. (See Necessary Approvals).
Protecting wildlife
Many woodlot owners enjoy the variety of plants and animals on their woodlot and do what they can to support them. A useful resource for improving wildlife habitat on your woodlot is Module Four, Woodlots and Wildlife .
New regulations called Wildlife Habitat and Watercourses Protection Regulations became law in January, 2002.
Call your local DNR office or visit http://www.gov.ns.ca/natr/forestry to learn more about them. The regulations do not permit extraction trails within 7 m (22 ft) of the watercourses, unless the stream is being crossed with an acceptable crossing (see Streams).
Find out about sensitive wildlife sites on your woodlot. You may want to contact your local DNR wildlife biologist to check out your woodlot with you. DNR has a Significant Habitat and Species Database for the entire province. Consult with local residents if you are new to the area. Your management plan may also refer to some special sites.
Exercise Four
Mark any special or sensitive wildlife sites on your map. Try to avoid these sites as you locate your road. You may even decide to shorten your road or link with a neighbour or public road to reduce habitat loss.
NECESSARY APPROVALS
and NOTIFICATIONS
Wetlands
Approval is required from the Nova Scotia Department of Environment and Labour (DEL) for any alteration or in-filling of a wetland. A decision is made within 60 days of receiving a completed application. The wetland is evaluated in terms of its importance to wildlife, rare species, groundwater and other values. Approval is only given if the wetland is not considered significant for these values or under special circumstances.
Watercourse alterations
Approval is also required from DEL for any alteration to a watercourse caused by the construction of a bridge, temporary crossings, culverts, causeways, dams, dredging, or placement of erosion protection.
No approval is required for culvert installation below a certain size between June 1 and September 30. The maximum size is 1.8 m (6 feet) in diameter for a pipe culvert, 3 m (10 feet) for an arch or open bottom culvert and 18.3 m (60 feet) in length. However, the landowner must still notify DEL of the intent of work to be done. This is a separate form and does not require an approval although DEL may be in touch if they have reason to believe that an adverse effect is possible.
Application forms are available from DEL. You and /or the contractor will have a better idea of what permits you need after you layout the road. Contact your local DEL inspector if you are uncertain if approval is required for a specific site on your land.
If approved, you must adhere to the legal conditions and specifications for each activity. You can be fined for not getting approvals or for not following the specifications.
Approval is required under the Environment Act, Activities Designation Regulations, Division One, Water Approvals. Wetland alteration approval comes under Division Six, Other Approvals Section 1b and is discussed further in the Wetlands Directive. The legislation is on line at www.gov.ns.ca/enla. You can link from there to the Environment Act.
TERRAIN
Below is a list of features to avoid and features to include as you lay out your road. A map will provide a good starting point but most of the layout will need to be done on site. Your layout may involve some compromises between these various features.
Features to avoid during layout
Wet areas
As much as possible, avoid areas where drainage is poor such as bogs, swamps, and marshes. The soil in these areas is muddy and does not make good road building material. Road cost may be considerably higher if extra fill or artificial materials are needed. It is also potentially damaging to the environment. Be aware of special techniques for building a road in a wet area. Some of these are listed in the next lesson.
 |
|
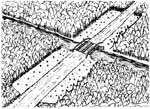
No-grub zone at stream crossing
|
Streams
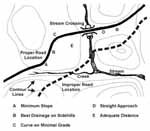
Avoid crossing streams if possible. Bridges add cost and erosion can be a problem. Lay out the road as far as possible from a stream or river to absorb any runoff. Try not to locate roads within 400 m (1312 ft) of a river or lake. A road should only come close to a waterway if leading to a stream crossing.
If you must cross a stream, be aware of the standards for road construction near waterways. A no-grub buffer zone of 30 m (98.4) is recommended between the road and stream if the slope is between 0 and 10 % and more if the slope is greater. Locate your road so that traffic approaches the bridge in a straight line. In most cases, this means the road will be close to a right angle to the stream. A low approach slope is also desirable. Locate your road at a narrow, straight, stable part of the stream which is less prone to erosion than a curve and will require a shorter bridge.
Rocky areas and fragile sites
Avoid areas with excessive boulders and rock outcrops and fragile sites with thin or sandy soil.
 |
|
Proper and improper road location
|
Features to include during layout
High ground
High ground, side slopes and valley routes each have advantages and disadvantages. Roads located on high ground will have fewer stream crossings and better drainage and require less maintenance. They also have less soil disturbance and therefore fewer culverts and less cost.
Side slopes may contain good construction materials and the soil cut out from the hillside can be used to build the roadbed. Use side slopes that are not too steep (a side slope of less than 20% is best; this means a 20 m of rise over 100 m of distance). River valleys have a low gradient but the road may be too close to the water and get washed out.
Gentle slopes
As much as possible, layout your road over gently rolling terrain where most slopes are less than 12 %. Steep slopes increase erosion problems resulting in higher maintenance costs. They may also be too steep for some vehicles. Follow the contour of the land to avoid sharp drops or climbs. If a steep slope is unavoidable, lay out the road in a zigzag pattern.
Try not to locate your road on a long, level stretch because of drainage problems. A long straight stretch may also be less visually appealing than a winding road.
Flatter areas for curves
Road curves are safer when located in flat areas rather than steeper slopes. Curves need to be wider than straight sections to allow for turning (minimum radius of the curve should be 50 m).
Suitable building material
As you lay out your road, check on the soil composition along the route. Most roads will be built from materials located along the way. For road building, the top soil is removed and the underneath layers are used. Some soils make better roads than others and it is important that you and/or your contractor recognize which are best. A well-graded gravel is the best material though few areas of the province have this type of soil. Well-graded till is fairly common and works well as a road base if it is well compacted. Small, angular gravel works better than round gravel or larger rocks. Sand, silt and clay are less desirable.
A basic guide for determining soil type is available from the Forest Engineering Institute of Canada (FERIC) called The Dirt on Gravel: identifying soils you can use for road construction. This eight page brochure contains some simple tests you can do at home on your woodlot soils. See Appendix A for ordering information. Do not use slate containing sulphide as a building material since it releases acid into waterways. Some areas of the province including parts of Halifax and Lunenburg Counties contain these acid-producing slates.
Points of interest
You may want to layout your road to take advantage of views, waterfalls and other natural points of interest along the way.
Exercise Five
Review each of these features as they relate to the general location you selected for your road in the last lesson. Do they affect your location choice in any way? If so, you may need to find a new location that is a better compromise. Draw a possible road layout with these features in mind using the information on your map (contour lines etc) and your knowledge of the woodlot.
FLAGGING
Now you are ready to flag your road. Your selected route may get some more fine tuning as you apply it on site. You may want to do this with a technician or contractor. Mark the centre line and side lines of the proposed route with flagging tape or fluorescent paint. To avoid confusion, it is recommended that you use one colour for the centreline and another colour for the side lines. Mark where culverts and bridges need to be located and note how many you will need. Be sure to add this to your overall cost and apply for approvals.
Landings, turnouts and turnarounds
Landings, turnouts and turnarounds should also be flagged when you do your layout. Turnouts for passing should be planned every 500 m (1640 ft). They can be easily built at high points on the road.
A landing is a flat area where the wood is piled to be picked up later by a tractor trailer, tandem truck or whatever. Plan your landings to minimize skidding or forwarding distance (see lesson six.) Landings can also be located on grub roads. Put your landings along a level stretch of high ground if possible. There are different ideas about where to put landings along hill slopes. The high side may be easier to drive off but water flow may be blocked by the landing. For this reason, some prefer to put the landing on the low side so that water drains away naturally.
 |
|
Turnaround spur
|
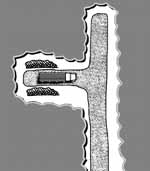
Turnarounds are usually located at the end of the road and need to be large enough to allow a tractor trailer to turn. If the turnaround is also to be used as a landing, make the area big enough for the wood piles and turning. Another way for trucks to turn completely is to build a short spur about 40 m deep off the left side of the road about 40 m from the end. This allows the trucker to back into the spur and see it from the driver's side.
Exercise Six
After you flag the road, make a note of any changes to your road layout on your map.
In summary
Try to avoid:
Sensitive wildlife sites
Wet areas and streams
Rocky areas and fragile sites
Try to include:
High ground
Gentle slopes
Flat areas for curves
Suitable building materials
Module 11 - Lesson Four Quiz
| Questions: | 10 |
| Attempts allowed: | Unlimited |
| Available: | Always |
| Pass rate: | 75 % |
| Backwards navigation: | Allowed |
Lesson Five - Building Your Road
Now you have a layout and your approvals, it is finally time to hire a road contractor and begin building. This is best done from mid-summer to mid- fall when conditions are dry. This lesson provides an overview of how to build a road. It gives you a basic understanding so you can discuss the road plan and work underway with the contractor. It also looks briefly at stream crossings and road maintenance.
For more details, read the booklet Environmental Standards for the Construction of Forest Roads and Ponds in Nova Scotia.
(See Appendix A).
In the previous lesson on layout, the message was "Stay away from the water." Now that construction is underway, the message is "Get the water away." This is done through proper use of ditches, culverts, building materials and grading to allow good drainage of water away from the road as soon as possible. The goal is to allow water to flow along its natural course rather than be blocked by the road.
The contractor's equipment should be in good working order and not leaking oil, hydraulic fluid or fuel into the soil or waterways. Adding fluids or refueling should be done at least 30m from a watercourse. The contractor should be knowledgeable about ways to reduce erosion while the road is under construction and have on hand a spill control kit to absorb fluids in case of an accident. The spill kit should include a selection of absorbant materials to contain an oil or chemical spill.
In the event you need additional help cleaning up a spill, you can call the NS Department of Environment and Labour at 1-800-565-1633 which deals with spills and other environmental emergencies. You may also want to become familiar with the Emergency Spill Regulations under the Provincial Environment Act that may apply should a spill occur.
STEPS IN ROAD BUILDING
A road is built in small sections beginning with cutting the trees, grubbing or removal of debris, ditching, installing culverts, building the base and crown, and grading. It is best to preplace any needed culverts and bridges along the route so they can be installed as the road is built. Ideally, culverts should go in as soon as possible to handle runoff immediately and protect the watercourses.
As each section is more or less complete, the machines can move on to the next section and begin grubbing. The grubbing distance should be no more than 200 m (656 ft) ahead of the finished road behind it. If you must build in wet areas, it involves some special techniques that are reviewed last.
Cutting the trees
The first step is to harvest the trees along your route. This corridor is called the right-of way. For a "D" class harvesting road, the recommended width of 12 m (39 ft) is three times wider than the road itself (4 m or 13 ft) to leave room for ditches and back slopes. This width also allows the sun in to dry the road and permit good visibility on turns.
 |
|
Cross section of a road
|
Aesthetics or how the road looks is also an important consideration for some landowners. They may prefer a scenic road with large trees close to the road edge and hanging branches overhead. A narrower right-of-way may be enough on roads that will only be used during dry and frozen conditions. Also a road used only for recreation or access may not need so wide a right-of-way.
If fewer trees are cut and fewer stumps removed, there is less potential for erosion. Also, less habitat will be lost. However, keep in mind that trees left close to the road will have more roots damaged during construction and may be prone to wind throw.
Grubbing
Grubbing refers to the removal of stumps, organic soil, rocks and slash along the route. This is done with a bulldozer and/or excavators. Excavators, (large back hoes) are more effective in wet areas.
Sometimes the stumps are piled up along the edge of the right-of-way. This looks unsightly and can block entrance into the woods by machines and cutting crews. Sometimes the stumps and rocks are used to fill in dips and holes in the road. This may be quicker and cheaper but does not create a good quality road as they settle and rot.
A preferred method for grubbing is to dig a hole off to the side of the road ahead of the excavator. On a slope, use the downhill side. Put the soil removed from the hole behind the excavator to build up the road. Then put the stumps and rocks in the hole, cover with top soil from the road ahead and compact it. Build it up high to allow for settling and later operations. This method creates a more stable and attractive road.
While you have the excavator on site, it may be cost effective to have the operator do other work such as digging ponds, or digging test pits for good building material along the way.
Ditching
Ditches help to divert water from the road and dry it out. They may be required on both sides of the road, one side of the road on hill sides, or not at all (in areas that are well-drained all year). The side of the ditch away from the road is called the back slope. The side next to the road is called the embankment and it should have a slope not more than 2:1 to hold the road in place. Material from the ditches can be used to build up the road if it is suitable. The depth of the ditch depends on the height of the road but should be at least 45 cm (1.5 ft).
Water should not flow along a ditch for a long distance or it will cause erosion. It should be directed away where needed by take-off ditches and cross culverts. Take-off ditches deposit the water in an area where the silt can settle out without damaging the environment. They should not be located near any watercourses. Digging a small settling pond or placing a straw bale at the end of the take-off ditch will also help to collect the siltation.
Installing culverts
Cross culverts may be needed under a road to direct water flow from the high side to the lower side. They may also be used where side roads and trails join the main road.
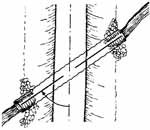
There are specifications for culvert diameter, length, material and installation that your road contractor should know. Most culverts are 18' (5.5 m) long but may need to be longer if placed at an angle under the road (See Illustration 19). Sixteen inch (40 cm) diameter culverts are a better minimum size than 12 inch (30 cm) culverts which can ice up more easily.
The depth and type of fill covering the culvert need to be considered. Use good quality fill that will not wash away and avoid large sharp rocks that might puncture the culvert. In general, cover the culvert with one foot of fill for every foot of culvert diameter. It is very important to properly compact the soil used for backfilling around culverts. Use of culverts in streams is discussed under Stream Crossings.
 |
|
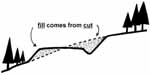
Cut and fill on a slope
|
Cutting and filling
Levelling off the road route will require some in-filling and some levelling off. On a slope, this can be done by digging out material on the uphill side and placing it on the downhill side to form the road. This is called a cut and fill. Cut and fills should be completed in layers of about 30 cm (1 ft) thick with the excavator or dozer running over each layer. This helps in soil compaction and will produce more stable fill slopes.
A long, continuous grade should be avoided. It lets water build up as it flows downhill and can cause erosion along your road surface. A small groove called a waterbar may be dug on the road surface to divert water out of a rut and into the ditch. A road grade of 3-5% is best and should not exceed 12%.
Building the base and grading
The base of your road (or infrastructure) is built from available material and should be higher than the ground next to it to provide good drainage. Using good quality material and compacting the road are both important to a successfully built road.. Compacting the road is done with heavy equipment. It helps prevent frost heave and road softening. It is best to compact the road before winter, let it settle and add the final surface of natural gravel (or foundation) in the spring after break up. If the gravel is added before winter, you may need to do it again in spring adding to your cost.
The crown is the slight upward slope from each side of the road to the middle. It is important to crown the road surface especially on long grades so the runoff is diverted into the ditches. The recommended crown is 10 cm (4 inches) in a "D" class road.
Grading is the final levelling off to create a smooth road surface. It is done using a grader or dozer. Be sure to leave the crown.
Building in wet areas
If building in a wet area is unavoidable, select a narrow location to cross it. Unlike the rest of the road, this work should be done in winter in frozen conditions. In shallow swamps (1 m or less), remove the organic mud and replace with suitable fill. In deeper swamps, do not remove stumps after cutting trees. Between the root mat and the roadbed fill, place brush, logs or geotextile fabric to stabilize the road.
It is vital to ensure that water can flow between the two sides of the road keeping the levels and exchange as natural as possible. This is done by using a sufficient number of culverts. Place these in areas where the mud is less deep to lessen siltation, and to prevent the culvert from sinking into the wetland.
STREAM CROSSINGS
If your road must cross a stream, you have three options: 1) a round or 2) arch culvert , or 3) a bridge. What you use depends on the width and location of the stream. Some basic information is provided here. For more detail, see Woodlot Roads Stream Crossings by Glen Brathwaite, available from the DNR library. This excellent 34-page guide contains technical information on such things as culvert size selection and many helpful illustrations.
Temporary fording while building
On-going travel directly through a stream can cause serious and permanent damage. However, a few crossings through the stream may be unavoidable when clearing and grubbing your road.
Try to cross where the stream bed is stable. If not possible, lay down logs or brush or some non-toxic material to protect the bed and remove afterward. Leave wood to be picked up after the bridge is built. The contractor should have on hand a temporary bridge so fording is unnecessary.
Culverts
Most culverts are round pipes usually made of corrugated metal and sometimes wood or plastic. Plastic culverts are recommended in areas where the rock produces acid. Box culverts are three-sided and made of wood. They come in a variety of widths and lengths.
 |
|
Skewed culvert under road
|
Picking the right size depends on many factors such as the watershed, the size and slope of the stream, composition of the stream bed and fish travel. Culverts may need to be placed at an skewed angle to best align with the natural flow of water. The proper slope for the culvert depends on the overall length.
In general, pipe culverts can be used on small streams. However, water speed is increased in a culvert and fish may find it hard to travel up them. Box culverts, arches or even bridges may be needed to maintain a natural stream bed for plant and fish health. Flat rocks laid in the stream bed at the exit, known as an apron, may help reduce erosion.
As mentioned before, it is very important to use good quality fill and compact the soil around the culvert. In some places, two or more culverts may be needed.
 |
|
Bridge parts
|
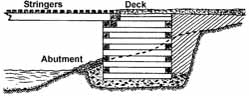
Bridges
A bridge may be needed over larger streams or where heavy use is planned. A bridge consists of the abutments, stringers and a deck. During initial construction of abutments, it may be necessary to prevent erosion by diverting the water in the stream. This is done using temporary dams called coffer dams and diversion channels. It may also be necessary to use this technique for culvert placement if too much water is present.
Approvals from DEL will be needed for this kind of work. Be sure to leave a no-grub zone with take-off ditches extending 30 m (100 ft) from the stream banks.
Temporary bridges or crossings may be needed for extraction trails across smaller streams. This may be as simple as logs chained together and laid on a brush mat. Another option is to put a log on the bank on either side of the stream to act as abuttments. More logs or planks are then laid between the logs and attached. This structure can be taken apart when harvesting is complete or you may choose to leave it for recreation or access. Some operators use larger, portable metal crossings.
MAINTAINING YOUR ROAD
Once your road is built, you will need to maintain it to keep it useable, and protect your investment and the environment. This involves keeping the road surface smooth and crowned, and ditches clear of larger vegetation.
If a road is no longer needed or wanted, you can take out culverts and rebuild natural watercourses.
 |
|
Design your ditches wide enough for a bush mower.
|
Mowing
The ditch slopes may need to be mowed with a bush mower every five years or so. If possible, design your ditches wide enough for a bush mower, and try to keep ditches free of rocks and stumps to make mowing easier and safer. If not, they may need to be cleared manually with a clearing or chain saw. Regular use of the road should keep the road surface clear.
Seeding
Vegetation like grasses or vines should be encouraged along ditch slopes and bottom to stabilize the soil and prevent erosion. If natural cover does not occur, you may need to have the slopes artificially seeded or use brush mats or hay bales. Slopes created by cutting and filling should be stabilized quickly.
Grading
Occasional regrading by a grader or dozer may also be necessary if the road becomes too uneven through erosion or you can fill the potholes. A new layer of gravel may also be helpful but is expensive on a long road.
Removing debris
Remove any blowdown or debris that may have fallen on the road during a storm or from old age. It is also necessary to check your culverts from time to time to remove debris that may be built up at the entrance, inside or at the exit.
Going public
An option, if you plan on regular, heavy use of the road and want to be spared the maintenance, is to go public. This means turning over a section of road to the province who will then grade, plow and maintain it for you. First you need to apply to the Department of Transportation and Public Works. It is not guaranteed that your application will be accepted or only part of the road may be accepted. You will need to upgrade the road to certain DOTPW standards before handing it over. See address in Appendix B.
Module 11 - Lesson Five Quiz
| Questions: | 10 |
| Attempts allowed: | Unlimited |
| Available: | Always |
| Pass rate: | 75 % |
| Backwards navigation: | Allowed |
Lesson Six - Locating and Building Trails
The layout of your trail system depends on its use for harvesting, recreation or access. Some trails may be designed for more than one use. This Lesson deals mainly with harvesting trails.
HARVESTING TRAILS
Trail layout
A harvesting trail network is designed so that skid trails or extraction trails feed into grub roads or winter roads or directly onto the "D" class road. Winter roads are meant to be used only when frost hardened. In winter, the trails and roads can support heavy machines and wet areas are frozen. Grub roads may only be needed where there are long extraction distances. Overall design is decided by the size and shape of the area to be cut, the terrain, environmental concerns, existing road layout and the skill level of the cutting crew.
The landings may be located on the grub road or the "D"class road or where the two meet. This depends on your road network and if the vehicle transporting the wood to the mill can travel on the grub road or only the "D" class road. A smaller truck may be able to reach landings on a grub road that a large tractor trailer cannot.
Your extraction trail layout depends first of all on whether you plan to clear cut or thin a stand. It is also depends on whether you plan to skid or forward the wood. In a skidding operation, full length, delimbed trees are dragged by a skidder, horse or tractor along a skid trail and the grub road to a landing. With the forwarding method, a felled tree is cut into shorter logs that are piled and later loaded onto a forwarder or tractor with a pulp loader and driven out to the landing.
 |
|
Possible skid trails in a patch cut.
|
The next section deals with skid trails and forwarding trails in a clearcut, and then skid trails and forwarding trails in a thinning. Trails for clearcutting are generally used only until the clearcut is finished whereas trails for thinning could be used over many years for repeat treatments.
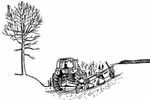
Skid trails in a clearcut
Doing a clearcut using skid trails is known as face cutting. Trees on one side of the trail are dropped in a backward diagonal to allow easy skidding out. Then cutting is done along the new "face" of the trail. This is repeated until the area has been cut. Don't skid logs on the main road since this tears up the road, and gets soil on the logs and causes environmental damage. Keep skidding distance to a minimum while ensuring that trucks can reach the pile for pickup.
 |
|
Forwarding trails in a clearcut
|
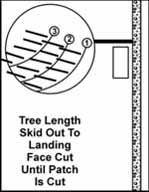
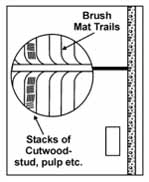
Forwarding trails in a clearcut
Doing a clearcut with a forwarder is called trail cutting. Trees are cut into short lengths and stacked in piles of pulpwood or stud wood to create rows separated by trails. The branches are laid between the rows to make brush mat trails driven over by the forwarders. This trail may curve where it joins the grub road to allow easy turning. A rule of thumb for the cutting area width (two rows and one brush trail or one row and two brush trails) is 2/3 the height of the trees.
Skid trails in a thinning
The trails are angled in a herringbone pattern to create a minimum turn angle when dragging tree length logs from the skid trail onto the grub road. Generally the distance between trails should be 60 m (200 ft) or less which gives a maximum 30 m (100 ft) skidding distance out to the trail. Longer skidding distances are possible in certain
 |
|
Skid trails in a thinning
|
situations if your cable is long enough. If the trail cannot follow this pattern because of obstacles in the terrain, remember to consider skidding distance on both sides of the proposed trail. You may want to create a recreational loop by extending a thinning trail back to the road.
Forwarding trails in a thinning
In general, these trails should be 20 m (66 ft) apart in general to reduce the distance the crew have to carry the log to the trail for pickup by the forwarder.
 |
|
Forwarding trails in a thinning
|
Skid trails on slopes
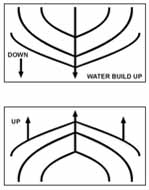
On gentle slopes (less than 10%), layout trails to skid trees uphill where possible. It is easier to skid trees downhill than uphill but downhill skid trails channel water, causing erosion. Try to avoid too much repeat use of the main trail. On slopes more than 10%, design the skid trails to go across the slope where possible (particularly if there are small flat areas) to disperse the water and skid downhill as little as possible. Try to locate landings on high ground where possible.
 |
|
Downhill and uphill skid trails
|
Trails versus roads
For harvesting purposes, the woodlot owner has to balance how much road to build versus how much trail. A grub road is cheaper to build than a "D" class road but a long grub road will require more time and therefore more expense to transport the logs to the landing.
It is also important to consider if the network will be used over many years or only once. A grub road may not hold up as well as a "D" class road resulting in more repairs and downtime. If a large amount of wood is to be harvested, it may be more economical in the long run to build more main road and less grub road.
Environmental concerns
The environmental considerations for a road apply when building a trail or grub road. Try to avoid wet areas, sensitive wildlife habitat and do not block water flow. You may need to install a culvert, a log bridge or other temporary or permanent structure. Harvest during freeze up or in the dry season. Proper location of trails will help reduce damage to the environment caused by skidding and forwarding.
Trail system for a large harvest
Harvesting on small woodlots in Nova Scotia is often done in small patches of suitable wood. The trail network may be fairly simple. In a large clearcut or thinning, some extra thought to possible layouts may save money and stress to the environment.
Exercise Seven
Below are three possible road and trail layouts for a large harvest using a skidder. Which one do you think is best? Why? Consider the various factors discussed so far such as locating roads and landings on high ground, skidding uphill, keeping roads and bridges to a minimum and efficient skidding distance.
| 27. Three road/trail layouts | |
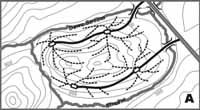 |
Plan A:2 bridges, 4 landings, 3 km of grub road |
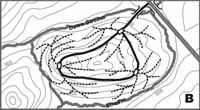 |
Plan B:1 bridge, 3 landings, 3.5 km of grub road • Loop road unnecessary |
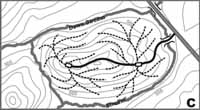 |
Plan C: 1 bridge, 2 landings, 2 km of grub road C IS THE BEST PLAN |
Other harvesting activities
In a Christmas tree lot, trails may be built throughout the area so a trailer can circulate to pick up trees. These trails are also used for access to shear and spray the trees. A maple syrup operation also has a trail system to allow access on foot for tapping the trees and cleaning and repairing the lines. Vehicle movement is limited because of the line network at chest height. In both types of operations, it is usually easy to walk in between the trees since the area has been brushed out to some extent.
A selection cut will require a good trail network that allows access to single trees or clumps that are cut every 5-20 years. Since all these types of trails are used on an on-going basis, you may decide to build better quality trails than you would for a clearcut.
Trail construction
Grub roads may be planned and cut out by the forestry contractor though some woodlot owners may tackle it themselves. On a grub road, a small dozer or tractor is used to remove surface material, rocks and stumps after the wood has been removed. This type of road is quicker and cheaper to build than a "D" class road as the grubbed material is usually just pushed off to the side. Once use is finished, you may want to seed it in to prevent erosion.
Extraction trails are cut out as used and may be twisty and follow the route of least resistance around or over rocks and stumps. Low spots may be filled in with brush or other materials
RECREATIONAL TRAILS
As mentioned in Lesson One, trails built for harvesting are often used for recreation. Some of these trails will be better for recreation than others. Dead end extraction trails in a clearcut or thinning may be improved for recreation if extended into a loop. You will need to move slash to keep a trail open or create a new one.
You may also want to create loops for recreation using existing trails in a shelterwood, selection cut or Christmas tree stand. Refer back to the sample woodlot map on Page 15. These stands are more visually appealing than a clearcut and have constant cover. Be careful not to damage new regeneration.
If you plan on using an area for recreation after harvesting, this should be considered when you locate your extraction trails and grub roads. You may decide to adapt harvesting trails so they are suitable for a particular activity like snowmobiling. Or you may want to build or upgrade a old trail specifically for recreation. See Woodlot Recreation Module Nine for layout requirements for specific recreational activities and basic construction methods.
ACCESS TRAILS
You may need a trail mainly for access to a special site on your land. Travel may be by foot, bike, ATV, or other vehicles suitable for trails. It may be longer than a harvesting trail and a straight route rather than a loop.
However, the most direct route may not be best. As with the road location, you may want to consider various ways of approaching the site based on neighbouring roads and trails and security issues. Try to avoid excessively steep and wet areas. You may want take advantage of views and other special spots along the way.
TRAIL MAINTENANCE
 |
|
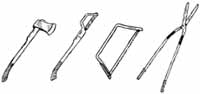
Axe, brush axe, brush hook, cross cut saw, and anvil pruners are all useful for maintaining trails
|
Your trail network needs to be maintained and repaired if repeat use is planned. Keep the trail clear of blowdowns using a chain saw or crosscut saw. Trim branches and small trees along the sides of narrow recreational trails using a saw, pruners, brush hook or axe. Look for damage from erosion and redirect the water flow or clear obstructions as necessary. Wider trails could be mowed with a bush hog pulled behind a tractor. They may be easier to maintain if ditches are placed on the high side.
Exercise Eight
Get out your map. It should include all existing and proposed roads on it. Mark in any existing trails. It should also have areas circled that you want to reach for harvesting, recreation and other access. Both immediate and future objectives should be included. Use this map to design your trail network. Grub roads for harvesting will be laid out ahead by the contractor. Extraction trails will be cut out at the time of harvesting.
You will need to answer the following: 1)Which of these trails can be used for your immediate objectives? 2)Which ones can be upgraded? 3)What new trails will be needed? 4 )Can I lay out the trails for multiple use?
Conclusion
Building your woodlot roads and trails can be a long process that involves much planning, information gathering and decision making. It pays off, however, in a long-lasting, well-made, environmentally sound road and trail network that will best serve your present and future needs.
Module 11 - Lesson Six Quiz
| Questions: | 10 |
| Attempts allowed: | Unlimited |
| Available: | Always |
| Pass rate: | 75 % |
| Backwards navigation: | Allowed |
Appendix A : References
Available from the DNR library (902) 424-8633:
-
Environmental Standards for the Construction of Forest Roads and Fire Ponds in Nova Scotia, Nova Scotia Department of Environment and Labour, Updated in 2002.
-
Forest Access Roads, Planning and Construction Manual, prepared by Steve Talbot, 1982, revised in 1991. Published by the Nova Scotia Department of Natural Resources (NSDNR)
-
Home Study Module Four - Woodlots and Wildlife, NSDNR
-
Home Study Module Nine - Woodlot Recreation, NSDNR
-
Woodlot Roads and Stream Crossings, Glen Brathwaite, 1993. NSDNR
-
Forestry/Wildlife Guidelines and Standards for Nova Scotia, DNR, 1988
-
Proper Planning for the Initial Location of Small-Scale Roads, FERIC (Forest Engineering Research Institute of Canada) Field Note 54.
-
Design Considerations for Small Scale Roads, FERIC Field Note 55
-
The Dirt on Gravel: Identifying soils you can use for road construction, Advantage series, Vol. 1, No.11, May 2000. Published by FERIC.
- FERIC Notes - See Roads and Bridges series for 2-page technical reports on new equipment, building materials, culverts, arches, bridges, etc
Other useful publications:
- Fish Habitat Care and Trout, Salmon and Silt, Fisheries and Oceans (Canada) (902) 426-3760
- Contractors and Operators. Best Management Practises Manual, Nova Forest Alliance (902) 639-2921
Recreational trail web sites:
-
A Forest Landowner's Guide to the Internet - Recreational Trail Design and Construction
www.na.fs.fed.us/pubs/misc/ir/index.htm
-
Pathways for People - Trail Design to Minimize Environmental Damage and Enhance User Enjoyment http://www.ces.purdue.edu/extmedia/FNR/FNR-121.html
-
Recreational Forest Trails: Plan for Success
www.ces.ncsu.edu/nreos/rrea/rectrailstoc.html
Appendix B - Information Sources
FERIC - Eastern Division
580 boul. Saint-Jean, Pointe-Claire, Quebec, H9R 3J9
Phone: (514)0694-1140, E-mail: admin@mtl.feric.ca
For maps, aerial photos, and registry information:
Land Information Centres
Main office
Service Nova Scotia and Municipal Relations (all counties)
2nd Floor, 5151 Terminal Road,
PO Box 2205
Halifax, NS B3J 3C4
Phone: (902) 424-2735
Web site: www.gov.ns/ca/snsmr
Lawrencetown (Digby, Annapolis, Kings, Hants)
Phone: (902) 584-2053
Bridgewater (Yarmouth, Shelburne, Queens, Lunenburg)
Phone: (902) 634-7577
Pictou (Cumberland, Colchester, Pictou, Antigonish)
Phone: (902) 485-4223
Sydney (Guysborough and Cape Breton)
Phone: (902) 563-2281
Amherst (Nova Scotia Geomatics Centre)
1-800-798-0706 (in NS only)
Digital mapping, nautical charts, national topographic maps, specialty maps such as canoe routes, geological maps, soil reports aeronautical charts.
Nova Scotia Department of Environment and Labour
Main office
5151 Terminal Road, PO Box 697
Halifax, NS B3J 2T8
Phone: (902) 424-5300
Web site: www.gov.ns.ca/enla
For local offices, see web site or call main office.
Nova Scotia Department of Natural Resources
Main office - Founders Square
1701 Hollis Street
Halifax, NS B3J 2T9
Phone: (902) 424-5935
Web site: www.gov.ns.ca/natr
For local offices, see web site or call main office.
Nova Scotia Department of Transportation and Public Works
Main office
1672 Granville Street,
Halifax , NS B3J 3Z8
Phone: (902) 424-2297
Web site: www.gov.ns.ca/tran
For local offices, see web site or call main office.
Forest Products Association of Nova Scotia
430 Marney Road, Hilden (Colchester County)
Mailing Address: PO Box 696, Truro, NS B2N 5E5
Phone: (902) 895-1179
E-mail: nsfpa@nsfpa..ns.ca
Web site: www.nsfpa.ns.ca
Appendix C - Glossary of Terms
Abutment: A bridge foundation
Break up: The period in late winter/early spring when the frost leaves the ground and the road is soft
Cofferdam: A water tight area built in a stream and pumped dry to prevent erosion and silt entering stream while building the bridge abutments and other structures
Cross culvert: A culvert that allows the water to flow under the road from the high side to the low side
Crown: The slope of a road (cross section view) which is slightly higher in the centre to direct water off the road
Embankment: The ditch slope that forms the side of the road
Erosion: The movement of soil particles by the action of water, wind or temperature
Grade: The degree of rise or fall in slope of a road, land or watercourse. A gentle grade would be around 5%. This means a 5 m of rise over 100 metres of horizontal distance. A much steeper grade would be 30% or a 30 m rise over 100 m.
Grubbing: The initial removal and disposal of stumps, slash, rocks and other materials along the route where the road will be built.
Landing: A clear, level roadside area where harvested wood is piled until it is picked up by a tractor trailer
No-grub zone: An area of no grubbing for 30 m on each side of a watercourse
Porter: A machine with a flat bed and grapple used to load and transport 2-4 cord of wood from the cutting site to the landing
Skidder: A harvesting machine with big tires and steel cable winches used to drag whole logs from the cutting site to the landing.
Snowfence: A line of small softwoods or a mesh net along an exposed section of road used to catch snow before it builds up on the road
Stringers: Timbers laid between and on top of abutments on a bridge.
Stumpage rate: The rate per cord paid to a landowner or woodseller by the forestry contractor
Take-off ditch: A ditch that diverts water from a road ditch and into a vegetated, settling area
Waterbar: A small groove in a road or trail surface used to divert water running down the surface into a ditch and away from the road or trail
Watercourse: The bed and shore of every river, stream, lake, creek, pond, spring, lagoon, or other natural water body and all ground water
Wetland: Land that is saturated or covered by water long enough to promote wetland processes and plant and animal life adapted to a wet habitat.
Downloads
As the Home Study modules become available copies will be made available for download. At this time only the Introduction - Getting More from your Woodlot, Module 2 and 9 are available in French.
| All modules are currently available in English and some in French |
Adobe Acrobat
Acrobate D'Adobe |
| Principles of Forest Stewardship | Download |
| Introduction: Getting More From Your Woodlot |
English Francais |
| Module 1: Introduction to Silviculture | Download |
| Module 2: Harvesting Systems |
English Francais |
| Module 3: Thinning for Value | Download |
| Module 4: Woodlots and Wildlife | Download |
| Module 5: Stand Establishment | Download |
| Module 6: Chainsaw Use and Safety | Download |
| Module 7: Woodlot Ecology | Download |
| Module 8: Wood Utilization and Technology | Download |
| Module 9: Woodlot Recreation |
English Francais |
| Module 10A: Managing Woodlot Finances:Planning and Investment Guide | Download |
| Module 10B: Introduction to Woodlot: Income Tax and Estate Planning | Download |
| Module 11: Roads & Trails: Planning it Right from the Start | Download |
| Module 12: Small Scale Harvesting Equipment | Download |
| Module 13: Non Timber Forest Products: Growing Opportunities | Download |