Lesson Four - Maintenance
MAINTENANCE
Too often a good saw is ruined despite detailed maintenance instructions found in the operator's manual. Neglecting the manual's advice will not only result in shorter saw life but will also cost you money and increase the chance of injury during saw operation. You have payed good money for your saw. Read the manual and look after it!
Maintenance checks can be done daily, weekly, and monthly. Obviously, certain items should be checked more often than other items.
In this lesson, we'll discuss daily maintenance and only briefly maintain the weekly or monthly maintenance.
DAILY MAINTENANCE
Checks are best conducted at the end of the day when work is completed. If something major is found it can be repaired before the next day.
Daily maintenance shouldn't take a lot of time. The items to be included are:
![]() Guide Bar, Chain and Sprocket
Guide Bar, Chain and Sprocket
Remove the bar and chain. Inspect the bar for damage or abnormal wear (e.g. chain entry and bar rails). Clean the groove with an appropriate tool. Be sure to clean the chain oil holes in the bar and saw
Check the operator's manual for instructions on lubricating the nose sprocket. Some sprockets may not require greasing.
![]() Before reassembling, examine the chain and inspect the drive socket for abnormal wear. Clean the clutch cover to remove sawdust or debris from the chain brake mechanism. Turn the bar over to maintain equal wear on both sides.
Before reassembling, examine the chain and inspect the drive socket for abnormal wear. Clean the clutch cover to remove sawdust or debris from the chain brake mechanism. Turn the bar over to maintain equal wear on both sides.
 Engine Area
Remove the top cover to clean two important areas.
First, ensure the cylinder fins on the engine block are clean. They are designed to help cool the engine. If the fins are dirty, heat is trapped. This can cause the engine to overheat and may result in engine failure.
 Second, clean the air filter. Of all the daily maintenance checks, the air filter is one of the most crucial. It is designed to remove dust particles from the air going to the motor. Dirty air filters can cause flooding, power loss and may even cause the saw to stop, A damaged filter will allow dirt to enter through the carburetor causing internal damage.
Improved technology on some newer chainsaws has greatly reduced the amount of dust particles being deposited on the air filter. These filters only require cleaning up to once a month.
Clean filters with either compressed air or warm soapy water. Carry a spare clean filter and replace daily. Generally, filters can be separated into two pieces. Compressed air should be blown outward through the screen to dislodge dirt particles. For a good cleaning, warm soapy water will be needed along with a soft, bristled toothbrush.
Rinsing the filter in clean unmixed gas is an alternative cleaning method, though not as good.
Finally, visually check the muffler mounting screws and the cleanliness of the screen. Screens (or spark arresters) are required by law. They reduce sparks that may come from the engine. It may be necessary to clean this screen, especially when the saw is new. Cleaning is rarely needed once the saw has been "broken in".
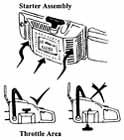 Starter Assembly
The starter side is not removed during daily maintenance. However, there are some item to check.
Ensure that air passages on the starter side are clean and will allow air into the saw. Remember, most of the air used by the engine is obtained from these air passages.
Pull the starter cord to check its condition. (Make sure the ignition switch is "OFF"). Look for worn sections and ensure it returns fully. The handle should sit upright when the cord is full returned. If not, readjust the spring tension.
Throttle Area
Although not a cleaning job, check the throttle and the throttle lock for proper operation.
Visually inspect all nuts and bolts on the saw. Frequently, bolts can loosen due to vibration. This is particularly true when the saw is new. Always keep a few extra bolts and nuts in your tool kit.
 Fuel Lubrication
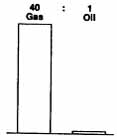
The chainsaw has a two stroke engine which requires blended fuel. The proportion of mix oil to gasoline varies according to the saw manufacturer's instructions. The most common ratio is 40-1 which represents 40 litres of gas to 1 litre of oil. For practical handling, 10 litres of gas are usually mixed with 250mL prepackaged container of mix oil.
Only use the manufacturer's recommended mix oil or another brand which meets the manufacturer's specifications.
Shake the container each time you fill the tank to reduce condensation buildup, especially in cold weather.
For overnight storage, fill the tank to reduce condensation buildup, especially in cold weather.
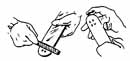
![]() Fuel is a highly flammable substance and should be handled carefully. Store it only in approved safety container and never expose it to flame or spark.
Fuel is a highly flammable substance and should be handled carefully. Store it only in approved safety container and never expose it to flame or spark.
Start the saw, let it warm up and finally check that the chain is receiving oil by holding the bar tip about 25 cm (10 in.) of a clean surface. Also verify that the chain brake is working properly.
Daily maintenance will take 10-15 minutes to complete but will assure you of trouble free operation the next morning.
WEEKLY MAINTENANCE
With the extra number of hours that a chainsaw operates during a week, maintenance must be slightly more detailed than the daily maintenance previously discussed.
These items to be checked weekly should be cross-referenced with your owner's manual which may have specific recommendations.
Spark Plug
Remove the spark plug from the engine block to check, clean, and if necessary re-set the gap to manufacturer's specifications. Always use a proper spark plug tool to remove the plug and a feeler gauge to measure the gap. Improper tools can cause cracks in porcelain and chips from the top shaft of the plug.
Do not over tighten the spark plug.
Starter Assembly
Remove the starter assembly to give the unit a good cleaning from the inside. Verify the condition of the starter cord.
Inspect the pulley and bearing for wear. Clean and apply light oil to the starter spring.
Take the opportunity to thoroughly clean the flywheel cooling fins. A screwdriver, pointed stick or similar device will be needed to remove the dirt, sawdust, and baked deposits which will not brush off.
A similar method may be required on the main engine block cylinders as well. However, do not cause breakage by forcing the cleaning tool between the vanes or fins.
Chain Brake Assembly
As with daily maintenance, the assembly must be removed from around the saw. Inspect the brake mechanism for excessive wear or cracks. Also grease the clutch bearing to provide lubrication between the bearing and the engine shaft. Check the manufacturer's instructions for further information. Some models can easily be greased with a grease gun while others may require specific procedures.
GUIDE BAR
The chain has to move around the bar in an upright position if it is to cut safely and efficiently. Therefore, the bar must be straight and the bar rails which support the chain must be maintained properly. Some of the most common causes of bar damage include:
-
Dull teeth force the chain to overwork and heat up causing burned spots.
-
Uneven top plate filing of the teeth will cause uneven wear to the bar rails.
-
Excessive bore cutting will cause wear to the guide bar nose (Note: Bore cutting is covered in Lesson Five).
-
A slack chain will hit against the bar causing burning and indentation to the underside of the bar nose.
-
Too much tension when the chain is running will cause the bar nose and bar rails to wear excessively.
-
If a tree should lean back on the bar, it could bend the bar or pinch the rails.
-
Lack of lubrication, improper tension, or a dull chain can result in excessive heating of the bar and may cause cracking and chipping of the rail.
To check for uneven rails, place a T-square or similar right angled tool against the guide bar.
You can repair uneven rails if the condition is not severs. Place a bar in a vise and use a flat file 20-30 cm (8"-12") with both hands. Remember to keep the file flat. Continue on one side then the other until the rails are even. The bar groove has a minimum depth equal to the depth of the drive link depth. Don't file the rails too low.
To check for thin rails remove the chain and sight along the guide bar rails. Thin rails are usually low. If the rails are thin and uneven, replace the bar.
 Burrs caused by normal use or running a dull chain may be removed by filing. The bar should be placed on a flat surface and file must be held flush with the surface of the bar to ensure a right angle at the rails. Failure to do this or filing at an incorrect angle will round the edges of the rails.
If you have excessive wear, check the list of causes of bar damage and correct the problem before you use the saw.
GUIDE BAR DAMAGE CHART

CHAIN
The chain can make or break the usefulness of the chainsaw. The chain must be sharpened properly and maintained regularly to ensure efficient and safe operation.
Suggestions for sharpening the chain have already been discussed in Lesson three. However, there are other parts of the chain that should be examined.
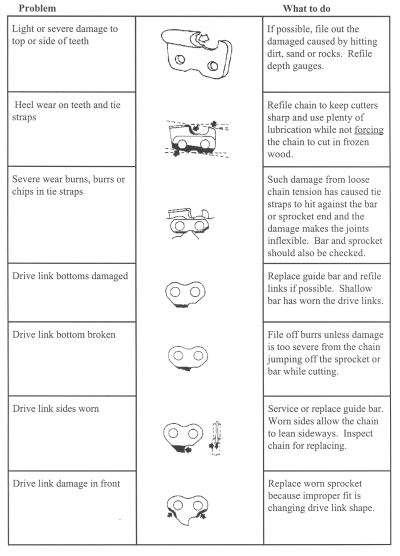
Check for wear or damage on the teeth, tie straps and drive links. Most damage to these chain parts is caused by either improper chain tension or poor sharpening methods. Some damage can be can also be caused by the chain coming in contact with material other than wood.
To check for specific wear problems, refer to the chain damage chart. Damage can usually be traced back to the source of the problem for proper correction. When actual cracks appear in any of the parts, however, the parts or chain must be replaced.
CHAIN DAMAGE CHART
CARBURETOR
The carburetor is one of the most important parts of the chainsaw. It controls the performance of the engine and ultimately the cutting efficiency of the saw. Unfortunately the carburetor is usually the first thing operators check when the saw isn't operating properly. Without careful inspection, however, adjusting the carburetor can cause more harm than good.
Do not adjust the carburetor when something is wrong. Generally, the carburetor will rarely need adjustment once it is set properly.
There are other parts of the saw that should be checked first. These include:
| Air Filter: | This is the most common problem of "suspected" carburetor problems. Clean the filter on a daily basis. |
| Fuel Filter: | If the filter plugged or restricting the fuel? |
| Air Vent: | Is the vent plugged? |
| Fuel Line: | Is it cracked and allowing air into the fuel mixture? Has the line collapsed? |
| Fuel Tank: | Is the gas tank full? Does it have properly mixed fuel? Has dirt or water entered the tank and moved through the line to the carburetor? |
| Screws: | Have the screws holding the carburetor to the engine block vibrated loose? |
| Gaskets: | Has the gasket between the carburetor and engine shifted or deteriorated? |
| Spark Plug: | Is the plug properly seated and the gap set properly? Is the wire or harness worn cracked or loose? |
Now that you have inspected the above items and are confident that they are not the problems, the carburetor can be adjusted.
Setting the Carburetor
Adjusting the carburetor is not easy. Some individuals have developed the ability to set the carburetor by ear. These individuals are more the exception than the rule. This is particularly true of new lighter chainsaws where the speed of the chain is more important than the torque of the engine. As such, the rpms of the engine have a narrower "window" of operation. Anything above this range will cause the saw to run too lean and eventually cause premature engine failure. A tachometer is needed to correctly set the rpms of the engine.
The following is a general procedure for setting a diaphragm carburetor. Remember, all settings and sometimes the procedures for setting a particular chainsaw must follow the manufacturer's recommendations.
| 1.a. |
Using the correct size screwdriver, turn the HIGH and LOW speed adjusting screws clockwise until they are seated. DO NOT ATTEMPT TO EXERT FURTHER PRESSURE OR THE NEEDLE VALVE SEATS MAY BE DAMAGED. |
| b. |
Turn the HIGH and LOW speed adjusting screws anti-clockwise by the amount recommended by the manufacturer. The saw should start at these settings. Start the saw and warm up the engine by making several cuts. |
| 2.a. |
Adjusting the Low Speed Jet It will be necessary to increase the engine speed by turning the throttle adjusting screw clockwise until a fast idle is achieved before starting this adjustment. With the saw running at a fast idle, turn the low speed adjusting screw very slowly in (clockwise) until the saw begins to falter. Turn the low speed adjusting screw very slowly out (counter-clockwise) through the point of fast idle until the saw begins to falter again. The fast idle point is generally half way between the falter points. Turn the low speed adjusting screw very slowly in (clockwise) until the fast idle position is reached. |
| b. |
Checking the Low Speed Setting Open the throttle quickly several times; if the saw picks up quickly without hesitation the low speed jet is correctly set. If it hesitates, turn the low speed screw slightly out (counter-clockwise) to enrich the mixture and check again. Turn the saw over onto its side; if the engine falters or stalls, close the low speed screw slightly until the fault disappears. |
| 3. |
Adjust the throttle adjusting screw to achieve correct idle ensuring that the chain does not move around the bar when the saw is idling. |
| 4.a. |
Adjusting the High Speed Jet With the throttle fully open, turn the high speed adjusting screw very slowly until the pitch of the engine noise rises to indicate maximum engine speed. Turn the high speed adjusting screw out slowly until the high pitched note changes into a deeper "bubbling" note. Finer adjustment will be required by turning the high speed adjusting screw in slightly while still maintaining the "bubbling" note of the engine. |
| b. |
Check the High Speed Setting The high speed setting can be checked by cutting into a log at full throttle. As the saw is cutting, (i.e. under load) the saw should run smoothly. IT IS IMPORTANT THAT THE SETTING IS NOT TOO WEAK. THIS WILL CAUSE THE ENGINE TO OVERHEAT AND CONSIDERABLE MECHANICAL DAMAGE MAY RESULT. |
| 5. |
Check both settings after 1-2 hours.
|
Spare Parts
Always carry spare parts with you at the job site. It will save you a lot of time and money rather than stopping work to drive to the nearest repair shop.
Generally, spare parts that will eventually be needed include:
Air Filter
New Saw Chain
Starter Rope (and handle)
Spark Plug
Extra Guide Bar Nuts
Extra Casing and Cover Screws
Starter Spring
Spare Files
You may want to expand this list to include other items you think are important. Some individuals like to carry an extra guide bar or sprocket. Sometimes, particular parts of a small engine may break. If so, you should add a spare to your spare parts bag.
Always carry your tool kit with you. Most new saws come equipped with a tool pouch providing the basic items to do minor repairs.