Lesson Five - Felling
Felling is the job of cutting a tree to bring it to the ground. As simple as it sounds, there are many factors to consider. It takes a lot of practice to put a tree where you want it and avoid causing unnecessary damage to the tree, the saw or injury to yourself.
 ASSESSING THE SITUATION
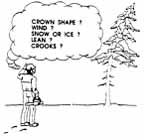
Take a few minutes to assess the tree you plan to fall. Some trees are more difficult to assess than others. However, since a large sawlog tree may weigh a ton, you must be confident of where it will be falling.
Although trees grow upright, few stand perfectly straight. A lopsided crown, broken top, dead limbs or prevailing winds can all affect the direction a tree will fall.
In addition to considering the above items, also check for ground debris and windfalls that may interfere. If a tree is hung up into another tree, get a machine to safely take it down or clearly mark the area for others to avoid.
 ESCAPE ROUTE
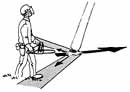
It is crucial to have an escape route available for every tree you fall. It is best established at a 45 degree angle diagonally backwards
Clear away brush and small trees from around the base of the tree to be felled. Avoid using the tip of the guide bar to reduce the potential risk of kick-back. A clear work area will ensure firm footing and no interference with your saw when making the notch and back cuts.
As you complete the backcut and the tree starts to fall, retreat into the escape route. Do not turn your back to a falling tree. In some cases, it may be necessary to make two escape routes.
Failure to properly assess the tree or move into an escape route has resulted in the deaths of several forest workers in Nova Scotia. Most accidents or fatalities are caused by carelessness or an error in judgment.
PRE-LIMBING
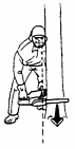
Prelimbing is the removal of the lower branches of a standing tree to permit easier felling.
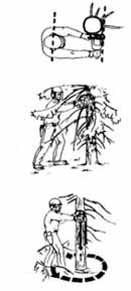
Hold your saw with the guide bar parallel to your shoulders and your arms slightly bent.
Keep the tree trunk between you and your saw. If kick-back does occur, the chain will be directed away from you. With heavy limbs, it may be necessary to begin prelimbing as shown below. Keep your body weight forward to hold the saw against the stem.
Always cut with a downward motion using the pulling chain (underside of the guide bar).
Never attempt to remove branches above shoulder height. Progress around the tree using full throttle each time a downward cut is made. When you finish, you should be in a position to begin the notch at the front of the tree.
The prelimbing procedure does appear to be awkward, but it is a safe and effective method used by trained forest workers. A demonstration by a competent worker would illustrate the merits of this method.
NOTCHING
A great deal of variance exists with the type of notch (or undercut) used for felling trees. Some are narrow, others wide, while some are just a saw cut placed without any purpose. Some people do not use a notch, thus exposing themselves to extremely hazardous situations.
There is a correct way to notch.
What is a Notch?
A notch consists of two cuts which meet exactly. It's made as low as possible at the base of the tree and toward the direction of fall.
 What is its Purpose?
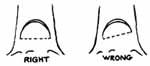
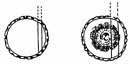
Notching determines the direction a tree will fall, and the openness of the notch determines how well the tree will be guided to the ground.
An open notch allows the tree to fall freely in the desired direction while still being attached to the stump by the hinge or holding wood (much like a door is guided by its hinges).
A narrow opening will close too soon and force the hinge to break off. The result will be a tree falling off-target and possibly lodging in another tree.
Many experienced forest workers attending training programs to upgrade their skills have said: "That new notching technique is a great improvement over the old way I've been doing it."
Basically it involves making the upper notch cut first and then the lower one. This is directly opposite to the traditional method most workers have learned.
How to do it
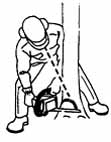
Work facing the felling direction. This allows you to saw the notch and the back (or felling) cut from the same side of the tree.
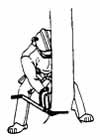
 Take up a firm stance slightly behind the tree. To help you work more comfortably, rest your left shoulder against the tree and if necessary, support you right arm on your right knee.
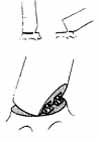
Grasp the left corner of the front handle to help make a 70-degree angle for the top cut. Line up the felling direction using the sighting lines on the saw.
Begin the top cut, make sure the cut is level and extends deep enough to make an adequate hinge.
With your left hand positioned midway along the side of the front handle, use the pulling chain to begin the bottom cut.
Keeping the guide bar horizontal, either begin to saw at the far end of the top cut and draw the saw toward you or saw from the near end and pivot the guide bar into the tree.
 To check that the bottom cut isn't made too deep, sight down the saw kerf of the upper cut.
 Both cuts should meet exactly. The depth of the notch should be approximately 1/4 of the tree diameter.
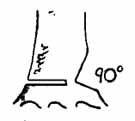
Note: Some workers prefer to make an angled bottom cut resulting in a 90-degree notch. This can be a useful technique when you need to control the tree over a longer range of its fall, for example, when felling a tree on a downhill grade.
THE BACK CUT
Now use the pushing chain on top of the guide bar to make the back cut. This cut should be level with or slightly above the bottom of the notch. This makes it easier to correctly judge the thickness of the hinge.
Begin the cut on the far side of the tree and complete it by pushing the engine forward toward the notch on the near side of the tree.
Insert your felling lever or wedge before the tree settles back and the saw kerf closes.
Be sure to leave sufficient hinge wood of even thickness to control the tree as it falls. One inch to a ten inch diameter tree is an approximate rule of thumb. However, thicker hinges may be required for trees with heart rot.
Withdraw the saw carefully and place it in a safe place. Use the felling lever, with your knees bent and back straight.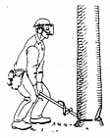
As the tree begins to fall, step into the escape route, watch out for any falling branches or tops.
As noted earlier, it is suggested that the notch and backcut be made from one general position. Although the technique is more efficient, it is also acceptable to cut the notch from the other side. This would be advisable if other trees or objects (eg. a rock or stump) interfered with notching from the suggested side.
This new notching technique will take a little practice, but once you've mastered it you'll be a safer and more productive worker.
TECHNIQUES FOR LARGER TREES
When dealing with trees of different diameters, the notching technique may have to be modified.
In the case of large diameter trees it will be necessary to cut the notch from both sides of the tree.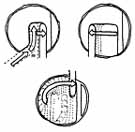
Trees with a diameter up to twice the length of the guide bar can be cut using the boring technique. After the notch has been cut, use the lower section of the guide bar tip to make a small cut in the tree. Once the cut is started, slowly straighten the saw to bore into the centre of the tree. When the bar is inserted completely, cut toward the hinge wood. Complete the backcut by sawing around the tree while leaving the proper hinge intact on both sides.
 Trees with a diameter greater than twice the length of the guide bar require an extra step. After the notch has been made, cut through the throat of the notch and remove the centre portion of the hinge. The diagrams show the correct procedure which still allows sufficient hinge wood to control the tree as it falls.
FOREST WORKER TOOLS
For years forest workers have used a wide range of peavies, pulp hooks, wedges and samsons to help make their work easier and safer. More recently, workers have been introduced to felling levers, hooks and tongs, and loggers' tapes. Used correctly, these tools simplify felling, thinning, and handling of wood.
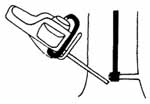
Felling Lever
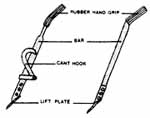
A felling lever is a bar made of tempered steel or light alloy. Several models are available, but all have the same basic design which includes a lift plate and a handle fitted with a rubber handle grip for greater safety. Small teeth on the front section of the lift plate dig into the stump and stop the lever from slipping out of the saw kerf. Some models have a cant hook to help with turning a stem or dislodging a hung-up tree.
 Felling levers are commonly 80 cm (32 in.) long. Steel models weigh about 2.5 kg (5.5 lbs.); those made of aluminum alloy are lighter but not nearly as rugged.
How Do You Use It?
Properly used, a felling lever can help prevent the saw from getting jammed in the tree, and make it easier to push a tree over. It won't take the place of good notching and felling, but it can improve your chances of landing the tree where you want without back strain.
 The lever is used after the notch is made and you're partly through the back cut. Stop sawing when there's enough space to insert the lift plate. Once in, it will prevent the tree settling back, closing the kerf and pinching the guide bar. Make sure the lever is pointing in the direction of fall, not at an angle.
Place the lever at the middle of the back cut and in as far as possible to maximize leverage. If necessary, cut away any thick bark so the lever is supported by solid wood. Taking care not to let the chain strike the lever, complete the back cut. Be sure to leave an adequate hinge.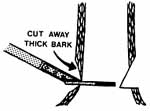
Now it's time to lever the tree over. To help distribute the load and to avoid strain, keep your back straight and knees bent --lift with your legs.
Keep both hands on the lever. When the tree begins to fall, always move back via the escape route.
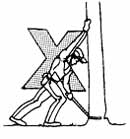 Never push on the tree with one hand while lifting with the other. Lifting in a twisted position is a sure way to a serious back injury.
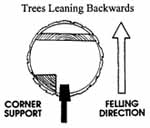
When felling trees upwind or against their natural lean, the felling lever can be invaluable. Cut a notch and make the back cut as illustrated. Be sure to leave a small unsawn corner for a support.
This will prevent the tree from settling back. Remove the saw and insert the felling lever. From the side of the tree, saw through the corner support at a downward angle to avoid hitting the felling lever. Lever the tree over as before.
 Get into the habit of using a felling lever. As you work, carry or toss it from tree to tree. You won't need to use the lever with every tree, but it will be handy when you do.
Pulp Tongs and Hooks
Pulp tongs and hooks have made woods work considerably safer and more efficient. The inventors of these tools have created extensions of our hands. No longer do we have to jam unsuspecting fingers while trying to lift slippery pulpwood or wrench our backs trying to lift while bending awkwardly.
 Tongs
Tongs
Tongs are used for grasping, holding or lifting pulpwood. Regular sized tongs can be used to lift wood with a diameter of up to 20-25 cm (8-10 in.).
Releasing the grip of the tongs from the wood requires a little practice. If they hold fast when you drop the wood, you or your tongs could end up on the pulp pile! To release the wood, use a quick pushing and twisting action. With practice, you'll learn quickly.
If you're willing to try the tongs even once, you'll understand why this tool has been so readily accepted by forest workers. Tongs come with a leather or vinyl holster which slips onto a belt for ready access.
 Hooks
Hooks
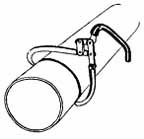
The pulp hook is a curved steel hook mounted on a handle. 'Two types are available. One has been used in Atlantic Canada since the 1930s. It is designed to lift four-foot pulpwood (but it is frequently used with eight-foot wood). It is approximately 30 cm (12 in.) long with the hook perpendicular to the handle. On some models, the tip is replaceable.
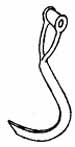
 The second type of pulp hook has a shorter history in Atlantic Canada. Used more frequently in Scandinavia than here, it was developed for rolling rather than lifting wood.
In contrast to the previous larger hook, this one has the handle and the hook in the same plane. As a result, any piece of wood with a diameter greater than 15 cm (5.5 in.) will fall out of the hook when lifted. This hook is designed to roll wood and it comes with a holster to be worn on your belt.
 This new hook is very good when used with modern silviculture systems. To learn its true advantages, however, you must commit yourself to learn how to use it. If you ignore the early frustrations, you will discover another valuable tool.
Here are a few suggestion on using the smaller pulp hook: 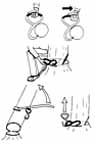
-
Hold the handle closer to the edge to improve your grip on the wood.
-
Being flat on both faces, the hook can serve as an emergency wedge to stop the tree from settling back and jamming your saw.
-
With a suitable felling lever, you can increase the leverage on hung-up trees. (Be careful not to bend the or break the hook).
- Using the pulp hook with another hook or tong, you improvise a crude felling lever.
Two Hooks
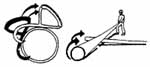
With the influence of Swedish forestry methods in the province, several forest workers now use two hooks instead of pulp tongs. This approach requires improved technique and careful practice. Lifting is more efficient because the weight is more evenly distributed on the shoulders than when using one hand with the tongs.
The hooks are held on opposite sides of the pulpwood stick, and at a slight angle, as shown.
To reduce the chance of injury, try this cautiously at first, or get a demonstration.![]()
Sharpening
Sharpening these tools, especially the hook, is crucial. Without correct sharpening they will be next to useless. New tools are rarely sharp when sold , so follow this sharpening guide (excerpted with permission from forestry instructor Pekka Harkonen's The Chainsaw--Use and Maintenance).
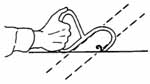 For the pulp hook, file the inside of the point flat, so that it will grip the wood securely. The inside of the point should be parallel to the front part of the handle. Bevel the outer edges of the point to create the sharpness. The shape of the point ensures that the hook always bites into the wood.

To check if the point is properly sharpened, pull the hook across a flat, wooden surface with both hands. The point should always bite into the wood. To maintain the correct shape of the point, sharpen by filing the bevelled, otter edges.
Pulp tongs are sharpened in a similar manner.