Lesson Four - Planning Your Layout
Woodlot terrain is the major factor in determining the layout of your road. Environmental concerns and protecting wildlife also need to be considered. Wildlife refers to all forms of organisms and their habitat including wild plants, invertebrates, microorganisms, fish, amphibians, and reptiles as well as birds and mammals.
ENVIRONMENTAL CONCERNS
1 Erosion
Poorly constructed roads are the major cause of erosion in the forest. When top soil is removed, the natural filtering action of the soil is lost and rain water is not absorbed. Water flow builds up on roads, trails and in ditches picking up soil particles and causing erosion. The soil particles may then flow into wooded areas and natural water courses causing siltation damage. This siltation can take months or even years to clear up.
Erosion can also happen after road and trail construction from the use of harvesting equipment and motorized recreational vehicles. These machines can compact the soil so water is not absorbed by the soil. If used in wet conditions, they can create ruts. These ruts become channels that collect and concentrate runoff that may find its way into watercourses.
 |
|
Impassable road washed out by erosion
|
Most of us have, unfortunately, seen examples of erosion in the woods such as washed out roads, trails and ditches, deep ruts, silty streams and wetlands filled with mud. Silty water running along ditches and into streams and ponds can ruin water quality and destroy wildlife habitat. A muddy wetland may no longer support the ducks, frogs and the many other plants and animals who lived there. Siltation may reduce the oxygen available to wetland plants and fish.
Control of surface runoff is by far the most important aspect of road construction both for the road itself and the environment. If the erosion is serious enough, the road may become impassable. Like a chain, a road is only as good as its weakest link.
During layout, observe water flow along the route to plan for the right size of culverts in the right places. (Also note water flow during spring run off and after a heavy rain). Proper building techniques to control runoff are discussed further in the next lesson. They may increase your road cost at the start but will save you money in the long run by reducing repair costs and lost access time.
 |
|
Avoid nesting sites when locating your road.
|
Protecing the environment protects your investment.
2 Loss and fragmentation of habitat
Habitat refers to the environment a plant or animal needs to survive. This can be a forested area, clearing or a wetland. The habitat that certain plants and animals need may be reduced by road construction. Loss of habitat may mean the loss of certain creatures on your woodlot. On land, nesting sites, dens, deer yards, rare plants or other critical sites could be destroyed. Certain small amphibians or reptiles may not cross over rocky or muddy road surfaces so their habitat will be limited or broken up. Larger mammals will have less habitat and less cover for traveling from area to area.
 |
|
This culvert is installed too high above water level for fish to travel.
|
Many species are dependant on watercourses for habitat and travel. Some animals won't travel through culverts that are too long or dark. Fish as well as reptiles, amphibians and smaller mammals will use culverts if they are big enough and properly installed. Arches or bridges that maintain a natural stream bed may sometimes be more effective for fish travel.
Wetlands
Wetlands serve to filter and clean water as well as providing vital habitat for certain forms of wildlife. Road construction can be especially destructive to wetlands. It may divert water from a wetland or flood it or both if the road divides the wetland. Siltation resulting from road erosion can destroy a wetland. Some fragile plant habitats like bogs may be altered or lost forever.
In most cases, it is best to avoid wetlands since it is not practical or environmentally sound to build there. If crossing a wetland is unavoidable, you will first need to get approval. (See Necessary Approvals).
Protecting wildlife
Many woodlot owners enjoy the variety of plants and animals on their woodlot and do what they can to support them. A useful resource for improving wildlife habitat on your woodlot is Module Four, Woodlots and Wildlife .
New regulations called Wildlife Habitat and Watercourses Protection Regulations became law in January, 2002.
Call your local DNR office or visit http://www.gov.ns.ca/natr/forestry to learn more about them. The regulations do not permit extraction trails within 7 m (22 ft) of the watercourses, unless the stream is being crossed with an acceptable crossing (see Streams).
Find out about sensitive wildlife sites on your woodlot. You may want to contact your local DNR wildlife biologist to check out your woodlot with you. DNR has a Significant Habitat and Species Database for the entire province. Consult with local residents if you are new to the area. Your management plan may also refer to some special sites.
Exercise Four
Mark any special or sensitive wildlife sites on your map. Try to avoid these sites as you locate your road. You may even decide to shorten your road or link with a neighbour or public road to reduce habitat loss.
NECESSARY APPROVALS
and NOTIFICATIONS
Wetlands
Approval is required from the Nova Scotia Department of Environment and Labour (DEL) for any alteration or in-filling of a wetland. A decision is made within 60 days of receiving a completed application. The wetland is evaluated in terms of its importance to wildlife, rare species, groundwater and other values. Approval is only given if the wetland is not considered significant for these values or under special circumstances.
Watercourse alterations
Approval is also required from DEL for any alteration to a watercourse caused by the construction of a bridge, temporary crossings, culverts, causeways, dams, dredging, or placement of erosion protection.
No approval is required for culvert installation below a certain size between June 1 and September 30. The maximum size is 1.8 m (6 feet) in diameter for a pipe culvert, 3 m (10 feet) for an arch or open bottom culvert and 18.3 m (60 feet) in length. However, the landowner must still notify DEL of the intent of work to be done. This is a separate form and does not require an approval although DEL may be in touch if they have reason to believe that an adverse effect is possible.
Application forms are available from DEL. You and /or the contractor will have a better idea of what permits you need after you layout the road. Contact your local DEL inspector if you are uncertain if approval is required for a specific site on your land.
If approved, you must adhere to the legal conditions and specifications for each activity. You can be fined for not getting approvals or for not following the specifications.
Approval is required under the Environment Act, Activities Designation Regulations, Division One, Water Approvals. Wetland alteration approval comes under Division Six, Other Approvals Section 1b and is discussed further in the Wetlands Directive. The legislation is on line at www.gov.ns.ca/enla. You can link from there to the Environment Act.
TERRAIN
Below is a list of features to avoid and features to include as you lay out your road. A map will provide a good starting point but most of the layout will need to be done on site. Your layout may involve some compromises between these various features.
Features to avoid during layout
Wet areas
As much as possible, avoid areas where drainage is poor such as bogs, swamps, and marshes. The soil in these areas is muddy and does not make good road building material. Road cost may be considerably higher if extra fill or artificial materials are needed. It is also potentially damaging to the environment. Be aware of special techniques for building a road in a wet area. Some of these are listed in the next lesson.
 |
|
No-grub zone at stream crossing
|
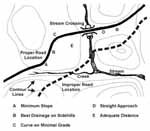
Streams
Avoid crossing streams if possible. Bridges add cost and erosion can be a problem. Lay out the road as far as possible from a stream or river to absorb any runoff. Try not to locate roads within 400 m (1312 ft) of a river or lake. A road should only come close to a waterway if leading to a stream crossing.
If you must cross a stream, be aware of the standards for road construction near waterways. A no-grub buffer zone of 30 m (98.4) is recommended between the road and stream if the slope is between 0 and 10 % and more if the slope is greater. Locate your road so that traffic approaches the bridge in a straight line. In most cases, this means the road will be close to a right angle to the stream. A low approach slope is also desirable. Locate your road at a narrow, straight, stable part of the stream which is less prone to erosion than a curve and will require a shorter bridge.
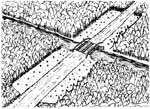
Rocky areas and fragile sites
Avoid areas with excessive boulders and rock outcrops and fragile sites with thin or sandy soil.
 |
|
Proper and improper road location
|
Features to include during layout
High ground
High ground, side slopes and valley routes each have advantages and disadvantages. Roads located on high ground will have fewer stream crossings and better drainage and require less maintenance. They also have less soil disturbance and therefore fewer culverts and less cost.
Side slopes may contain good construction materials and the soil cut out from the hillside can be used to build the roadbed. Use side slopes that are not too steep (a side slope of less than 20% is best; this means a 20 m of rise over 100 m of distance). River valleys have a low gradient but the road may be too close to the water and get washed out.
Gentle slopes
As much as possible, layout your road over gently rolling terrain where most slopes are less than 12 %. Steep slopes increase erosion problems resulting in higher maintenance costs. They may also be too steep for some vehicles. Follow the contour of the land to avoid sharp drops or climbs. If a steep slope is unavoidable, lay out the road in a zigzag pattern.
Try not to locate your road on a long, level stretch because of drainage problems. A long straight stretch may also be less visually appealing than a winding road.
Flatter areas for curves
Road curves are safer when located in flat areas rather than steeper slopes. Curves need to be wider than straight sections to allow for turning (minimum radius of the curve should be 50 m).
Suitable building material
As you lay out your road, check on the soil composition along the route. Most roads will be built from materials located along the way. For road building, the top soil is removed and the underneath layers are used. Some soils make better roads than others and it is important that you and/or your contractor recognize which are best. A well-graded gravel is the best material though few areas of the province have this type of soil. Well-graded till is fairly common and works well as a road base if it is well compacted. Small, angular gravel works better than round gravel or larger rocks. Sand, silt and clay are less desirable.
A basic guide for determining soil type is available from the Forest Engineering Institute of Canada (FERIC) called The Dirt on Gravel: identifying soils you can use for road construction. This eight page brochure contains some simple tests you can do at home on your woodlot soils. See Appendix A for ordering information. Do not use slate containing sulphide as a building material since it releases acid into waterways. Some areas of the province including parts of Halifax and Lunenburg Counties contain these acid-producing slates.
Points of interest
You may want to layout your road to take advantage of views, waterfalls and other natural points of interest along the way.
Exercise Five
Review each of these features as they relate to the general location you selected for your road in the last lesson. Do they affect your location choice in any way? If so, you may need to find a new location that is a better compromise. Draw a possible road layout with these features in mind using the information on your map (contour lines etc) and your knowledge of the woodlot.
FLAGGING
Now you are ready to flag your road. Your selected route may get some more fine tuning as you apply it on site. You may want to do this with a technician or contractor. Mark the centre line and side lines of the proposed route with flagging tape or fluorescent paint. To avoid confusion, it is recommended that you use one colour for the centreline and another colour for the side lines. Mark where culverts and bridges need to be located and note how many you will need. Be sure to add this to your overall cost and apply for approvals.
Landings, turnouts and turnarounds
Landings, turnouts and turnarounds should also be flagged when you do your layout. Turnouts for passing should be planned every 500 m (1640 ft). They can be easily built at high points on the road.
A landing is a flat area where the wood is piled to be picked up later by a tractor trailer, tandem truck or whatever. Plan your landings to minimize skidding or forwarding distance (see lesson six.) Landings can also be located on grub roads. Put your landings along a level stretch of high ground if possible. There are different ideas about where to put landings along hill slopes. The high side may be easier to drive off but water flow may be blocked by the landing. For this reason, some prefer to put the landing on the low side so that water drains away naturally.
 |
|
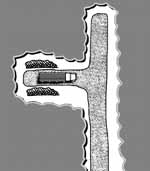
Turnaround spur
|
Turnarounds are usually located at the end of the road and need to be large enough to allow a tractor trailer to turn. If the turnaround is also to be used as a landing, make the area big enough for the wood piles and turning. Another way for trucks to turn completely is to build a short spur about 40 m deep off the left side of the road about 40 m from the end. This allows the trucker to back into the spur and see it from the driver's side.
Exercise Six
After you flag the road, make a note of any changes to your road layout on your map.
In summary
Try to avoid:
Sensitive wildlife sites
Wet areas and streams
Rocky areas and fragile sites
Try to include:
High ground
Gentle slopes
Flat areas for curves
Suitable building materials