Lesson Six - Locating and Building Trails
The layout of your trail system depends on its use for harvesting, recreation or access. Some trails may be designed for more than one use. This Lesson deals mainly with harvesting trails.
HARVESTING TRAILS
Trail layout
A harvesting trail network is designed so that skid trails or extraction trails feed into grub roads or winter roads or directly onto the "D" class road. Winter roads are meant to be used only when frost hardened. In winter, the trails and roads can support heavy machines and wet areas are frozen. Grub roads may only be needed where there are long extraction distances. Overall design is decided by the size and shape of the area to be cut, the terrain, environmental concerns, existing road layout and the skill level of the cutting crew.
The landings may be located on the grub road or the "D"class road or where the two meet. This depends on your road network and if the vehicle transporting the wood to the mill can travel on the grub road or only the "D" class road. A smaller truck may be able to reach landings on a grub road that a large tractor trailer cannot.
Your extraction trail layout depends first of all on whether you plan to clear cut or thin a stand. It is also depends on whether you plan to skid or forward the wood. In a skidding operation, full length, delimbed trees are dragged by a skidder, horse or tractor along a skid trail and the grub road to a landing. With the forwarding method, a felled tree is cut into shorter logs that are piled and later loaded onto a forwarder or tractor with a pulp loader and driven out to the landing.
 |
|
Possible skid trails in a patch cut.
|
The next section deals with skid trails and forwarding trails in a clearcut, and then skid trails and forwarding trails in a thinning. Trails for clearcutting are generally used only until the clearcut is finished whereas trails for thinning could be used over many years for repeat treatments.
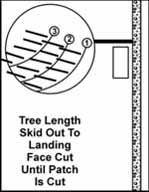
Skid trails in a clearcut
Doing a clearcut using skid trails is known as face cutting. Trees on one side of the trail are dropped in a backward diagonal to allow easy skidding out. Then cutting is done along the new "face" of the trail. This is repeated until the area has been cut. Don't skid logs on the main road since this tears up the road, and gets soil on the logs and causes environmental damage. Keep skidding distance to a minimum while ensuring that trucks can reach the pile for pickup.
 |
|
Forwarding trails in a clearcut
|
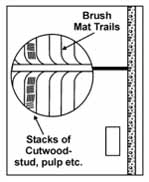
Forwarding trails in a clearcut
Doing a clearcut with a forwarder is called trail cutting. Trees are cut into short lengths and stacked in piles of pulpwood or stud wood to create rows separated by trails. The branches are laid between the rows to make brush mat trails driven over by the forwarders. This trail may curve where it joins the grub road to allow easy turning. A rule of thumb for the cutting area width (two rows and one brush trail or one row and two brush trails) is 2/3 the height of the trees.
Skid trails in a thinning
The trails are angled in a herringbone pattern to create a minimum turn angle when dragging tree length logs from the skid trail onto the grub road. Generally the distance between trails should be 60 m (200 ft) or less which gives a maximum 30 m (100 ft) skidding distance out to the trail. Longer skidding distances are possible in certain
 |
|
Skid trails in a thinning
|
situations if your cable is long enough. If the trail cannot follow this pattern because of obstacles in the terrain, remember to consider skidding distance on both sides of the proposed trail. You may want to create a recreational loop by extending a thinning trail back to the road.
Forwarding trails in a thinning
In general, these trails should be 20 m (66 ft) apart in general to reduce the distance the crew have to carry the log to the trail for pickup by the forwarder.
 |
|
Forwarding trails in a thinning
|
Skid trails on slopes
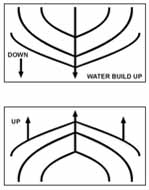
On gentle slopes (less than 10%), layout trails to skid trees uphill where possible. It is easier to skid trees downhill than uphill but downhill skid trails channel water, causing erosion. Try to avoid too much repeat use of the main trail. On slopes more than 10%, design the skid trails to go across the slope where possible (particularly if there are small flat areas) to disperse the water and skid downhill as little as possible. Try to locate landings on high ground where possible.
 |
|
Downhill and uphill skid trails
|
Trails versus roads
For harvesting purposes, the woodlot owner has to balance how much road to build versus how much trail. A grub road is cheaper to build than a "D" class road but a long grub road will require more time and therefore more expense to transport the logs to the landing.
It is also important to consider if the network will be used over many years or only once. A grub road may not hold up as well as a "D" class road resulting in more repairs and downtime. If a large amount of wood is to be harvested, it may be more economical in the long run to build more main road and less grub road.
Environmental concerns
The environmental considerations for a road apply when building a trail or grub road. Try to avoid wet areas, sensitive wildlife habitat and do not block water flow. You may need to install a culvert, a log bridge or other temporary or permanent structure. Harvest during freeze up or in the dry season. Proper location of trails will help reduce damage to the environment caused by skidding and forwarding.
Trail system for a large harvest
Harvesting on small woodlots in Nova Scotia is often done in small patches of suitable wood. The trail network may be fairly simple. In a large clearcut or thinning, some extra thought to possible layouts may save money and stress to the environment.
Exercise Seven
Below are three possible road and trail layouts for a large harvest using a skidder. Which one do you think is best? Why? Consider the various factors discussed so far such as locating roads and landings on high ground, skidding uphill, keeping roads and bridges to a minimum and efficient skidding distance.
| 27. Three road/trail layouts | |
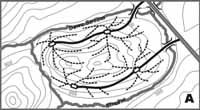 |
Plan A:2 bridges, 4 landings, 3 km of grub road |
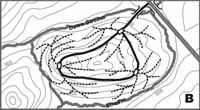 |
Plan B:1 bridge, 3 landings, 3.5 km of grub road • Loop road unnecessary |
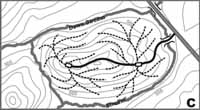 |
Plan C: 1 bridge, 2 landings, 2 km of grub road C IS THE BEST PLAN |
Other harvesting activities
In a Christmas tree lot, trails may be built throughout the area so a trailer can circulate to pick up trees. These trails are also used for access to shear and spray the trees. A maple syrup operation also has a trail system to allow access on foot for tapping the trees and cleaning and repairing the lines. Vehicle movement is limited because of the line network at chest height. In both types of operations, it is usually easy to walk in between the trees since the area has been brushed out to some extent.
A selection cut will require a good trail network that allows access to single trees or clumps that are cut every 5-20 years. Since all these types of trails are used on an on-going basis, you may decide to build better quality trails than you would for a clearcut.
Trail construction
Grub roads may be planned and cut out by the forestry contractor though some woodlot owners may tackle it themselves. On a grub road, a small dozer or tractor is used to remove surface material, rocks and stumps after the wood has been removed. This type of road is quicker and cheaper to build than a "D" class road as the grubbed material is usually just pushed off to the side. Once use is finished, you may want to seed it in to prevent erosion.
Extraction trails are cut out as used and may be twisty and follow the route of least resistance around or over rocks and stumps. Low spots may be filled in with brush or other materials
RECREATIONAL TRAILS
As mentioned in Lesson One, trails built for harvesting are often used for recreation. Some of these trails will be better for recreation than others. Dead end extraction trails in a clearcut or thinning may be improved for recreation if extended into a loop. You will need to move slash to keep a trail open or create a new one.
You may also want to create loops for recreation using existing trails in a shelterwood, selection cut or Christmas tree stand. Refer back to the sample woodlot map on Page 15. These stands are more visually appealing than a clearcut and have constant cover. Be careful not to damage new regeneration.
If you plan on using an area for recreation after harvesting, this should be considered when you locate your extraction trails and grub roads. You may decide to adapt harvesting trails so they are suitable for a particular activity like snowmobiling. Or you may want to build or upgrade a old trail specifically for recreation. See Woodlot Recreation Module Nine for layout requirements for specific recreational activities and basic construction methods.
ACCESS TRAILS
You may need a trail mainly for access to a special site on your land. Travel may be by foot, bike, ATV, or other vehicles suitable for trails. It may be longer than a harvesting trail and a straight route rather than a loop.
However, the most direct route may not be best. As with the road location, you may want to consider various ways of approaching the site based on neighbouring roads and trails and security issues. Try to avoid excessively steep and wet areas. You may want take advantage of views and other special spots along the way.
TRAIL MAINTENANCE
 |
|
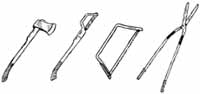
Axe, brush axe, brush hook, cross cut saw, and anvil pruners are all useful for maintaining trails
|
Your trail network needs to be maintained and repaired if repeat use is planned. Keep the trail clear of blowdowns using a chain saw or crosscut saw. Trim branches and small trees along the sides of narrow recreational trails using a saw, pruners, brush hook or axe. Look for damage from erosion and redirect the water flow or clear obstructions as necessary. Wider trails could be mowed with a bush hog pulled behind a tractor. They may be easier to maintain if ditches are placed on the high side.
Exercise Eight
Get out your map. It should include all existing and proposed roads on it. Mark in any existing trails. It should also have areas circled that you want to reach for harvesting, recreation and other access. Both immediate and future objectives should be included. Use this map to design your trail network. Grub roads for harvesting will be laid out ahead by the contractor. Extraction trails will be cut out at the time of harvesting.
You will need to answer the following: 1)Which of these trails can be used for your immediate objectives? 2)Which ones can be upgraded? 3)What new trails will be needed? 4 )Can I lay out the trails for multiple use?
Conclusion
Building your woodlot roads and trails can be a long process that involves much planning, information gathering and decision making. It pays off, however, in a long-lasting, well-made, environmentally sound road and trail network that will best serve your present and future needs.