Module 6: Chain Saw Use and Safety
Lesson Eight - First Aid
FIRST AID
First Aid is a combination of knowledge, skills and attitudes which must be learned and practised before emergencies arise. First Aid saves lives, relieves suffering and reduces the cost of accidents.
The contents of this lesson are taken from the St. John Ambulance book " Emergency First Aid Safety Oriented ". The lesson does not constitute a First Aid course, neither does it meet a recognized standard of First Aid training. Certified First Aid training is available through St. John Ambulance courses and the Red Cross Society. However, the lesson does contain some of the basic and simple First Aid that could relieve suffering or even save a life - maybe your own.
DEFINITIONS
First aid is the skilled application of accepted principles of treatment in case of accident or sudden illness, using facilities or materials readily available. First Aid is treatment given to a casualty:
- to sustain life
- to prevent the condition from becoming worse
- to promote recovery
Medical Aid refers to professional treatment by, or under the supervision of, a physician at the site of the incident or in a medical facility.
RESPONSIBILITIES OF A FIRST AIDER
When you have arrived at the site of an injury your practical knowledge of First Aid, and common sense will dictate what should be done first. Make full use of your senses to obtain maximum information: listen, look, touch, and smell.
Unless there is a danger of further injury or death to the casualty or yourself (for example, a tree about to fall, or casualty lying in the path of moving vehicles or machinery) leave him where he is and find out what is wrong. Administer to the following urgent need of the casualty:
- Breathing. Ensure that the airway is clear. If the casualty is not breathing start artificial respiration immediately.
- Bleeding. Control serious bleeding and elevate the injured part if no fracture is suspected.
- Unconsciousness. If unconscious, the casualty must be placed in the recovery position. Maintain an open airway.
In case of serious injury, obtain medical aid as quickly as possible.
BREATHING
Artificial respiration is a means of supplying air to the lungs of a person who is not breathing. This is done either by breathing into the person's mouth or nose (direct methods) or by compressing or expanding the chest cavity (indirect methods).
Whenever you think a person may not be breathing, the following steps should be taken:
- check for breathing. Look for the rise and fall of the chest, listen at the casualty's mouth and nose for the sounds of breathing and feel with your cheek for air movement.
- if breathing is noisy or absent, call out for help.
- open the airway. This may be all that is needed to restore breathing.
- if no neck or back injury is suspected, use the head tilt-chin lift method to open the airway.
- if neck or back injury is suspected, use the jaw thrust without head lift method to open the airway.
- reassess breathing. Look, listen and feel for breathing.
- start artificial respiration if the breathing does not start:
- give two quick breaths
- check pluse for seven to 10 seconds
- if pulse is present, begin ventilation at a rate of one every five seconds for an adult.
BLEEDING
The aim of First Aid is to control bleeding while at the same time taking steps to prevent infection. Even the casualty, provided he or she is conscious, should be able to take necessary First Aid measures to control bleeding.
In the case of severe loss of blood, external or internal, some or all of the following signs and symptoms may be present:
- paleness, with cold, clammy skin.
- faintness, dizziness, nausea and thirst.
- shallow breathing, with sighing, yawning or gasping for air (air hunger).
- rapid pulse, gradually becoming weaker.
The body possesses certain built-in mechanisms which tend to stop control or stop bleeding. For example:
- the blood will clot and block the damaged vessel.
- when cut, the ends of the blood vessel pull back into the surrounding tissues and the diameters of the vessels constrict, thus slowing down the flow of blood.
- blood pressure falls in proportion to the loss of blood; consequently there is less pressure to force the blood out of the damaged blood vessel.
The First Aider can assist the natural action of the body to stop bleeding by taking these important First Aid measures:
-
Direct Pressure. The application of firm pressure directly on the wound is the most effective method of controlling bleeding. This action controls bleeding by compressing the blood in the wound until it clots. As long as there is pressure on the vessels, bleeding will stop.
-
Rest. Having the casualty lie down and remain quiet, with the bleeding part supported, tends to reduce the amount of blood going into the bleeding area.

- Elevation. Elevating the bleeding part above the level of the heart forces the blood to run upwards. The amount of blood in the vessel is lessened and bleeding will stop more quickly.
Slight Bleeding
Blood may ooze from several points of an injured area, for example, one caused by a severe scrape or laceration. Bleeding will usually stop of its own accord; if not, it is easily controlled:
-
where practical, wash the wound with clean water to remove visible signs of soiling. Dry the surrounding area by wiping away from the wound.
-
apply pressure to the bleeding points, cover them with a sterile dressing and hold it in position with a bandage. An adhesive dressing may be sufficient.
- have the casualty rest and elevate the bleeding part, if necessary.
Severe Bleeding
The first priority is to get the bleeding under control:
-
apply hand pressure to the bleeding part immediately, over a dressing if available. Use your bare hand if necessary and maintain pressure until bleeding is under control.
-
apply a dressing directly over the wound. The pressure dressing is particularly useful in controlling bleeding.
-
if the dressing becomes blood soaked do not remove it. This may disturb the clot formation. Apply further pressure dressings until the bleeding stops and bandage them in place to maintain pressure.
- have the casualty rest and elevate the bleeding part.
Foreign Bodies
A first aider should never attempt to remove a foreign object from a wound. If a broken bone or foreign object protrudes through the skin, do the following:
-
apply pressure around the foreign body or broken bone or press the sides of the wound firmly but gently together.
-
if possible, cover lightly with a dressing to prevent infection.
- place pads of soft material around the wound to a height sufficient to prevent pressure on the foreign body or projecting broken bone. Bandage or tape them in place.
Internal Bleeding
Internal bleeding, such as bleeding into the stomach or the chest cavity, is a serious condition which may result in death. Internal bleeding is often concealed although occasionally it may be shown by bleeding from the body openings such as the mouth or nose. The signs of serious internal bleeding are the same as those for any severe bleeding. There is little the First Aider can do except obtain Medical Aid as a first priority. While awaiting Medical Aid, the First Aider should make the casualty as comfortable as possible:
-
place the casualty at rest with legs elevated unless other injuries prevent this action. If vomiting occurs, or appears likely, place the casualty in the recovery position.
-
loosen tight clothing and keep the casualty warm.
-
do not give the casualty any food or liquids.
- talk to him to reassure him.
Infection
All wounds are contaminated to some degree when they are incurred. While the First Aider has no control over the original injury, further contamination can be prevented if these basic rules are observed:
-
if possible, wash the hands with soap and water before treating the casualty.
-
cover the wound quickly with a clean dressing.
-
do not cough or breathe directly over a wound.
- do not allow the fingers to touch the wound or the side of the dressing which will come in contact with the wound.
Any visible dirt should be washed out of the wound with clean water. The skin around the wound may be cleaned with soap and water. Always clean by swabbing away from the edges of the wound.
Dressings
A dressing is a protective covering applied to a wound primarily to:
- control bleeding.
- prevent infection.
A dressing should have the following characteristics:
-
it should be clean and free of harmful germs (sterile).
-
it should be absorbent so that it will soak up blood and other liquid discharges.
-
it should be thick, soft and compressible so that the pressure of the bandage may be evenly transmitted over the wound area.
- it should have a surface that will not stick to the wound. Gauze, cotton or linen are suitable; woollen or fluffy material such as absorbent cotton should not be placed in direct contact with a wound.
There are a number of commercial dressings available each of which is designed for a particular requirement:
- Adhesive Dressings. These sterile dressings are supplied sealed in a paper or plastic covering. They vary in size in accordance with their intended use and consist basically of a piece of absorbent gauze or cellulose held in place by a layer of adhesive material. They are used primarily in treating wounds with slight bleeding.
- Pressure Dressings. These sterile dressings are non-adhesive and consist of layers of gauze covered by a pad of cotton wool with an attached roller bandage to hold them in position. They are used primarily for applying pressure when treating wounds with severe bleeding.
- Gauze Dressings. This type of sterile dressing consists of layers of gauze. It is absorbent, soft and pliable and is used in the treatment of large wounds with severe bleeding.
- Improvised Dressings. When commercial dressings are not available any clean absorbent material may be used.
Regardless of the type of dressing used the most important thing to do is to cover the wound as quickly as possible with a sterile or clean dressing that exerts sufficient pressure to control bleeding. In the meantime, all normal precautions must be taken to prevent infection.
Bandages
A bandage is used to do the following:
- maintain direct pressure over a wound to control bleeding
- keep dressing and splints in place
- provide support for a limb or joint
- restrict movement.
To be effective bandages should be applied firmly. If a bandage is applied too tightly it may slow down or stop the circulation of the blood causing swelling of the injured part and thus increasing the tension of the bandage. When a bandage is too tight, the pulse beyond the bandage may appear to be weak or it may not be felt at all. There may be a numbness, tingling, or a sensation of cold below the bandage, and in the fingers and toes the nail beds may become pale or bluish in colour. These signs and symptoms are due to an interference with circulation by a bandage too tightly applied to a limb. This can be a serious complication of First Aid. To determine that the circulation is not impaired, fingers and toes should be inspected frequently.
FIRST AID KITS
First aid kits with many variations in content are available through drug and department stores or St. John Ambulance. Always carry a first aid kit in your car or truck. When you leave your vehicle to walk into the woodlot, it is strongly recommended that you carry with you in a plastic bag two large, sterile pressure bandages and a large cotton cloth. The pressure bandages can be put directly on a wound to reduce bleeding. The cloth bandage can be used to hold the pressure bandages in place and under pressure. Women's sanitary napkins make reasonably good pressure bandages.
THE UNCONSCIOUS CASUALTY
Lying on their backs, semi-conscious persons may appear to be choking or struggling for breath and the skin may appear bluish because of the lack of oxygen. Unconscious persons show no signs of choking or struggling although they may very well be suffocating from airway obstruction. The most important thing to remember is that an unconscious person is in danger of suffocation if left lying face-up. Therefore, all unconscious persons must be placed in the recovery position to ensure an open airway and allow vomit or fluids to run out of the mouth.
 The Recovery Position
When it is necessary to place a casualty in the recovery position, movements should be gentle but firm:
-
giving maximum support to any injured area and using the clothing at the knee and hip, draw the far leg over the leg nearest you, turning the casualty into the position shown below.
- place the casualty's arms in the position giving the greatest degree of comfort and stability. Usually this is on the casualty's back and with the arm nearest you lying flat along the casualty's face.
The aim of First Aid in the treatment of an unconscious person is to ensure an open airway, prevent further injury and obtain Medical Aid. The general rules of treatment of unconsciousness from any cause include the following:
- if breathing stops begin artificial respiration.
- gently place the casualty in the recovery position and ensure an open airway.
- if you suspect a neck or back injury, you will not be able to place the casualty in the recovery position because of the risk of further injury. In these cases you will have to monitor the casualty closely and be prepared to assist if breathing becomes difficult or stops (use the jaw thrust without head-tilt to open the airway).
- control severe bleeding.
- immobilize fractures if necessary.
- loosen tight clothing around the neck, chest and waist.
- obtain Medical Aid. The unconscious person must be transported in the recovery or prone position never in the sitting position or lying face-up.
SHOCK
Shock is a complex condition and accompanies may injuries or sudden illnesses, particularly those of a serious nature. Appropriate treatment of individual injuries or illnesses and proper care and handling of the casualty are in themselves the best First Aid treatment for shock.
The signs and symptoms of shock are similar to those seen in fainting:
- paleness
- coldness and clamminess of the skin; sweating
- faintness
- thirst
- nausea and vomiting
- loss of consciousness
- increase in pulse rate and tendency for the pulse to become weak
- shallow and rapid breathing
- anxiety
Shock may increase with time and become irreversible if not properly treated. It may cause death even though the injury or illness which causes it is not in itself fatal. Do not delay in obtaining Medical Aid; meanwhile give immediate treatment for the injury causing shock.
- ensure a clear airway and give artificial respiration if required.
- control severe bleeding and cover burns.
- stabilize serious fractures.
- position the casualty with head low and turned to one side. Provide warmth but do not use hot water bottles.
- move the casualty only when necessary and then as gently as possible.
- if the casualty is unconscious, or if vomiting seems likely to occur, place in the recovery position.
- following a heart attack or chest injury, place the casualty in a sitting or semi-sitting position or in the position that affords the most relief from pain and discomfort.
- if the casualty complains of thirst, moisten the lips. Do not give anything to drink.
- touch and talk to the casualty to reassure him and thus relieve anxiety.
It is important for a First Aider to remember that the expression "treat for shock" means treat the condition that is causing shock.
INJURIES TO THE EYE
The eye is a very sensitive organ and any injury to it should be considered potentially serious. It is senseless to lose one's eyesight by failure to observe basic safety precautions. The most important rule for a chainsaw user is to wear eye protection.
Particles of grit, loose eyelashes or small pieces of sawdust may lodge on the eyeball or under the eyelid causing discomfort and inflammation if not removed. When examining and treating an eye injury ensure that the hands are clean to avoid infection and warn the casualty not to rub the eye since this will cause pain, possible tearing and increased inflammation.
Tears formed in the eye may wash away any loose particles which are present. Larger particles are more difficult to remove and procedures attempted must be performed gently and cautiously.
- if the particle is under the upper lid tell the person to pull the upper lid down over the lower. The lashes of the lower lid may dislodge the particle.
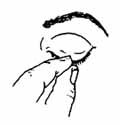 Removal of a Particle from the Upper Lid
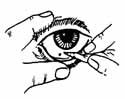
- the under surface of the upper and lower lids may be examined and the particle gently removed with the corner of a clean cloth soaked in warm water.
- the particle may be flushed out by an eye bath or irrigation.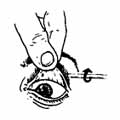
If these methods fail do not persist in trying to remove the particle and do not attempt to remove a particle if it is on the pupil of the eye or if it is embedded in or adhering to the eyeball. Cover the affected eye with a soft pad of cotton and obtain Medical Aid at once.
 The eyes may be injured by a strong corrosive chemical. Chemical powder, such as lime, should be brushed away from the eye and the corrosive, liquid or solid, flushed out of the eye with slowly running water for at least 10 minutes. Medical Aid is required.
Lacerated eyes usually bleed profusely and should be treated as any other case of bleeding. Lacerations of the eyeball are serious and pressure should not be applied. Cover the eye with a soft pad of gauze or other dressing and arrange for immediate Medical Aid.
The eyeball may be perforated by a flying object such as a wood chip or splinter, or by direct impalement on a sharp object. Regardless of the size of the penetration this injury is most serious. Do not remove the object. Cover the eye with a paper cup or cardboard cone to prevent the object from being driven further into the eye. Cover the uninjured eye to prevent movement of both eyes and arrange for immediate Medical Aid. In all cases requiring Medical Aid, both eyes should be covered to prevent movement.
FRACTURES
A fracture is a broken or cracked bone. In many cases fractures can be determined only by X-ray. When there is doubt, treat the injury as a fracture.
Fractures are classified as:
- closed, when the skin is not broken.
- open, when there is a wound which leads down to the bone or when bone fragments pierce the skin.
- complicated, when there is injury to some important tissue such as a nerve, blood vessel or internal organ.
A fracture may be recognized by:
- pain, made worse by movement, at the site of fracture.
- tenderness on pressing gently over the site of fracture.
- swelling at the site of irregularity if the fracture is near the skin as in the case of a collarbone or a shin bone.
- deformity, recognized by the abnormal position of the limb.
- the snap of the bone or the noise of the ends of the bones grating together.
Every movement of a broken bone causes extra pain and increases damage to the surrounding tissues, including blood vessels and nerves.
The aim of First Aid for fractures is to immobilize the injured part and prevent the movement of the broken bones. If breathing has stopped, artificial respiration must be given immediately. If there is serious bleeding, it must be treated as the next priority. Only when these emergencies have been dealt with should the First Aider proceed with the treatment of the fracture.
- treat the casualty where the injury happened. Do not move an injured person except for reasons of safety or to give proper First Aid.
- support the injured part immediately to prevent further damage to surrounding tissues.
- when there is a possibility of along or rough ride to Medical Aid, immobilize the joints above and below the fractures as well as the bone itself.
- after immobilization, gently raise and support the injured part. This may cause some discomfort to the casualty.
SPLINTING is the most effective way to immobilize a fracture.
There are several methods of splinting:
- securing the injured part to a sound part of the body.
- using a metal, wooden or inflatable splints or splints improvised from walking sticks, broom handles, blankets, pillows, cardboard or firmly folded newspaper.
- using a door or the stretcher on which the casualty lies as a splint for broken back or neck.
When splinting a fracture:
- secure the injured limb to the splint or to the sound part of the body by means of bandages applied securely above and below the fracture and at both ends of the splint. Tie the bandage over the splint or over the uninjured side.
- place padding between the splint and the normal curves of the injured limb.
- while applying a splint, steady and support the injured part so that movement is reduced to the minimum. The simplest way of supporting a broken limb is to apply traction (tension), that is to pull firmly on the hand or foot while the body is supported above the fracture.
Traction (tension) should not be applied with the intention of forcing the fractured bones into place, but it may be necessary to straighten a broken limb to prevent the bone ends from damaging blood vessels, nerves or muscles, or from piercing the skin. When broken bones are only slightly out of line, traction (tension) is sufficient to prepare the limb for immobilization. However, when broken bones are out of line to such an extent that movement of the casualty may cause serious complications, the bones must be straightened in the following manner:
- gently but firmly grasp the limb above and below the fracture.
- apply traction (tension) steadily and smoothly while moving the limb into its normal position. Do not attempt to change the angle of the limb by force.
- maintain traction (tension) while the limb is being immobilized.
Check bandages frequently after they have been applied to ensure that swelling has not tightened them and that circulation has not been hindered. If the limb below the bandage feels cold or if the nail beds of the fingers or toes appear bluish, it maybe necessary to loosen the bandages. Common sense must be used.
The principles of recognition of fractures and the general method of treatment outlined above may be applied to the specific treatment of any fracture.
TRANSPORTING A CASUALTY
There are various means of transferring a casualty from the site of an accident to where Medical Aid is available. The best method is by stretcher and ambulance. However, improvisation is often necessary if the casualty is to receive adequate treatment with the least possible delay. Unless there is danger of further injury, leave the person where he is and find out what is wrong.
To ensure that the movement of a casualty takes place in a manner which prevents a condition or injury from becoming worse before reaching Medical Aid, a few simple rules should be followed:
- there should be no unnecessary movement. The position assumed by the casualty or the position in which the casualty is placed must be maintained.
- the general condition of the casualty must be watched at all times for signs of deterioration.
- an open airway must be maintained.
- bleeding must be controlled.
- immobilized fractures and large wounds must be checked and maintained secure.
- transport by any means must be safe and as steady as conditions will allow.