Module 6: Chain Saw Use and Safety
Lesson Three - Sharpening
SELECTING THE CHAIN
For normal woodlot operations, there are several types of chain available. Always purchase a safety chain as discussed in lesson one, but consider the following when choosing a chain most suitable for your work.
 Chain Pitch
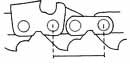
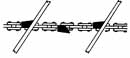
The pitch is the size of the drive link and is obtained by measuring the distance between any three adjacent rivets and dividing by two. Both the chain and sprocket pitch must be the same to get a good fit and to prevent damage to the chain, sprocket and bar. The fit can be tested by hand meshing the sprocket and drive links or by using a sprocket gauge.
Chain Gauge
Chain gauge is the thickness of the drive link. To fit properly, the drive links must match the width of the bar groove and fit snugly without touching the bottom groove. Place the drive links in the bar groove to check the fit. It is best to check with the chain dealer or product box for chain gauge thickness.
Chain Length
The chain length is expressed by the number of drive links. If an old chain is still on your saw, this length (number of drive links) can be determined by a simple count. The chain length must match the length of the guide bar to ensure a proper fit and to prevent damage to bar and sprocket.
 CHAIN TENSION
An improperly tensioned chain is dangerous and is the cause of most chain problems.
To adjust the tension, shut off the saw and loosen the bar nuts. Wearing gloves to protect your hands, grasp the bar tip and lift. Place your screwdriver in the adjustment bolt and turn clockwise to tighten the chain or counter clockwise to loosen it. The chain should be snug with the bottom of the bar. With older saws you may need to keep your grip on the bar to maintain its position while tightening the bar nuts. Once tightened, the chain should easily be turned around the bar by hand.
Installing the Bar, Sprocket and Chain
To begin the process of installing a new chain, bar or sprocket, check that all the parts match for pitch, gauge and length.
-
Remove the sprocket-clutch cover as well as the chain and bar. (Keep all parts neatly in the order you remove them.)
-
Secure the flywheel (follow manufacturers instructions) and remove the sprocket and bearing
- If you have a spur sprocket attached to the clutch drum, the whole piece must be replaced.
- With a rim sprocket, only the rim sprocket and bearing need replacing.
-
Always assemble the components in the order they were removed.
-
Grease and replace the bearing.
-
With the rim sprockets, older models may have a more open side which should face away from the engine when placed on the hub spline. Newer rims can be placed either way.
-
Place the bar on the saw and align it with the studs. Important: Oiler hole in the saw body must be aligned with oil hole in the bar.
- Place the chain on the bar and over the sprocket. Pull the chain a few times to ensure that the drive links set in the sprocket properly. Pull the bar forward to tighten the chain around the bar and sprocket. Adjust the tension as discussed earlier. Note: It is a common mistake with beginners to put the chain on backwards. The chain teeth should be facing away from the saw body on the top portion of the bar.
 Lubrication
To eliminate wear or seizing of components, it is necessary to oil the chain and bar regularly. Use heavy weight chain oil during the summer and light weight chain oil during the winter. Medium weight oil is also available for spring and fall use. Each time you refuel, fill the oil tank. Check the owners manual to see if the nose sprocket of the bar needs to be greased. If yes, make sure that you clean the greased fitting hole of the bar.
This procedure is also important at the end of the day to prevent moisture build-up.
Do not depend on chain oil to prevent wear to the chain when it is not sharpened correctly, dull or used improperly.
Some older saws have a manual oiler which is worked with your thumb. Don't get carried away with your cutting and forget to pump oil to the chain. Adjust the amount of oil to match the cutting. Automatic oilers are common on the newer saws and they are adjusted to use approximately a tank of oil for each tank of fuel.
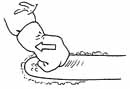
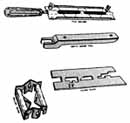
![]() Cleaning the Bar Groove and Oil Hole
Cleaning the Bar Groove and Oil Hole
To eliminate wasting oil and to prevent damage to the bar, the bar groove and oil holes must be cleaned daily.
Remove the bar and chain. Insert a bar cleaning tool or similar instrument into the bar groove making sure that it is touching the base of the groove. Clean the bar groove in the direction away from the nose sprocket. Clean the oil holes and groove with an appropriate cleaning tool. Replace the components and adjust chain tension.
SHARPENING THE CUTTING TEETH
A sharp and properly maintained chain is essential for safe and efficient chain saw performance.
Before sharpening, remove oil and dirt from the chain teeth. Secure the chain in the bar groove or other holding device so that the teeth won't move when you are filing.
 Filing Angles
The important thing to remember is consistency. All top plate angles must be the same. The angle (usually either 25 or 30 degrees) is recommended by the manufacturer. Also, are all teeth the same length? Consistent angled and equal tooth lengths will allow your chain to cut smoother and stay sharp longer.
Technique
The actual file size for a specific chain is recommended by the chain manufacturer and printed on the chain box or manual.
 Place a handle on your file to make filing easier and prevent punctures to your hand. When sharpening, make sure you place the file on the tooth properly. Keep at least 10 percent of the file above the top plate of the cutting tooth. If the file is held to low, a dangerous "hook" is created. This causes the chain to grab and cut roughly, increasing the possibly of kickback. If the file is held too high, a "backslope" is created and cutting is slow.
Read the manufacturer's instruction for any special sharpening requirements for the chain you're using.
Remember to press the file lightly against the cutting edge and down towards the bar. Proper sharpening "hones" the edge and doesn't remove a lot of filings.
Check the filing angles often as you sharpen all the chain teeth.
 Sharpening Guides
To overcome errors in sharpening, you may want to use a sharpening guide. Some are relatively inexpensive and surprisingly easy to use. They help to ensure the consistency needed for a smooth-cutting chain.
Some individuals can do a good job sharpening freehand (without a guide). However, they are a selected few who have mastered an art of sharpening. In a way, they have developed their ability to trouble-shoot chain problems.
Most will need some assistance to do a reasonable job. Remember, the use of a sharpening guide does not always indicate an amateur.
Sharpening Frequency
Ideally, the chain should be sharpened whenever it becomes dull. Many instruction manuals suggest that the teeth be sharpened lightly at each fill-up. How often will depend upon the species of tree you're cutting, the season of the year, the forestry treatment, and the type of chain being used. Therefore, it may be necessary to sharpen only once or twice daily.
Discarding the Chain
When a chain breaks it can cause serious injury to the operator.
Examine the chain regularly to locate cracks or excessive wear. Common wear points include tie straps, drive links, rivets, and cutters.
Discard the chain if these checks find damage that affects the chain's strength. The type of damage will also indicate why the damage has occurred. Knowing this is important to stop unnecessary damage to your next chain.
As a general rule, seriously damaged chains are not repaired. The first break may only be the start of a regular breakage.
When you discard a chain, it is also important to check the drive sprocket. A worn or damaged sprocket will cause unnecessary wear to a new chain. Therefore, it is recommended that a new chain always be fitted on a new sprocket.
FILING THE DEPTH GAUGES
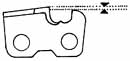 Depth gauges and the resulting depth gauge setting determine how deep the cutting teeth will "bite" into the wood. It is important that you use a depth gauge tool whenever you are filing the depth gauge.
Refer to manufacturer's specifications for the correct depth gauge setting for your chain. All depth gauges must be the same height.
A depth gauge which is filled too low causes "choppy" cutting and greatly increases vibration, chain breakage, unnecessary wear as well as kickback and injury.
![]() Filing the depth gauges off entirely will not improve the cutting ability of the saw. The depth gauges, or modified safety links, are designed to reduce kickback. It is important that filing retain the original shape of the depth gauge.
Filing the depth gauges off entirely will not improve the cutting ability of the saw. The depth gauges, or modified safety links, are designed to reduce kickback. It is important that filing retain the original shape of the depth gauge.
Use a flat file with an appropriate depth-gauge setting tool to keep the setting within 0.0127 cm (0.005 in.) of the manufacturer's specifications. A common setting of 0.0635 cm (0.025 in.) would allow a setting on no lower than 0.0762 cm (0.030 in.). This is very difficult to judge with the naked eye.
Check the depth gauge settings every third filing and adjust if necessary.
*****************